Daily Quests: Difference between revisions
Jump to navigation
Jump to search
No edit summary Tags: Manual revert Visual edit: Switched |
No edit summary |
||
| Line 1: | Line 1: | ||
{{#css:MediaWiki:Tabs.css}} | |||
{{#css:MediaWiki:Img.css}} | |||
{{#css:MediaWiki:Overview.css}} | |||
{ | {{#css:MediaWiki:MonsterCard.css}} | ||
{{#css:MediaWiki:GuideCard.css}} | |||
{{#css:MediaWiki:QuestCard.css}} | |||
{{#css:MediaWiki:StatsCar.css}} | |||
{{#css:MediaWiki:QuestTracker.css}} | |||
{{#css:MediaWiki:Eclipse.css}} | |||
< | <html> | ||
<html lang="en" id="top"> | |||
<head> | |||
<meta charset="UTF-8" /> | |||
<meta name="viewport" content="width=device-width, initial-scale=1" /> | |||
<title>CoraTO Wiki • Daily Quests</title> | |||
</head> | |||
<body> | |||
<div class="mw-page-scope"> | |||
<!-- Hero --> | |||
<header class="hero"> | |||
<div class="hero-inner"> | |||
<h1 class="hero-title">Daily Quests</h1> | |||
<p class="hero-subtitle">Complete repeatable quests daily to earn TM Experience and Daily Coupons. Reset occurs | |||
at approximately 12:00AM PST.</p> | |||
<div class="status-pill">Daily Content</div> | |||
</div> | |||
</header> | |||
<!-- Main Tabs Navigation --> | |||
<nav class="nav-tabs" role="tablist"> | |||
<button class="nav-tab active" role="tab" aria-selected="true" aria-controls="tab-guide" data-tab="tab-guide" | |||
tabindex="0"><span class="full-text">Guide</span><span class="short-text">Guide</span></button> | |||
<button class="nav-tab" role="tab" aria-selected="false" aria-controls="tab-normal-daily" | |||
data-tab="tab-normal-daily" tabindex="-1"><span class="full-text">Normal Daily</span><span | |||
class="short-text">Normal</span></button> | |||
<button class="nav-tab" role="tab" aria-selected="false" aria-controls="tab-shadow-dailies" | |||
data-tab="tab-shadow-dailies" tabindex="-1"><span class="full-text">Stella - Shadow Star</span><span | |||
class="short-text">Stella</span></button> | |||
<button class="nav-tab" role="tab" aria-selected="false" aria-controls="tab-shaman-girl-jia" | |||
data-tab="tab-shaman-girl-jia" tabindex="-1"><span class="full-text">Shaman Girl Jia - Dark Spirit</span><span | |||
class="short-text">Jia</span></button> | |||
</nav> | |||
<main class="content" id="top"> | |||
<!-- GUIDE TAB --> | |||
<section id="tab-guide" class="tab-content active" role="tabpanel"> | |||
<!-- Guide Header --> | |||
<div class="guide-section-header"> | |||
<h1 class="guide-main-title">Complete Daily Quests Guide</h1> | |||
<p class="hero-subtitle">Everything you need to know to maximize your daily earnings in CoraTO</p> | |||
</div> | |||
<!-- Introduction Cards --> | |||
<div class="guide-intro"> | |||
<div class="highlights-grid"> | |||
<div class="guide-card"> | |||
<div class="guide-card-icon"> | |||
💎 | |||
</div> | |||
<h3>What are Daily Quests?</h3> | |||
<p>Daily missions that provide TM Experience and Daily Coupons. They reset approximately at 12:00AM PST | |||
every day, allowing constant progression.</p> | |||
</div> | |||
<div class="guide-card"> | |||
<div class="guide-card-icon"> | |||
🎯 | |||
</div> | |||
<h3>Types of Daily Quests</h3> | |||
<p>There are three main types: Normal Dailies (basic), Shadow Dailies (advanced), and Shaman Girl Jia | |||
(special), each with unique requirements and rewards.</p> | |||
</div> | |||
<div class="guide-card"> | |||
<div class="guide-card-icon"> | |||
🏆 | |||
</div> | |||
<h3>Benefits</h3> | |||
<p>Besides TM Experience, you earn Daily Coupons that can be exchanged for valuable items with NPC Miranda | |||
Watty in Megalopolis.</p> | |||
</div> | |||
</div> | |||
</div> | |||
<!-- Navigation Guide --> | |||
<div class="guide-navigation"> | |||
<h2 class="guide-section-title">How to Navigate the Tabs</h2> | |||
<div class="navigation-steps"> | |||
<div class="nav-step"> | |||
<div class="step-number">1</div> | |||
<h3 class="step-title">Normal Daily</h3> | |||
<p class="step-description">Basic missions available in various zones. Ideal for beginners and mid-level | |||
players.</p> | |||
<div class="step-tabs"> | |||
<span class="step-tab">Coral Beach</span> | |||
<span class="step-tab">Desert Beach</span> | |||
<span class="step-tab">Megalopolis</span> | |||
<span class="step-tab">Azteca</span> | |||
<span class="step-tab">+8 more</span> | |||
</div> | |||
</div> | |||
<div class="nav-step"> | |||
<div class="step-number">2</div> | |||
<h3 class="step-title">Stella - Shadow Star</h3> | |||
<p class="step-description">Advanced missions with Shadow monsters. Require higher levels but offer better | |||
rewards.</p> | |||
<div class="step-tabs"> | |||
<span class="step-tab">Lv 180+</span> | |||
<span class="step-tab">Shadow Monsters</span> | |||
<span class="step-tab">Better Rewards</span> | |||
</div> | |||
</div> | |||
<div class="nav-step"> | |||
<div class="step-number">3</div> | |||
<h3 class="step-title">Shaman Girl Jia</h3> | |||
<p class="step-description">Special missions with Dark Spirit. Unique content with different mechanics. | |||
</p> | |||
<div class="step-tabs"> | |||
<span class="step-tab">Dark Spirit</span> | |||
<span class="step-tab">Special</span> | |||
<span class="step-tab">Unique</span> | |||
</div> | |||
</div> | |||
</div> | |||
</div> | |||
<!-- Quest Types --> | |||
<div class="quest-types"> | |||
<h2 class="guide-section-title">Mission Types</h2> | |||
<div class="quest-types-grid"> | |||
<div class="quest-type-card"> | |||
<div class="quest-type-header"> | |||
<h3 class="quest-type-title">Normal Dailies</h3> | |||
<p class="quest-type-subtitle">Basic missions for all levels</p> | |||
</div> | |||
<div class="quest-type-content"> | |||
<ul class="quest-features"> | |||
<li>Available in 12 different zones</li> | |||
<li>Low to medium level requirements</li> | |||
<li>Involves basic drilling or hunting</li> | |||
<li>Rewards: 1x Daily Coupon + TM EXP</li> | |||
<li>Ideal for beginners</li> | |||
<li>Daily reset at 12:00AM PST</li> | |||
</ul> | |||
</div> | |||
</div> | |||
<div class="quest-type-card"> | |||
<div class="quest-type-header"> | |||
<h3 class="quest-type-title">Shadow Dailies</h3> | |||
<p class="quest-type-subtitle">Advanced missions with Shadow Monsters</p> | |||
</div> | |||
<div class="quest-type-content"> | |||
<ul class="quest-features"> | |||
<li>Requires levels 180+ up to 345+</li> | |||
<li>More challenging Shadow monsters</li> | |||
<li>Better TM EXP rewards</li> | |||
<li>Unique items as drops</li> | |||
<li>Progression through difficulty zones</li> | |||
<li>End-game content</li> | |||
</ul> | |||
</div> | |||
</div> | |||
</div> | |||
</div> | |||
<!-- Level Progression --> | |||
<!-- Tips Section --> | |||
<div class="guide-tips"> | |||
<h2 class="guide-section-title">Important Tips</h2> | |||
<div class="tips-grid"> | |||
<div class="tip-card"> | |||
<div class="tip-icon">⏰</div> | |||
<h3 class="tip-title">Daily Reset</h3> | |||
<p class="tip-content">All Daily Quests reset at 12:00AM PST. Plan your time to complete all before the | |||
reset.</p> | |||
</div> | |||
<div class="tip-card"> | |||
<div class="tip-icon">📍</div> | |||
<h3 class="tip-title">NPC Locations</h3> | |||
<p class="tip-content">Each zone has its specific NPC. Use the provided images and maps to find them | |||
easily.</p> | |||
</div> | |||
<div class="tip-card"> | |||
<div class="tip-icon">🎒</div> | |||
<h3 class="tip-title">Preparation</h3> | |||
<p class="tip-content">Check required items before leaving. Some can be drilled, others need to be hunted | |||
from specific monsters.</p> | |||
</div> | |||
<div class="tip-card"> | |||
<div class="tip-icon">💰</div> | |||
<h3 class="tip-title">Daily Coupons</h3> | |||
<p class="tip-content">Exchange your Daily Coupons with Miranda Watty in Megalopolis for valuable items | |||
and equipment.</p> | |||
</div> | |||
<div class="tip-card"> | |||
<div class="tip-icon">⚡</div> | |||
<h3 class="tip-title">Efficiency</h3> | |||
<p class="tip-content">Start with geographically closest missions to optimize your travel time.</p> | |||
</div> | |||
<div class="tip-card"> | |||
<div class="tip-icon">🔄</div> | |||
<h3 class="tip-title">Progression</h3> | |||
<p class="tip-content">As your level increases, unlock Shadow Dailies for better rewards and challenges. | |||
</p> | |||
</div> | |||
</div> | |||
</div> | |||
<!-- Quick Start Guide --> | |||
<div class="guide-navigation"> | |||
<h2 class="guide-section-title">Quick Start Guide</h2> | |||
<div class="navigation-steps"> | |||
<div class="nav-step"> | |||
<div class="step-number">1</div> | |||
<h3 class="step-title">Choose Your Tab</h3> | |||
<p class="step-description">Click on the tab corresponding to your level: Normal Daily for beginners, | |||
Shadow Dailies for levels 180+.</p> | |||
</div> | |||
<div class="nav-step"> | |||
<div class="step-number">2</div> | |||
<h3 class="step-title">Select the Zone</h3> | |||
<p class="step-description">Use the internal tabs to navigate between different zones and find the mission | |||
suitable for your level.</p> | |||
</div> | |||
<div class="nav-step"> | |||
<div class="step-number">3</div> | |||
<h3 class="step-title">Prepare</h3> | |||
<p class="step-description">Read the requirements, locate the NPC on the map and collect/buy the necessary | |||
items before departing.</p> | |||
</div> | |||
<div class="nav-step"> | |||
<div class="step-number">4</div> | |||
<h3 class="step-title">Complete and Repeat</h3> | |||
<p class="step-description">Execute the mission, collect your rewards and repeat daily to maximize your | |||
earnings.</p> | |||
</div> | |||
</div> | |||
</div> | |||
</section> | |||
<!-- NORMAL DAILY TAB --> | |||
<section id="tab-normal-daily" class="tab-content" role="tabpanel"> | |||
<div class="section-header"> | |||
<h2>Normal Daily Requests and Rewards</h2> | |||
<p class="section-lead">Note: The rewards do not include all possible drops, but will include guaranteed ones. | |||
</p> | |||
</div> | |||
<!-- Nested Tabs for Normal Daily by Zone --> | |||
<nav class="nested-tabs" role="tablist"> | |||
<button class="nested-tab active" role="tab" aria-selected="true" data-tab="coral-beach">Coral Beach</button> | |||
<button class="nested-tab" role="tab" aria-selected="false" data-tab="desert-beach">Desert Beach</button> | |||
<button class="nested-tab" role="tab" aria-selected="false" data-tab="megalopolis">Megalopolis</button> | |||
<button class="nested-tab" role="tab" aria-selected="false" data-tab="azteca">Azteca</button> | |||
<button class="nested-tab" role="tab" aria-selected="false" data-tab="oops-warf">Oops Warf</button> | |||
<button class="nested-tab" role="tab" aria-selected="false" data-tab="mermaid-palace">Mermaid Palace</button> | |||
<button class="nested-tab" role="tab" aria-selected="false" data-tab="ghost-blue">Ghost Blue</button> | |||
<button class="nested-tab" role="tab" aria-selected="false" data-tab="rose-garden">Rose Garden</button> | |||
<button class="nested-tab" role="tab" aria-selected="false" data-tab="black-swamp-normal">Black Swamp</button> | |||
<button class="nested-tab" role="tab" aria-selected="false" data-tab="snow-hill-normal">Snow Hill</button> | |||
<button class="nested-tab" role="tab" aria-selected="false" data-tab="techichi-normal">Techichi</button> | |||
<button class="nested-tab" role="tab" aria-selected="false" data-tab="tapasco-normal">Tapasco</button> | |||
</nav> | |||
== | <!-- Nested content for each zone --> | ||
<div id="coral-beach" class="nested-content active"> | |||
<div class="quest-card"> | |||
<!-- Quest Header --> | |||
<div class="quest-header"> | |||
<h1 class="quest-title">Coral Beach Daily</h1> | |||
<span class="quest-type">Drill</span> | |||
</div> | |||
<!-- Quest Sections Grid --> | |||
<div class="quest-sections"> | |||
<!-- Location Section --> | |||
<div class="quest-section"> | |||
<h5 class="quest-section-title">Location</h5> | |||
<div class="quest-section-icon"></div> | |||
<div class="quest-detail-item"> | |||
<div class="image-container"><img src="https://mewsie.world/CoraTOWiki/images/7/7b/BlomingIndiana.png" | |||
alt="Blooming Cora Location" class="quest-location-image"> | |||
<strong><a href="https://wikimirror.lifeto.co/wiki.ggftw.com/trickster/Blooming_Cora.html" | |||
target="_blank">Blooming Cora</a></strong> | |||
</div> | |||
</div> | |||
<div class="quest-detail-item"> | |||
<div class="image-container"> | |||
<img | |||
src="https://mewsie.world/CoraTOWiki/images/thumb/f/f1/Coralbeachdaily.png/300px-Coralbeachdaily.png" | |||
alt="Coral Beach Overview" class="quest-location-image"> | |||
</div> | |||
</div> | |||
</div> | |||
<!-- Quest NPC Section --> | |||
<div class="quest-section"> | |||
<h5 class="quest-section-title">Quest NPC</h5> | |||
<div class="quest-section-icon"></div> | |||
<div class="image-container"> | |||
<img src="https://wikimirror.lifeto.co/asset.103.ggftw.net/wiki/to-w/images/0/0f/Indiana_John.gif" | |||
alt="Indiana John NPC"> | |||
<strong><a | |||
href="https://wikimirror.lifeto.co/wiki.ggftw.com/trickster/Indiana_John_-_Daily_Quest_-_Coral_Beach.html" | |||
target="_blank">Indiana John</a></strong> | |||
</div> | |||
<div class="quest-section-content"></div> | |||
<h5 class="quest-section-title">Requested Item</h5> | |||
<div class="quest-section-icon"></div> | |||
<div class="image-container"> | |||
<img src="https://wikimirror.lifeto.co/asset.103.ggftw.net/wiki/to-w/images/f/f2/Crystal.gif" | |||
alt="Crystal"> | |||
<strong><a href="https://wikimirror.lifeto.co/wiki.ggftw.com/trickster/Crystal.html" | |||
target="_blank">2x Crystal</a></strong> | |||
</div> | |||
<div class="quest-section-content"> | |||
<span class="quest-badge">Drillable Item</span> | |||
</div> | |||
</div> | |||
<!-- Rewards Section --> | |||
<div class="quest-section"> | |||
<h5 class="quest-rewards-title">Rewards</h5> | |||
<div class="quest-rewards-list"> | |||
<div class="quest-reward-item"> | |||
<div class="image-container"> | |||
<img | |||
src="https://wikimirror.lifeto.co/asset.103.ggftw.net/wiki/to-w/images/9/90/Crystal_Coupon.gif" | |||
alt="Daily Coupon"> | |||
1x Daily Coupon | |||
</div> | |||
</div> | |||
</div> | |||
</div> | |||
</div> | |||
<!-- Location Details --> | |||
<div class="quest-location-details"> | |||
Indiana John, On the right half of the map, below Pachi/Field 3 | |||
</div> | |||
<!-- Item Drop Information --> | |||
<div class="quest-drop-info"> | |||
<u>Recommendation:</u> Drill in Coral Beach fields.<br> | |||
Can be drilled in: | |||
<ul> | |||
<li>Coral Beach Fields</li> | |||
<li>Dark Cave</li> | |||
<li>Gate of Desert Beach</li> | |||
<li>Pyramid Dungeon Halls</li> | |||
<li>Poppuri Dungeons</li> | |||
<li>Path to Desert Beach</li> | |||
<li>Ghost Blue fields</li> | |||
<li>Fiesta Zones 1-6</li> | |||
</ul> | |||
<strong>NOTE</strong>: On this server, the level requirement is 20, not 5! | |||
</div> | |||
</div> | |||
</div> | |||
<div id="desert-beach" class="nested-content"> | |||
<div class="quest-card"> | |||
<!-- Quest Header --> | |||
<div class="quest-header"> | |||
<h1 class="quest-title">Desert Beach Daily</h1> | |||
<span class="quest-type">Hunt</span> | |||
</div> | |||
<!-- Quest Sections Grid --> | |||
<div class="quest-sections"> | |||
<!-- Location Section --> | |||
<div class="quest-section"> | |||
<h5 class="quest-section-title">Location</h5> | |||
<div class="quest-section-icon"></div> | |||
<div class="quest-detail-item"> | |||
<div class="image-container"><img src="https://mewsie.world/CoraTOWiki/images/f/f9/DesertMonkey.png" | |||
alt="Paradise Location" class="quest-location-image"> | |||
<strong><a href="https://wikimirror.lifeto.co/wiki.ggftw.com/trickster/Paradise.html" | |||
target="_blank">Paradise</a></strong> | |||
</div> | |||
</div> | |||
<div class="quest-detail-item"> | |||
<div class="image-container"> | |||
<img | |||
src="https://mewsie.world/CoraTOWiki/images/thumb/8/88/Desertbeachdaily.png/300px-Desertbeachdaily.png" | |||
alt="Paradise Overview" class="quest-location-image"> | |||
</div> | |||
</div> | |||
<div class="quest-section-content"></div> | |||
</div> | |||
<!-- Quest NPC Section --> | |||
<div class="quest-section"> | |||
<h5 class="quest-section-title">Quest NPC</h5> | |||
<div class="quest-section-icon"> | |||
<div class="info-grid"> | |||
</div> | |||
</div> | |||
<div class="image-container"> | |||
<img src="https://wikimirror.lifeto.co/asset.103.ggftw.net/wiki/to-w/images/3/3e/Monkey_T.gif" | |||
alt="Monkey_T NPC"> | |||
<strong><a | |||
href="https://wikimirror.lifeto.co/wiki.ggftw.com/trickster/Monkey_T_-_Daily_Quest_-_Desert_Beach.html" | |||
target="_blank">Monkey_T</a></strong> | |||
</div> | |||
<div class="quest-section-content"></div> | |||
<h5 class="quest-section-title">Requested Item</h5> | |||
<div class="quest-section-icon"> | |||
</div> | |||
<div class="image-container"> | |||
<img src="https://wikimirror.lifeto.co/asset.103.ggftw.net/wiki/to-w/images/1/1b/Luxury_Socks.gif" | |||
alt="Luxury Socks"> | |||
<strong><a href="https://wikimirror.lifeto.co/wiki.ggftw.com/trickster/Sleeping_Socks.html" | |||
target="_blank">1x Sleeping Socks</a></strong> | |||
</div> | |||
<div class="quest-section-content"> | |||
<span class="quest-badge"> Guaranteed Drop</span> | |||
</div> | |||
</div> | |||
<!-- Rewards Section --> | |||
<div class="quest-section"> | |||
<h5 class="quest-rewards-title">Rewards</h5> | |||
<div class="quest-rewards-list"> | |||
<div class="quest-reward-item"> | |||
<div class="image-container"> | |||
<img | |||
src="https://wikimirror.lifeto.co/asset.103.ggftw.net/wiki/to-w/images/9/90/Crystal_Coupon.gif" | |||
alt="Daily Coupon"> | |||
1x Daily Coupon | |||
</div> | |||
<div class="image-container"> | |||
<img | |||
src="https://wikimirror.lifeto.co/asset.103.ggftw.net/wiki/to-w/images/d/d6/100k_Galder_Check.gif" | |||
alt="Daily Coupon"> | |||
1x 100k Galder Check | |||
</div> | |||
</div> | |||
</div> | |||
</div> | |||
</div> | |||
<!-- Location Details --> | |||
<div class="quest-location-details"> | |||
Monkey_T location on the right half of the map next to Pachi and Paradise Shop | |||
</div> | |||
<!-- Item Drop Information --> | |||
<div class="quest-drop-info"> | |||
Guaranteed drop from <strong>Punisher Cannonshell</strong> in Desert Beach Fields 1-4 <div | |||
class="image-container"> | |||
<img src="https://wikimirror.lifeto.co/asset.103.ggftw.net/wiki/to-w/images/8/80/Cannon_Shell.gif" | |||
alt="Punisher Cannonshell"> | |||
<strong><a href="https://wikimirror.lifeto.co/wiki.ggftw.com/trickster/Punisher_Cannonshell.html" | |||
target="_blank">Punisher Cannonshell</a></strong> | |||
</div> | |||
</div> | |||
</div> | |||
</div> | |||
<div id="megalopolis" class="nested-content"> | |||
<div class="quest-card"> | |||
<!-- Quest Header --> | |||
<div class="quest-header"> | |||
<h1 class="quest-title">Megalopolis Daily</h1> | |||
<span class="quest-type">Hunt</span> | |||
</div> | |||
<!-- Quest Sections Grid --> | |||
<div class="quest-sections"> | |||
<!-- Location Section --> | |||
<div class="quest-section"> | |||
<h5 class="quest-section-title">Location</h5> | |||
<div class="quest-section-icon"></div> | |||
<div class="quest-detail-item"> | |||
<div class="image-container"><img src="https://mewsie.world/CoraTOWiki/images/9/9d/MegaloStella.png" | |||
alt="Megalopolis Location" class="quest-location-image"> | |||
<strong><a href="https://wikimirror.lifeto.co/wiki.ggftw.com/trickster/Megalopolis.html" | |||
target="_blank">Megalopolis</a></strong> | |||
</div> | |||
</div> | |||
<div class="quest-detail-item"> | |||
<div class="image-container"> | |||
<img src="https://mewsie.world/CoraTOWiki/images/thumb/d/d6/Megadaily.png/300px-Megadaily.png" | |||
alt="Megalopolis Overview" class="quest-location-image"> | |||
</div> | |||
</div> | |||
<div class="quest-section-content"></div> | |||
</div> | |||
<!-- Quest NPC Section --> | |||
<div class="quest-section"> | |||
<h5 class="quest-section-title">Quest NPC</h5> | |||
<div class="quest-section-icon"></div> | |||
<div class="image-container"> | |||
<img | |||
src="https://wikimirror.lifeto.co/asset.103.ggftw.net/wiki/to-w/images/e/e5/Star_Gazer_Stella.gif" | |||
alt="Stargazer Stella NPC"> | |||
<strong><a | |||
href="https://wikimirror.lifeto.co/wiki.ggftw.com/trickster/Star_Gazer_Stella_-_Daily_Quest_-_Megalopolis.html" | |||
target="_blank">Stargazer Stella</a></strong> | |||
</div> | |||
<div class="quest-section-content"></div> | |||
<h5 class="quest-section-title">Requested Item</h5> | |||
<div class="quest-section-icon"></div> | |||
<div class="image-container"> | |||
<img | |||
src="https://wikimirror.lifeto.co/asset.103.ggftw.net/wiki/to-w/images/0/0c/Envelope_with_Photo.gif" | |||
alt="Stella's Profile"> | |||
<strong><a href="https://wikimirror.lifeto.co/wiki.ggftw.com/trickster/Shtella%27s_Profile.html" | |||
target="_blank">2x Stella's Profile</a></strong> | |||
</div> | |||
<div class="quest-section-content"> | |||
<span class="quest-badge">Random Drop</span> | |||
</div> | |||
</div> | |||
<!-- Rewards Section --> | |||
<div class="quest-section"> | |||
<h5 class="quest-rewards-title">Rewards</h5> | |||
<div class="quest-rewards-list"> | |||
<div class="quest-reward-item"> | |||
<div class="image-container"> | |||
<img | |||
src="https://wikimirror.lifeto.co/asset.103.ggftw.net/wiki/to-w/images/9/90/Crystal_Coupon.gif" | |||
alt="Daily Coupon"> | |||
1x Daily Coupon | |||
</div> | |||
<div class="image-container"> | |||
<img | |||
src="https://wikimirror.lifeto.co/asset.103.ggftw.net/wiki/to-w/images/d/d6/100k_Galder_Check.gif" | |||
alt="Daily Coupon"> | |||
1x 100k Galder Check | |||
</div> | |||
</div> | |||
</div> | |||
</div> | |||
</div> | |||
<!-- Location Details --> | |||
<div class="quest-location-details"> | |||
Stargazer Stella, east of the Guild Management building | |||
</div> | |||
<!-- Item Drop Information --> | |||
<div class="quest-drop-info"> | |||
Random drop from monsters in: | |||
<ul> | |||
<li>Desert Beach</li> | |||
<li>Caballa Relics</li> | |||
<li>Oops Wharfs</li> | |||
</ul> | |||
<strong>NOTE</strong>: Requires "<a | |||
href="https://wikimirror.lifeto.co/wiki.ggftw.com/trickster/Star_Gazing.html" target="_blank">Stella | |||
Reading Quest</a>"!! | |||
</div> | |||
</div> | |||
</div> | |||
<div id="azteca" class="nested-content"> | |||
<div class="quest-card"> | |||
<!-- Quest Header --> | |||
<div class="quest-header"> | |||
<h1 class="quest-title">Azteca Daily</h1> | |||
<span class="quest-type">Hunt</span> | |||
</div> | |||
<!-- Quest Sections Grid --> | |||
<div class="quest-sections"> | |||
<!-- Location Section --> | |||
<div class="quest-section"> | |||
<h5 class="quest-section-title">Location</h5> | |||
<div class="quest-section-icon"></div> | |||
<div class="quest-detail-item"> | |||
<div class="image-container"><img src="https://mewsie.world/CoraTOWiki/images/5/56/AztecaPhara.png" | |||
alt="Azteca Location" class="quest-location-image"> | |||
<strong><a href="https://wikimirror.lifeto.co/wiki.ggftw.com/trickster/Azteca.html" | |||
target="_blank">Azteca</a></strong> | |||
</div> | |||
</div> | |||
<div class="quest-detail-item"> | |||
<div class="image-container"> | |||
<img | |||
src="https://mewsie.world/CoraTOWiki/images/thumb/0/0d/Pharoah_boy_location_azteca.png/300px-Pharoah_boy_location_azteca.png" | |||
alt="Azteca Overview" class="quest-location-image"> | |||
</div> | |||
</div> | |||
<div class="quest-section-content"></div> | |||
</div> | |||
<!-- Quest NPC Section --> | |||
<div class="quest-section"> | |||
<h5 class="quest-section-title">Quest NPC</h5> | |||
<div class="quest-section-icon"></div> | |||
<div class="image-container"> | |||
<img src="https://wikimirror.lifeto.co/asset.103.ggftw.net/wiki/to-w/images/4/46/Pharaoh_Boy.gif" | |||
alt="Pharoah Boy NPC"> | |||
<strong><a | |||
href="https://wikimirror.lifeto.co/wiki.ggftw.com/trickster/Pharaoh_Boy_-_Daily_Quest_-_Caballa_Relics.html" | |||
target="_blank">Pharoah Boy</a></strong> | |||
</div> | |||
<div class="quest-section-content"></div> | |||
<h5 class="quest-section-title">Requested Item</h5> | |||
<div class="quest-section-icon"></div> | |||
<div class="image-container"> | |||
<img src="https://wikimirror.lifeto.co/asset.103.ggftw.net/wiki/to-w/images/0/08/Aposis%27_Stick.gif" | |||
alt="Staff of Purification"> | |||
<strong><a href="https://wikimirror.lifeto.co/wiki.ggftw.com/trickster/Staff_of_Purification.html" | |||
target="_blank">1x Staff of Purification</a></strong> | |||
</div> | |||
<div class="quest-section-content"> | |||
<span class="quest-badge">Guaranteed Drop</span> | |||
</div> | |||
</div> | |||
<!-- Rewards Section --> | |||
<div class="quest-section"> | |||
<h5 class="quest-rewards-title">Rewards</h5> | |||
<div class="quest-rewards-list"> | |||
<div class="quest-reward-item"> | |||
<div class="image-container"> | |||
<img | |||
src="https://wikimirror.lifeto.co/asset.103.ggftw.net/wiki/to-w/images/9/90/Crystal_Coupon.gif" | |||
alt="Daily Coupon"> | |||
1x Daily Coupon | |||
</div> | |||
<div class="image-container"> | |||
<img | |||
src="https://wikimirror.lifeto.co/asset.103.ggftw.net/wiki/to-w/images/d/d6/100k_Galder_Check.gif" | |||
alt="Daily Coupon"> | |||
1x 100k Galder Check | |||
</div> | |||
</div> | |||
</div> | |||
</div> | |||
</div> | |||
<!-- Location Details --> | |||
<div class="quest-location-details"> | |||
Pharoah Boy, Top Right of Azteca | |||
</div> | |||
<!-- Item Drop Information --> | |||
<div class="quest-drop-info"> | |||
Guaranteed drop from <strong>Punisher Aposis</strong> in Relics Fields 1-4 <div class="image-container"> | |||
<img src="https://wikimirror.lifeto.co/asset.103.ggftw.net/wiki/to-w/images/e/e3/Aposis.gif" | |||
alt="Punisher Aposis"> | |||
<strong><a href="https://wikimirror.lifeto.co/wiki.ggftw.com/trickster/Punisher_Aposis.html" | |||
target="_blank">Punisher Aposis</a></strong> | |||
</div> | |||
</div> | |||
</div> | |||
</div> | |||
<div id="oops-warf" class="nested-content"> | |||
<div class="quest-card"> | |||
<!-- Quest Header --> | |||
<div class="quest-header"> | |||
<h1 class="quest-title">Oops Warf Daily</h1> | |||
<span class="quest-type">Hunt</span> | |||
</div> | |||
<!-- Quest Sections Grid --> | |||
<div class="quest-sections"> | |||
<!-- Location Section --> | |||
<div class="quest-section"> | |||
<h5 class="quest-section-title">Location</h5> | |||
<div class="quest-section-icon"></div> | |||
<div class="quest-detail-item"> | |||
<div class="image-container"> | |||
<img src="https://mewsie.world/CoraTOWiki/images/6/61/OopsMarine.png" alt="Oops Warf Location" | |||
class="quest-location-image"> | |||
<strong><a href="https://wikimirror.lifeto.co/wiki.ggftw.com/trickster/Oops_Warf.html" | |||
target="_blank">Oops Warf</a></strong> | |||
</div> | |||
</div> | |||
<div class="quest-detail-item"> | |||
<div class="image-container"> | |||
<img | |||
src="https://mewsie.world/CoraTOWiki/images/thumb/2/29/Marinel_location_oops_warf.png/300px-Marinel_location_oops_warf.png" | |||
alt="Oops Warf Overview" class="quest-location-image"> | |||
</div> | |||
</div> | |||
<div class="quest-section-content"></div> | |||
</div> | |||
<!-- Quest NPC Section --> | |||
<div class="quest-section"> | |||
<h5 class="quest-section-title">Quest NPC</h5> | |||
<div class="quest-section-icon"></div> | |||
<div class="image-container"> | |||
<img src="https://wikimirror.lifeto.co/asset.103.ggftw.net/wiki/to-w/images/4/4f/Marinel.gif" | |||
alt="Marinel NPC"> | |||
<strong><a | |||
href="https://wikimirror.lifeto.co/wiki.ggftw.com/trickster/Marinel_-_Daily_Quest_-_Oops_Wharf.html" | |||
target="_blank">Marinel</a></strong> | |||
</div> | |||
<div class="quest-section-content"></div> | |||
<h5 class="quest-section-title">Requested Item</h5> | |||
<div class="quest-section-icon"></div> | |||
<div class="image-container"> | |||
<img src="https://wikimirror.lifeto.co/asset.103.ggftw.net/wiki/to-w/images/4/4f/Thick_Rope.gif" | |||
alt="Thick Rope"> | |||
<strong><a href="https://wikimirror.lifeto.co/wiki.ggftw.com/trickster/Thick_Rope.html" | |||
target="_blank">2x Thick Rope</a></strong> | |||
</div> | |||
<div class="quest-section-content"> | |||
<span class="quest-badge">Guaranteed Drop</span> | |||
</div> | |||
</div> | |||
<!-- Rewards Section --> | |||
<div class="quest-section"> | |||
<h5 class="quest-rewards-title">Rewards</h5> | |||
<div class="quest-rewards-list"> | |||
<div class="quest-reward-item"> | |||
<div class="image-container"> | |||
<img | |||
src="https://wikimirror.lifeto.co/asset.103.ggftw.net/wiki/to-w/images/9/90/Crystal_Coupon.gif" | |||
alt="Daily Coupon"> | |||
1x Daily Coupon | |||
</div> | |||
</div> | |||
</div> | |||
</div> | |||
</div> | |||
<!-- Location Details --> | |||
<div class="quest-location-details | |||
Revision as of 17:21, 21 October 2025
Daily Quests
Complete repeatable quests daily to earn TM Experience and Daily Coupons. Reset occurs at approximately 12:00AM PST.
Daily Content
Complete Daily Quests Guide
Everything you need to know to maximize your daily earnings in CoraTO
What are Daily Quests?
Daily missions that provide TM Experience and Daily Coupons. They reset approximately at 12:00AM PST every day, allowing constant progression.
Types of Daily Quests
There are three main types: Normal Dailies (basic), Shadow Dailies (advanced), and Shaman Girl Jia (special), each with unique requirements and rewards.
Benefits
Besides TM Experience, you earn Daily Coupons that can be exchanged for valuable items with NPC Miranda Watty in Megalopolis.
Mission Types
Normal Dailies
Basic missions for all levels
- Available in 12 different zones
- Low to medium level requirements
- Involves basic drilling or hunting
- Rewards: 1x Daily Coupon + TM EXP
- Ideal for beginners
- Daily reset at 12:00AM PST
Shadow Dailies
Advanced missions with Shadow Monsters
- Requires levels 180+ up to 345+
- More challenging Shadow monsters
- Better TM EXP rewards
- Unique items as drops
- Progression through difficulty zones
- End-game content
Important Tips
Daily Reset
All Daily Quests reset at 12:00AM PST. Plan your time to complete all before the reset.
NPC Locations
Each zone has its specific NPC. Use the provided images and maps to find them easily.
Preparation
Check required items before leaving. Some can be drilled, others need to be hunted from specific monsters.
Daily Coupons
Exchange your Daily Coupons with Miranda Watty in Megalopolis for valuable items and equipment.
Efficiency
Start with geographically closest missions to optimize your travel time.
Progression
As your level increases, unlock Shadow Dailies for better rewards and challenges.
Normal Daily Requests and Rewards
Note: The rewards do not include all possible drops, but will include guaranteed ones.
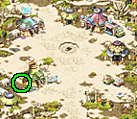
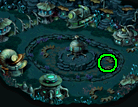
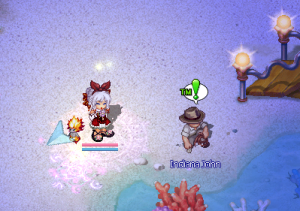
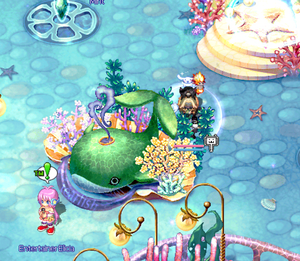
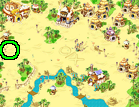
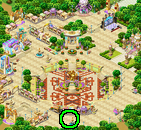
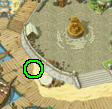
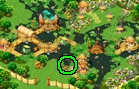
Coral Beach Daily
Drill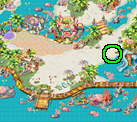


Rewards
 1x Daily Coupon
Indiana John, On the right half of the map, below Pachi/Field 3
Recommendation: Drill in Coral Beach fields.
Can be drilled in:
Can be drilled in:
- Coral Beach Fields
- Dark Cave
- Gate of Desert Beach
- Pyramid Dungeon Halls
- Poppuri Dungeons
- Path to Desert Beach
- Ghost Blue fields
- Fiesta Zones 1-6
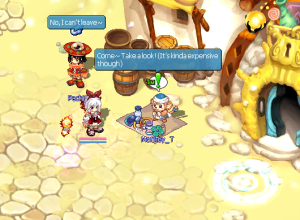
Desert Beach Daily
Hunt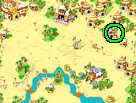


Rewards
1x Daily Coupon
 1x 100k Galder Check
Monkey_T location on the right half of the map next to Pachi and Paradise Shop
Guaranteed drop from Punisher Cannonshell in Desert Beach Fields 1-4

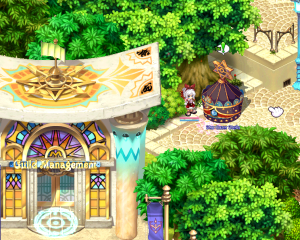
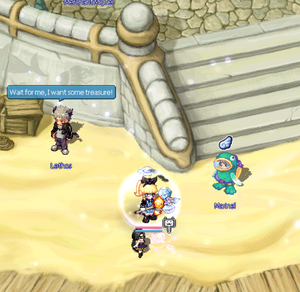
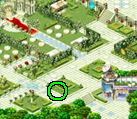
Megalopolis Daily
Hunt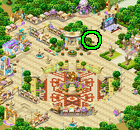


Rewards
1x Daily Coupon
1x 100k Galder Check
Stargazer Stella, east of the Guild Management building
Random drop from monsters in:
- Desert Beach
- Caballa Relics
- Oops Wharfs
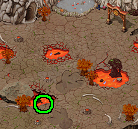
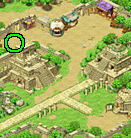
Azteca Daily
Hunt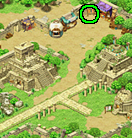


Rewards
1x Daily Coupon
1x 100k Galder Check
Pharoah Boy, Top Right of Azteca
Guaranteed drop from Punisher Aposis in Relics Fields 1-4
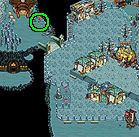
Oops Warf Daily
Hunt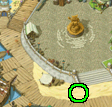


Rewards
1x Daily Coupon
Marinel, bottom right of Oops Warf
Drillable in any Oops Field
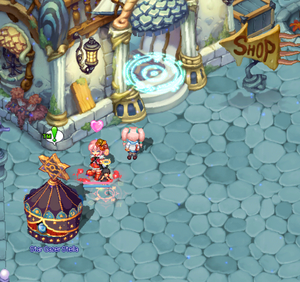
Mermaid Palace Daily
Hunt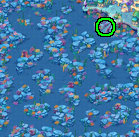


Rewards
1x Daily Coupon
1x 100k Galder Check
Entertainer Alicia, top right of field 4 by the portal to the Gate
Guaranteed drop from Punisher Merman in Mermaid Fields 1-4
Ghost Blue Daily
Hunt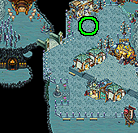
Rewards
1x Daily Coupon
1x 100k Galder Check
Stargazer Stella, in Aquarius to the left of the Shop portal
Random drop from monsters in:
- Mermaid Fields
- Ghost Blue Fields
- Rose Garden Fields
Rose Garden Daily
Hunt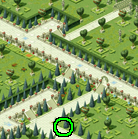


Rewards
1x Daily Coupon
1x 100k Galder Check
Homeless Ian, in Rose Field 1 near the Event Garden Portal stairs and right of Genius Cochma and Rosemary
Guaranteed drop from Punisher Beast Vincento in Rose Garden Fields 1-4

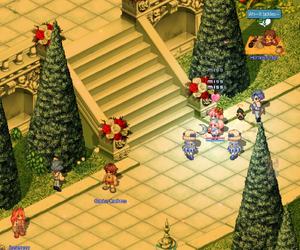
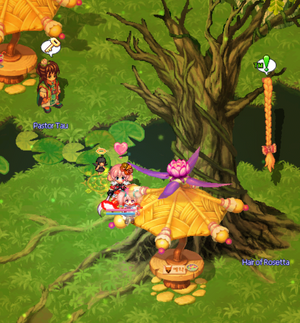
Black Swamp Daily
Drill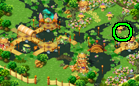


Rewards
1x Daily Coupon
Hair of Rosetta, at the top right of Carbigal near Pastor Tau
Drillable in any Swamp Field
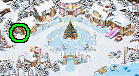
Snow Hill Daily
Hunt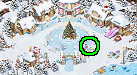


Rewards
1x Daily Coupon
1x 100k Galder Check
Winnie, at the bottom-right of Laplanoel town center
Guaranteed drop from Punisher Icicler in Snow Fields 1-4

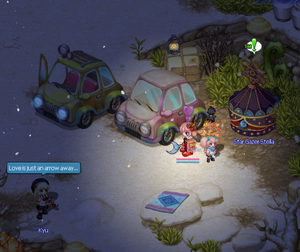
Techichi Daily
Hunt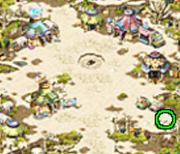
Rewards
1x Daily Coupon
1x 100k Galder Check
Star Gazer Stella, bottom right of Neil's Camp by Kyu and the local drive-in
Random drop from monsters in:
- Techichi Fields
- Tapasco Fields
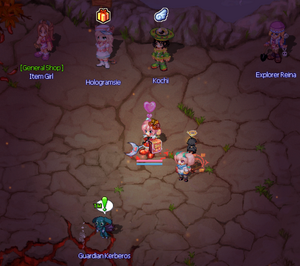
Tapasco Daily
Hunt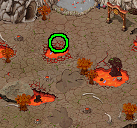


Rewards
1x Daily Coupon
1x 100k Galder Check
Guardian Kerberos, directly below Hologramsie near the Tap 1 field portal at Tap Gate
Guaranteed drop from Punisher Fire Golem in Tap Fields 1-4
About Shadow Dailies
Shadow Dailies are special daily quests that require you to hunt Shadow monsters. These quests are available from level 180 and above.
Shadow Dailies are special dailies you can do after you obtain guardian to grind low to mid level drop rate fortune cards and Star Tears! If you do all 12 in a day, you can get unlimited fortune (each star tear covers 2h of fortune so 2*12=24!), but they are Star Tears EV, so you cannot trade them.
 To see Stella, you must use Mind's Eye in the appropriate location.
Each quest has the chance to obtain either Star Card Pack No. 5 (which on this server only has the drop cards), Pink Potions, Blue Potions, or a Star Gazer Story Book (gives some Star Gazer lore, nothing more), but is guaranteed a Star Tears EV.
Coral Town Shadow Daily
Hunt

Monsters:

Shadow Totochi (Field 1)
 Shadow Clione (Field 3)

Shadow Thiefmon (Field 3)
Shadow Totochi (Field 1)
Shadow Clione (Field 3)
Shadow Thiefmon (Field 3)
Desert Town Shadow Daily
Hunt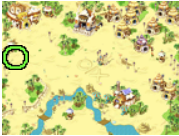
Monsters:

Shadow Shell Trap (Field 1)
 Shadow Golden Mole (Field 1)
 Shadow Fanta Fish (Field 2)
 Shadow Sand Demon (Field 3)
 Shadow Pineapple (Field 3)
 Shadow Fan Lizard (Field 4)
 Shadow Cannon Shell (Field 4)
Shadow Shell Trap (Field 1)
Shadow Golden Mole (Field 1)
Shadow Fanta Fish (Field 2)
Shadow Sand Demon (Field 3)
Shadow Pineapple (Field 3)
Shadow Fan Lizard (Field 4)
Shadow Cannon Shell (Field 4)
Megalopolis Shadow Daily
Hunt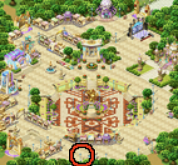
Monsters:

Shadow Queen Yamu (Southeast Forest)
 Shadow Forest Wasp (Southwest Forest)
 Shadow Forest Mantis (Southwest Forest)
Shadow Queen Yamu (Southeast Forest)
Shadow Forest Wasp (Southwest Forest)
Shadow Forest Mantis (Southwest Forest)
Azteca Shadow Daily
Hunt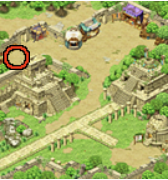
Monsters:

Shadow Mandragora (Path to, Field 1)
 Shadow Aposis (Field 3, Field 4)
Shadow Mandragora (Path to, Field 1)
Shadow Aposis (Field 3, Field 4)
Oops Warf Shadow Daily
Hunt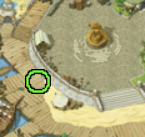
Monsters:
 Shadow Sea Tiger (Path to Oops)
 Shadow Quiem (Oops Field 1, Field 3)
 Shadow Crow (Oops Field 2, Field 3)

Shadow Black Foe (Oops Field 4)
 Shadow Master Foe (Oops Field 4)
 Shadow Mermaid Little (Mermaid Field 1, Field 2)
 Shadow Fish Guardian Tink (Mermaid Field 2, Field 3)
 Shadow Fish Guardian Bell (Mermaid Field 3)
 Shadow Merman Aku (Mermaid Field 4)
 Shadow Merman Ale (Mermaid Field 4)
Shadow Sea Tiger (Path to Oops)
Shadow Quiem (Oops Field 1, Field 3)
Shadow Crow (Oops Field 2, Field 3)
Shadow Black Foe (Oops Field 4)
Shadow Master Foe (Oops Field 4)
Shadow Mermaid Little (Mermaid Field 1, Field 2)
Shadow Fish Guardian Tink (Mermaid Field 2, Field 3)
Shadow Fish Guardian Bell (Mermaid Field 3)
Shadow Merman Aku (Mermaid Field 4)
Shadow Merman Ale (Mermaid Field 4)
Ghost Blue Shadow Daily
Hunt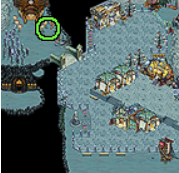
Monsters:
 Shadow Plug Bat (Path to 1, Path to 2)
 Shadow Pirate Boxer (Path to 2)
 Shadow Torpedo Fish (Field 2, Field 3)
 Shadow Cora Pyupyu (Field 2, Field 3)
 Shadow Siremaid (Field 4)
 Shadow Pirate Ghost (Field 4)
Shadow Plug Bat (Path to 1, Path to 2)
Shadow Pirate Boxer (Path to 2)
Shadow Torpedo Fish (Field 2, Field 3)
Shadow Cora Pyupyu (Field 2, Field 3)
Shadow Siremaid (Field 4)
Shadow Pirate Ghost (Field 4)
Rose Garden Shadow Daily
Hunt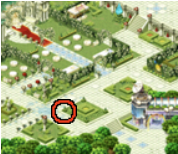

Monsters:
 Shadow Dancer Isabelle (Field 1)
 Shadow Captain Charman (Field 2)
 Shadow Captain Arman (Field 2)
 Shadow Madam Fondue (Field 3, Field 4)
 Shadow Beast Vincento (Field 4)
Shadow Dancer Isabelle (Field 1)
Shadow Captain Charman (Field 2)
Shadow Captain Arman (Field 2)
Shadow Madam Fondue (Field 3, Field 4)
Shadow Beast Vincento (Field 4)
Black Swamp Shadow Daily
Hunt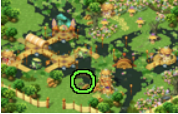

Monsters:

Shadow Monkya (Field 3)
 Shadow Arachne (Field 4, Field 5, Field 6)
 Shadow Mud Bigfoot (Field 6)
Shadow Monkya (Field 3)
Shadow Arachne (Field 4, Field 5, Field 6)
Shadow Mud Bigfoot (Field 6)
Snow Hill Shadow Daily
Hunt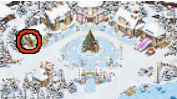

Monsters:
 Shadow Joker (Northwest Forest, Frost Forest 1)
 Shadow Goma (Frost Forest 1, Frost Forest 2)
 Shadow Santa Bear (Field 2)
 Shadow Ice Cream (Field 3)
 Shadow Yeti (Field 3)
 Shadow Icicler (Field 4)
Shadow Joker (Northwest Forest, Frost Forest 1)
Shadow Goma (Frost Forest 1, Frost Forest 2)
Shadow Santa Bear (Field 2)
Shadow Ice Cream (Field 3)
Shadow Yeti (Field 3)
Shadow Icicler (Field 4)
Techichi Shadow Daily
Hunt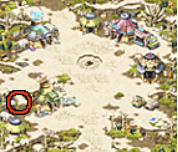

Monsters:
 Shadow Roaster (Path to 1, Path to 2)
 Shadow Kilimanjaro (Path to 2, Field 1)
 Shadow Ponchichi (Field 2, Field 1)
 Shadow Orpeo (Field 3)
 Shadow Orconio (Field 3)
 Shadow Dekumanus (Field 4)
Shadow Roaster (Path to 1, Path to 2)
Shadow Kilimanjaro (Path to 2, Field 1)
Shadow Ponchichi (Field 2, Field 1)
Shadow Orpeo (Field 3)
Shadow Orconio (Field 3)
Shadow Dekumanus (Field 4)
Tapasco Shadow Daily
Hunt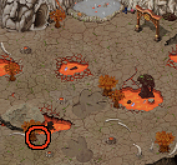

Monsters:
 Shadow Red Salamander (Field 1)
 Shadow Blue Salamander (Field 2)
 Shadow Funky Orc (Field 3)

Shadow Reggae Orc (Field 3, Field 4)
 Shadow Fire Golem (Field 2, Field 4)
Shadow Red Salamander (Field 1)
Shadow Blue Salamander (Field 2)
Shadow Funky Orc (Field 3)
Shadow Reggae Orc (Field 3, Field 4)
Shadow Fire Golem (Field 2, Field 4)
Abyss Town - Platonia Shadow Daily
Hunt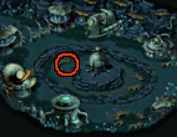
Monsters:

Shadow Channa (Field 4)
 Shadow Ghost Diver (Field 1, Field 4)
Shadow Channa (Field 4)
Shadow Ghost Diver (Field 1, Field 4)
Shaman Jia Shadow World Guide
Complete guide for Dark Spirit Punishment quests with monster details, locations, and rewards
What is Shadow World?
An advanced quest system available at level 180+ featuring shadow versions of familiar monsters with enhanced stats and unique rewards across 12 different locations.
Mind's Eye Required
Essential skill obtained from Eclipse NPC that allows you to see and interact with shadow entities throughout the game world.
51 Shadow Quests
Complete progression system spanning levels 180-250+ with location-specific NPCs offering different quests based on your level and area.
Understanding Shadow World Tabs
Eclipse Tab
Essential Prerequisites
- Complete Mind's Eye quest walkthrough
- Required items and NPC locations
- Step-by-step instructions
- Unlock the entire Shadow World system
Quest Tracker
Progress Monitoring
- Track all 51 shadow quests simultaneously
- Visual progress indicators
- Completion status for each location
- Organized by difficulty and level
Location Tabs
Detailed Area Guides
- Monster stats and locations
- Quest requirements and rewards
- NPC locations and dialogue
- Level recommendations and tips
Essential Tips & Strategies
Mind's Eye Active
Always keep Mind's Eye skill active. Without it, you cannot see shadow NPCs or monsters anywhere in the game world.
Guardian Pet Required
Keep your Guardian pet active during all shadow activities. It's required for accessing Shadow World content.
Use Quest Tracker
Monitor your progress across all 12 locations simultaneously using the Quest Tracker tab for efficient completion.
Shadow Monsters Stronger
Shadow monsters have enhanced stats compared to regular versions. Prepare with better equipment and consumables.
Level Progression Matters
Complete quests in order for optimal experience gain. Don't attempt areas too early or too late for your level.
Location-Specific NPCs
Each area has its own Shaman Girl Jia offering different quests based on your level and the specific location.


 Location: