Daily Quests: Difference between revisions
Jump to navigation
Jump to search
mNo edit summary |
m maybe |
||
| (25 intermediate revisions by 2 users not shown) | |||
| Line 1: | Line 1: | ||
<usestyle src="Img.css" /> | |||
<usestyle src="Overview.css" /> | |||
<usestyle src="MonsterCard.css" /> | |||
<usestyle src="GuideCard.css" /> | |||
<usestyle src="QuestCard.css" /> | |||
<usestyle src="StatsCard.css" /> | |||
<usestyle src="QuestTracker.css" /> | |||
<usestyle src="Eclipse.css" /> | |||
<usestyle src="InfoBox.css" /> | |||
<usestyle src="Tabs.css" /> | |||
< | <usescript src="ShowFirstTabs.js"/> | ||
<usescript src="DailyQuestTracker.js" /> | |||
<usescript src="MonkeyTTracker.js" /> | |||
<html> | |||
<html lang="en"> | |||
<head> | |||
<meta charset="UTF-8" /> | |||
<meta name="viewport" content="width=device-width, initial-scale=1" /> | |||
<title>CoraTO Wiki • Daily Quests</title> | |||
</head> | |||
<body> | |||
'''NOTE''': Requires | <div class="mw-page-scope"> | ||
<!-- Hero --> | |||
* 1 Daily | <header class="hero"> | ||
<div class="hero-inner"> | |||
<h1 class="hero-title">Daily Quests</h1> | |||
<p class="hero-subtitle">Complete repeatable quests daily to earn TM Experience and Daily Coupons. Reset occurs | |||
at approximately 8:00AM UTC.</p> | |||
<p class="hero-subtitle">Check out this <a href="https://tools.cora-to.com/daily-tracker/index.html">easy-to-use tracker here</a> to help guide you in this server!</p> | |||
<div class="status-pill">Daily Content</div> | |||
</div> | |||
</header> | |||
<!-- Main Tabs Navigation --> | |||
<nav class="nav-tabs" role="tablist"> | |||
<button class="nav-tab active" role="tab" aria-selected="true" aria-controls="tab-guide" data-tab="tab-guide" | |||
tabindex="0"><span class="full-text">Guide</span><span class="short-text">Guide</span> | |||
</button> | |||
<button class="nav-tab" role="tab" aria-selected="false" aria-controls="tab-normal-daily" | |||
data-tab="tab-normal-daily" tabindex="-1"><span class="full-text">Normal Daily</span><span | |||
class="short-text">Normal</span> | |||
</button> | |||
<button class="nav-tab" role="tab" aria-selected="false" aria-controls="tab-shadow-dailies" | |||
data-tab="tab-shadow-dailies" tabindex="-1"><span class="full-text">Stella - Shadow Star</span><span | |||
class="short-text">Stella</span> | |||
</button> | |||
<button class="nav-tab" role="tab" aria-selected="false" aria-controls="tab-shaman-girl-jia" | |||
data-tab="tab-shaman-girl-jia" tabindex="-1"><span class="full-text">Shaman Girl Jia - Dark Spirit</span><span | |||
class="short-text">Jia</span> | |||
</button> | |||
<button class="nav-tab" role="tab" aria-selected="false" aria-controls="tab-monkey-t" data-tab="tab-monkey-t" | |||
tabindex="-1"><span class="full-text">Monkey | |||
T</span><span class="short-text">Mon.T Grass</span> | |||
</button> | |||
</nav> | |||
<main class="content" id="top"> | |||
<!------------------------------------------------------------- GUIDE TAB -------------------------------------------------------------> | |||
<section id="tab-guide" class="tab-content active" role="tabpanel"> | |||
<!-- Guide Header --> | |||
<div class="guide-section-header"> | |||
<h1 class="guide-main-title">Complete Daily Quests Guide</h1> | |||
<p class="hero-subtitle">Everything you need to know to maximize your daily earnings in CoraTO</p> | |||
</div> | |||
<!-- Introduction Cards --> | |||
<div class="guide-intro"> | |||
<div class="highlights-grid"> | |||
<div class="guide-card"> | |||
<div class="guide-card-icon"> | |||
💎 | |||
</div> | |||
<h3>What are Daily Quests?</h3> | |||
<p>Daily missions that provide TM Experience and Daily Coupons. They reset approximately at 12:00AM PST | |||
every day, allowing constant progression.</p> | |||
</div> | |||
<div class="guide-card"> | |||
<div class="guide-card-icon"> | |||
🎯 | |||
</div> | |||
<h3>Types of Daily Quests</h3> | |||
<p>There are four main types: Normal Dailies, Stella Dailies, Shaman Girl Jia Dailies, and Monkey_T Dailies. | |||
(special), each with unique requirements and rewards.</p> | |||
</div> | |||
<div class="guide-card"> | |||
<div class="guide-card-icon"> | |||
🏆 | |||
</div> | |||
<h3>Benefits</h3> | |||
<p>Besides TM Experience, you earn Daily Coupons that can be exchanged for valuable items with the PyuPyu Exchange in Skill Garden.</p> | |||
</div> | |||
</div> | |||
</div> | |||
<!-- Navigation Guide --> | |||
<div class="guide-navigation"> | |||
<h2 class="guide-section-title">How to Navigate the Tabs</h2> | |||
<div class="navigation-steps"> | |||
<div class="nav-step"> | |||
<div class="step-number">1</div> | |||
<h3 class="step-title">Normal Daily</h3> | |||
<p class="step-description">Basic missions available in various zones. Ideal for beginners and mid-level | |||
players.</p> | |||
<div class="step-tabs"> | |||
<span class="step-tab">Coral Beach</span> | |||
<span class="step-tab">Desert Beach</span> | |||
<span class="step-tab">Megalopolis</span> | |||
<span class="step-tab">Azteca</span> | |||
<span class="step-tab">+8 more</span> | |||
</div> | |||
</div> | |||
<div class="nav-step"> | |||
<div class="step-number">2</div> | |||
<h3 class="step-title">Stella - Shadow Star</h3> | |||
<p class="step-description">Small item-hunts in exchange for extending your fortune indefinitely, if you do all the towns. Also, free Drop Cards!</p> | |||
<div class="step-tabs"> | |||
<span class="step-tab">Lv 180+</span> | |||
<span class="step-tab">Shadow Monsters</span> | |||
<span class="step-tab">Fortune-oriented</span> | |||
</div> | |||
</div> | |||
<div class="nav-step"> | |||
<div class="step-number">3</div> | |||
<h3 class="step-title">Shaman Girl Jia</h3> | |||
<p class="step-description">Brief Monster Quests in exchange for a 50% chance at a MyShop Consumables box. | |||
</p> | |||
<div class="step-tabs"> | |||
<span class="step-tab">Lv 180+</span> | |||
<span class="step-tab">Shadow Monsters</span> | |||
<span class="step-tab">MyShop Consumable Boxes</span> | |||
</div></div> | |||
<div class="nav-step"> | |||
<div class="step-number">4</div> | |||
<h3 class="step-title">Monkey_T</h3> | |||
<p class="step-description">Hunt regular monsters for grass in exchange for a 50% chance of Harkon Defense Shard Rewards for the <a href="https://mewsie.world/CoraTOWiki/index.php/Harkon_Defense_Custom_Exchanges">F2P MyShop Compound Stone Exchange</a>. | |||
</p> | |||
<div class="step-tabs"> | |||
<span class="step-tab">Lv 20+</span> | |||
<span class="step-tab">Regular Monsters</span> | |||
<span class="step-tab">Harkon Defense Shards & Compound Stones</span> | |||
</div> | |||
</div> | |||
</div> | |||
</div> | |||
<!-- Quest Types --> | |||
<div class="quest-types"> | |||
<h2 class="guide-section-title">Mission Types</h2> | |||
<div class="quest-types-grid"> | |||
<div class="quest-type-card"> | |||
<div class="quest-type-header"> | |||
<h3 class="quest-type-title">Normal Dailies</h3> | |||
<p class="quest-type-subtitle">Basic missions for all levels</p> | |||
</div> | |||
<div class="quest-type-content"> | |||
<ul class="quest-features"> | |||
<li>Available in 13 different zones</li> | |||
<li>Low to medium level requirements</li> | |||
<li>Involves basic drilling or hunting</li> | |||
<li>Rewards: 1x Daily Coupon, 100k Galder, 75% 1x Cora Coupon / 25% 3 Bonus Eggs + TM EXP (Normal) OR <a href="https://mewsie.world/CoraTOWiki/index.php/Monkey_T%27s_Grass_Quests_(Shard_Quests)">50% Chance at specific Shards</a> (Grass)</li> | |||
<li>Ideal for beginners</li> | |||
<li>Daily reset at 8:00AM UTC</li> | |||
</ul> | |||
</div> | |||
</div> | |||
<div class="quest-type-card"> | |||
<div class="quest-type-header"> | |||
<h3 class="quest-type-title">Shadow Dailies</h3> | |||
<p class="quest-type-subtitle">Advanced missions with Shadow Monsters</p> | |||
</div> | |||
<div class="quest-type-content"> | |||
<ul class="quest-features"> | |||
<li>Requires guardian + levels 180+ up to 345+</li> | |||
<li>More challenging Shadow monsters</li> | |||
<li>Better TM EXP rewards</li> | |||
<li>50% chance at MyShop Consumables Box or <a href="https://mewsie.world/CoraTOWiki/index.php/Shadow_Dailies">Guaranteed Star Card Pack No.5 + Star Tears EV Rewards</a></li> | |||
<li>Great for progression through difficulty zones</li> | |||
<li>End-game content</li> | |||
</ul> | |||
</div> | |||
</div> | |||
</div> | |||
</div> | |||
<!-- Level Progression --> | |||
<!-- Tips Section --> | |||
<div class="guide-tips"> | |||
<h2 class="guide-section-title">Important Tips</h2> | |||
<div class="tips-grid"> | |||
<div class="tip-card"> | |||
<div class="tip-icon">⏰</div> | |||
<h3 class="tip-title">Daily Reset</h3> | |||
<p class="tip-content">All Daily Quests reset at 8:00AM UTC. Plan your time to complete all before the | |||
reset.</p> | |||
</div> | |||
<div class="tip-card"> | |||
<div class="tip-icon">📍</div> | |||
<h3 class="tip-title">NPC Locations</h3> | |||
<p class="tip-content">Each zone has its specific NPC. Use the provided images and maps to find them | |||
easily.</p> | |||
</div> | |||
<div class="tip-card"> | |||
<div class="tip-icon">🎒</div> | |||
<h3 class="tip-title">Preparation</h3> | |||
<p class="tip-content">Check required items before leaving. Some can be drilled, others need to be hunted | |||
from specific monsters.</p> | |||
</div> | |||
<div class="tip-card"> | |||
<div class="tip-icon">💰</div> | |||
<h3 class="tip-title">Daily Coupons</h3> | |||
<p class="tip-content">Exchange your Daily Coupons with Miranda Watty in Megalopolis for valuable items | |||
and equipment.</p> | |||
</div> | |||
<div class="tip-card"> | |||
<div class="tip-icon">⚡</div> | |||
<h3 class="tip-title">Efficiency</h3> | |||
<p class="tip-content">Start with geographically closest missions to optimize your travel time.</p> | |||
</div> | |||
<div class="tip-card"> | |||
<div class="tip-icon">🔄</div> | |||
<h3 class="tip-title">Progression</h3> | |||
<p class="tip-content">As your level increases, unlock Shadow Dailies for better rewards and challenges. | |||
</p> | |||
</div> | |||
</div> | |||
</div> | |||
<!-- Quick Start Guide --> | |||
<div class="guide-navigation"> | |||
<h2 class="guide-section-title">Quick Start Guide</h2> | |||
<div class="navigation-steps"> | |||
<div class="nav-step"> | |||
<div class="step-number">1</div> | |||
<h3 class="step-title">Choose Your Tab</h3> | |||
<p class="step-description">Click on the tab corresponding to your level: Normal and Monkey_T Dailies are for beginners, | |||
Shadow Dailies are best for levels 180+ with guardian.</p> | |||
</div> | |||
<div class="nav-step"> | |||
<div class="step-number">2</div> | |||
<h3 class="step-title">Select the Zone</h3> | |||
<p class="step-description">Use the internal tabs to navigate between different zones and find the mission | |||
suitable for your level.</p> | |||
</div> | |||
<div class="nav-step"> | |||
<div class="step-number">3</div> | |||
<h3 class="step-title">Prepare</h3> | |||
<p class="step-description">Read the requirements, locate the NPC on the map and collect/buy the necessary | |||
items before departing.</p> | |||
</div> | |||
<div class="nav-step"> | |||
<div class="step-number">4</div> | |||
<h3 class="step-title">Complete and Repeat</h3> | |||
<p class="step-description">Execute the mission, collect your rewards and repeat daily to maximize your | |||
earnings.</p> | |||
</div> | |||
</div> | |||
</div> | |||
</section> | |||
<!----------------------------------------------------------- NORMAL DAILY TAB ---------------------------------------------------------> | |||
<section id="tab-normal-daily" class="tab-content" role="tabpanel"> | |||
<div class="section-header"> | |||
<h2>Normal Daily Requests and Rewards</h2> | |||
<p class="section-lead">Note: The rewards do not include all possible drops, but will include guaranteed ones. | |||
</p> | |||
</div> | |||
<!-- Nested Tabs for Normal Daily by Zone --> | |||
<nav class="nested-tabs" role="tablist"> | |||
<button class="nested-tab active" role="tab" aria-selected="true" data-tab="coral-beach">Coral Beach</button> | |||
<button class="nested-tab" role="tab" aria-selected="false" data-tab="desert-beach">Desert Beach</button> | |||
<button class="nested-tab" role="tab" aria-selected="false" data-tab="megalopolis">Megalopolis</button> | |||
<button class="nested-tab" role="tab" aria-selected="false" data-tab="azteca">Azteca</button> | |||
<button class="nested-tab" role="tab" aria-selected="false" data-tab="oops-warf">Oops Warf</button> | |||
<button class="nested-tab" role="tab" aria-selected="false" data-tab="mermaid-palace">Mermaid Palace</button> | |||
<button class="nested-tab" role="tab" aria-selected="false" data-tab="ghost-blue">Ghost Blue</button> | |||
<button class="nested-tab" role="tab" aria-selected="false" data-tab="rose-garden">Rose Garden</button> | |||
<button class="nested-tab" role="tab" aria-selected="false" data-tab="black-swamp-normal">Black Swamp</button> | |||
<button class="nested-tab" role="tab" aria-selected="false" data-tab="snow-hill-normal">Snow Hill</button> | |||
<button class="nested-tab" role="tab" aria-selected="false" data-tab="techichi-normal">Techichi</button> | |||
<button class="nested-tab" role="tab" aria-selected="false" data-tab="tapasco-normal">Tapasco</button> | |||
<button class="nested-tab" role="tab" aria-selected="false" data-tab="abyss-normal">Abyss</button> | |||
</nav> | |||
<!-- Nested content for each zone --> | |||
<div id="coral-beach" class="nested-content active"> | |||
<div class="quest-card"> | |||
<!-- Quest Header --> | |||
<div class="quest-header"> | |||
<h1 class="quest-title">Coral Beach Daily</h1> | |||
<span class="quest-type">Drill</span> | |||
</div> | |||
<!-- Quest Sections Grid --> | |||
<div class="quest-sections"> | |||
<!-- Location Section --> | |||
<div class="quest-section"> | |||
<h5 class="quest-section-title">Location</h5> | |||
<div class="quest-section-icon"></div> | |||
<div class="quest-detail-item"> | |||
<div class="image-container"><img src="https://mewsie.world/CoraTOWiki/images/7/7b/BlomingIndiana.png" | |||
alt="Blooming Cora Location" class="quest-location-image"> | |||
<strong><a href="https://wikimirror.lifeto.co/wiki.ggftw.com/trickster/Blooming_Cora.html" | |||
target="_blank">Blooming Cora</a></strong> | |||
</div> | |||
</div> | |||
<div class="quest-detail-item"> | |||
<div class="image-container"> | |||
<img | |||
src="https://mewsie.world/CoraTOWiki/images/thumb/f/f1/Coralbeachdaily.png/300px-Coralbeachdaily.png" | |||
alt="Coral Beach Overview" class="quest-location-image"> | |||
</div> | |||
</div> | |||
</div> | |||
<!-- Quest NPC Section --> | |||
<div class="quest-section"> | |||
<h5 class="quest-section-title">Quest NPC</h5> | |||
<div class="quest-section-icon"></div> | |||
<div class="image-container"> | |||
<img src="https://wikimirror.lifeto.co/asset.103.ggftw.net/wiki/to-w/images/0/0f/Indiana_John.gif" | |||
alt="Indiana John NPC"> | |||
<strong><a | |||
href="https://wikimirror.lifeto.co/wiki.ggftw.com/trickster/Indiana_John_-_Daily_Quest_-_Coral_Beach.html" | |||
target="_blank">Indiana John</a></strong> | |||
</div> | |||
<div class="quest-section-content"></div> | |||
<h5 class="quest-section-title">Requested Item</h5> | |||
<div class="quest-section-icon"></div> | |||
<div class="image-container"> | |||
<img src="https://wikimirror.lifeto.co/asset.103.ggftw.net/wiki/to-w/images/f/f2/Crystal.gif" | |||
alt="Crystal"> | |||
<strong><a href="https://wikimirror.lifeto.co/wiki.ggftw.com/trickster/Crystal.html" | |||
target="_blank">2x Crystal</a></strong> | |||
</div> | |||
<div class="quest-section-content"> | |||
<span class="quest-badge">Drillable Item</span> | |||
</div> | |||
</div> | |||
<!-- Rewards Section --> | |||
<div class="quest-section"> | |||
<h5 class="quest-rewards-title">Rewards</h5> | |||
<div class="quest-rewards-list"> | |||
<div class="quest-reward-item"> | |||
<div class="image-container"> | |||
<img | |||
src="https://wikimirror.lifeto.co/asset.103.ggftw.net/wiki/to-w/images/9/90/Crystal_Coupon.gif" | |||
alt="Daily Coupon"> | |||
1x Daily Coupon + | |||
</div> | |||
<div class="image-container"> | |||
<img src="https://mewsie.world/CoraTOWiki/images/0/06/Coracoupon.png" | |||
alt="Cora Coupon"> | |||
75% chance of 2x Cora Coupon </div> | |||
<div class="image-container"> | |||
<img src="https://wikimirror.lifeto.co/asset.103.ggftw.net/wiki/to-w/images/f/fe/Bonus_Egg.gif" | |||
alt="Bonus Eggs"> | |||
75% chance of 3x Bonus Eggs </div> | |||
</div> | |||
</div> | |||
</div> | |||
</div> | |||
</div> | |||
<!-- Location Details --> | |||
<div class="quest-location-details"> | |||
Indiana John, On the right half of the map, below Pachi/Field 3 | |||
</div> | |||
<!-- Item Drop Information --> | |||
<div class="quest-drop-info"> | |||
<u>Recommendation:</u> Drill in Coral Beach fields.<br> | |||
Can be drilled in: | |||
<ul> | |||
<li>Coral Beach Fields</li> | |||
<li>Dark Cave</li> | |||
<li>Gate of Desert Beach</li> | |||
<li>Pyramid Dungeon Halls</li> | |||
<li>Poppuri Dungeons</li> | |||
<li>Path to Desert Beach</li> | |||
<li>Ghost Blue fields</li> | |||
<li>Fiesta Zones 1-6</li> | |||
</ul> | |||
<strong>NOTE</strong>: On this server, the level requirement is 20, not 5! | |||
</div> | |||
</div> | |||
</div> | |||
<div id="desert-beach" class="nested-content"> | |||
<div class="quest-card"> | |||
<!-- Quest Header --> | |||
<div class="quest-header"> | |||
<h1 class="quest-title">Desert Beach Daily</h1> | |||
<span class="quest-type">Hunt</span> | |||
</div> | |||
<!-- Quest Sections Grid --> | |||
<div class="quest-sections"> | |||
<!-- Location Section --> | |||
<div class="quest-section"> | |||
<h5 class="quest-section-title">Location</h5> | |||
<div class="quest-section-icon"></div> | |||
<div class="quest-detail-item"> | |||
<div class="image-container"><img src="https://mewsie.world/CoraTOWiki/images/f/f9/DesertMonkey.png" | |||
alt="Paradise Location" class="quest-location-image"> | |||
<strong><a href="https://wikimirror.lifeto.co/wiki.ggftw.com/trickster/Paradise.html" | |||
target="_blank">Paradise</a></strong> | |||
</div> | |||
</div> | |||
<div class="quest-detail-item"> | |||
<div class="image-container"> | |||
<img | |||
src="https://mewsie.world/CoraTOWiki/images/thumb/8/88/Desertbeachdaily.png/300px-Desertbeachdaily.png" | |||
alt="Paradise Overview" class="quest-location-image"> | |||
</div> | |||
</div> | |||
<div class="quest-section-content"></div> | |||
</div> | |||
<!-- Quest NPC Section --> | |||
<div class="quest-section"> | |||
<h5 class="quest-section-title">Quest NPC</h5> | |||
<div class="quest-section-icon"> | |||
<div class="info-grid"> | |||
</div> | |||
</div> | |||
<div class="image-container"> | |||
<img src="https://wikimirror.lifeto.co/asset.103.ggftw.net/wiki/to-w/images/3/3e/Monkey_T.gif" | |||
alt="Monkey_T NPC"> | |||
<strong><a | |||
href="https://wikimirror.lifeto.co/wiki.ggftw.com/trickster/Monkey_T_-_Daily_Quest_-_Desert_Beach.html" | |||
target="_blank">Monkey_T</a></strong> | |||
</div> | |||
<div class="quest-section-content"></div> | |||
<h5 class="quest-section-title">Requested Item</h5> | |||
<div class="quest-section-icon"> | |||
</div> | |||
<div class="image-container"> | |||
<img src="https://wikimirror.lifeto.co/asset.103.ggftw.net/wiki/to-w/images/1/1b/Luxury_Socks.gif" | |||
alt="Luxury Socks"> | |||
<strong><a href="https://wikimirror.lifeto.co/wiki.ggftw.com/trickster/Sleeping_Socks.html" | |||
target="_blank">1x Sleeping Socks</a></strong> | |||
</div> | |||
<div class="quest-section-content"> | |||
<span class="quest-badge"> Guaranteed Drop</span> | |||
</div> | |||
</div> | |||
<!-- Rewards Section --> | |||
<div class="quest-section"> | |||
<h5 class="quest-rewards-title">Rewards</h5> | |||
<div class="quest-rewards-list"> | |||
<div class="quest-reward-item"> | |||
<div class="image-container"> | |||
<img | |||
src="https://wikimirror.lifeto.co/asset.103.ggftw.net/wiki/to-w/images/9/90/Crystal_Coupon.gif" | |||
alt="Daily Coupon"> | |||
1x Daily Coupon + | |||
</div> | |||
<div class="image-container"> | |||
<img | |||
src="https://wikimirror.lifeto.co/asset.103.ggftw.net/wiki/to-w/images/d/d6/100k_Galder_Check.gif" | |||
alt="Daily Coupon"> | |||
1x 100k Galder Check + | |||
</div> | |||
<div class="image-container"> | |||
<img src="https://mewsie.world/CoraTOWiki/images/0/06/Coracoupon.png" | |||
alt="Cora Coupon"> | |||
75% chance of 2x Cora Coupon </div> | |||
<div class="image-container"> | |||
<img src="https://wikimirror.lifeto.co/asset.103.ggftw.net/wiki/to-w/images/f/fe/Bonus_Egg.gif" | |||
alt="Bonus Eggs"> | |||
75% chance of 3x Bonus Eggs </div> | |||
</div> | |||
</div> | |||
</div> | |||
</div> | |||
</div> | |||
<!-- Location Details --> | |||
<div class="quest-location-details"> | |||
Monkey_T location on the right half of the map next to Pachi and Paradise Shop | |||
</div> | |||
<!-- Item Drop Information --> | |||
<div class="quest-drop-info"> | |||
Guaranteed drop from <strong>Punisher Cannonshell</strong> in Desert Beach Fields 1-4 <div | |||
class="image-container"> | |||
<img src="https://wikimirror.lifeto.co/asset.103.ggftw.net/wiki/to-w/images/8/80/Cannon_Shell.gif" | |||
alt="Punisher Cannonshell"> | |||
<strong><a href="https://wikimirror.lifeto.co/wiki.ggftw.com/trickster/Punisher_Cannonshell.html" | |||
target="_blank">Punisher Cannonshell</a></strong> | |||
</div> | |||
</div> | |||
</div> | |||
</div> | |||
<div id="megalopolis" class="nested-content"> | |||
<div class="quest-card"> | |||
<!-- Quest Header --> | |||
<div class="quest-header"> | |||
<h1 class="quest-title">Megalopolis Daily</h1> | |||
<span class="quest-type">Hunt</span> | |||
</div> | |||
<!-- Quest Sections Grid --> | |||
<div class="quest-sections"> | |||
<!-- Location Section --> | |||
<div class="quest-section"> | |||
<h5 class="quest-section-title">Location</h5> | |||
<div class="quest-section-icon"></div> | |||
<div class="quest-detail-item"> | |||
<div class="image-container"><img src="https://mewsie.world/CoraTOWiki/images/9/9d/MegaloStella.png" | |||
alt="Megalopolis Location" class="quest-location-image"> | |||
<strong><a href="https://wikimirror.lifeto.co/wiki.ggftw.com/trickster/Megalopolis.html" | |||
target="_blank">Megalopolis</a></strong> | |||
</div> | |||
</div> | |||
<div class="quest-detail-item"> | |||
<div class="image-container"> | |||
<img src="https://mewsie.world/CoraTOWiki/images/thumb/d/d6/Megadaily.png/300px-Megadaily.png" | |||
alt="Megalopolis Overview" class="quest-location-image"> | |||
</div> | |||
</div> | |||
<div class="quest-section-content"></div> | |||
</div> | |||
<!-- Quest NPC Section --> | |||
<div class="quest-section"> | |||
<h5 class="quest-section-title">Quest NPC</h5> | |||
<div class="quest-section-icon"></div> | |||
<div class="image-container"> | |||
<img | |||
src="https://wikimirror.lifeto.co/asset.103.ggftw.net/wiki/to-w/images/e/e5/Star_Gazer_Stella.gif" | |||
alt="Stargazer Stella NPC"> | |||
<strong><a | |||
href="https://wikimirror.lifeto.co/wiki.ggftw.com/trickster/Star_Gazer_Stella_-_Daily_Quest_-_Megalopolis.html" | |||
target="_blank">Stargazer Stella</a></strong> | |||
</div> | |||
<div class="quest-section-content"></div> | |||
<h5 class="quest-section-title">Requested Item</h5> | |||
<div class="quest-section-icon"></div> | |||
<div class="image-container"> | |||
<img | |||
src="https://wikimirror.lifeto.co/asset.103.ggftw.net/wiki/to-w/images/0/0c/Envelope_with_Photo.gif" | |||
alt="Stella's Profile"> | |||
<strong><a href="https://wikimirror.lifeto.co/wiki.ggftw.com/trickster/Shtella%27s_Profile.html" | |||
target="_blank">2x Stella's Profile</a></strong> | |||
</div> | |||
<div class="quest-section-content"> | |||
<span class="quest-badge">Random Drop</span> | |||
</div> | |||
</div> | |||
<!-- Rewards Section --> | |||
<div class="quest-section"> | |||
<h5 class="quest-rewards-title">Rewards</h5> | |||
<div class="quest-rewards-list"> | |||
<div class="quest-reward-item"> | |||
<div class="image-container"> | |||
<img | |||
src="https://wikimirror.lifeto.co/asset.103.ggftw.net/wiki/to-w/images/9/90/Crystal_Coupon.gif" | |||
alt="Daily Coupon"> | |||
1x Daily Coupon + | |||
</div> | |||
<div class="image-container"> | |||
<img | |||
src="https://wikimirror.lifeto.co/asset.103.ggftw.net/wiki/to-w/images/d/d6/100k_Galder_Check.gif" | |||
alt="Daily Coupon"> | |||
1x 100k Galder Check + | |||
</div> | |||
<div class="image-container"> | |||
<img src="https://mewsie.world/CoraTOWiki/images/0/06/Coracoupon.png" | |||
alt="Cora Coupon"> | |||
75% chance of 2x Cora Coupon </div> | |||
<div class="image-container"> | |||
<img src="https://wikimirror.lifeto.co/asset.103.ggftw.net/wiki/to-w/images/f/fe/Bonus_Egg.gif" | |||
alt="Bonus Eggs"> | |||
75% chance of 3x Bonus Eggs </div> | |||
</div> | |||
</div> | |||
</div> | |||
</div> | |||
</div> | |||
<!-- Location Details --> | |||
<div class="quest-location-details"> | |||
Stargazer Stella, east of the Guild Management building | |||
</div> | |||
<!-- Item Drop Information --> | |||
<div class="quest-drop-info"> | |||
Random drop from monsters in: | |||
<ul> | |||
<li>Desert Beach</li> | |||
<li>Caballa Relics</li> | |||
<li>Oops Wharfs</li> | |||
</ul> | |||
<strong>NOTE</strong>: Requires "<a | |||
href="https://wikimirror.lifeto.co/wiki.ggftw.com/trickster/Star_Gazing.html" target="_blank">Stella | |||
Reading Quest</a>"!! | |||
</div> | |||
</div> | |||
</div> | |||
<div id="azteca" class="nested-content"> | |||
<div class="quest-card"> | |||
<!-- Quest Header --> | |||
<div class="quest-header"> | |||
<h1 class="quest-title">Azteca Daily</h1> | |||
<span class="quest-type">Hunt</span> | |||
</div> | |||
<!-- Quest Sections Grid --> | |||
<div class="quest-sections"> | |||
<!-- Location Section --> | |||
<div class="quest-section"> | |||
<h5 class="quest-section-title">Location</h5> | |||
<div class="quest-section-icon"></div> | |||
<div class="quest-detail-item"> | |||
<div class="image-container"><img src="https://mewsie.world/CoraTOWiki/images/5/56/AztecaPhara.png" | |||
alt="Azteca Location" class="quest-location-image"> | |||
<strong><a href="https://wikimirror.lifeto.co/wiki.ggftw.com/trickster/Azteca.html" | |||
target="_blank">Azteca</a></strong> | |||
</div> | |||
</div> | |||
<div class="quest-detail-item"> | |||
<div class="image-container"> | |||
<img | |||
src="https://mewsie.world/CoraTOWiki/images/thumb/0/0d/Pharoah_boy_location_azteca.png/300px-Pharoah_boy_location_azteca.png" | |||
alt="Azteca Overview" class="quest-location-image"> | |||
</div> | |||
</div> | |||
<div class="quest-section-content"></div> | |||
</div> | |||
<!-- Quest NPC Section --> | |||
<div class="quest-section"> | |||
<h5 class="quest-section-title">Quest NPC</h5> | |||
<div class="quest-section-icon"></div> | |||
<div class="image-container"> | |||
<img src="https://wikimirror.lifeto.co/asset.103.ggftw.net/wiki/to-w/images/4/46/Pharaoh_Boy.gif" | |||
alt="Pharoah Boy NPC"> | |||
<strong><a | |||
href="https://wikimirror.lifeto.co/wiki.ggftw.com/trickster/Pharaoh_Boy_-_Daily_Quest_-_Caballa_Relics.html" | |||
target="_blank">Pharoah Boy</a></strong> | |||
</div> | |||
<div class="quest-section-content"></div> | |||
<h5 class="quest-section-title">Requested Item</h5> | |||
<div class="quest-section-icon"></div> | |||
<div class="image-container"> | |||
<img src="https://wikimirror.lifeto.co/asset.103.ggftw.net/wiki/to-w/images/0/08/Aposis%27_Stick.gif" | |||
alt="Staff of Purification"> | |||
<strong><a href="https://wikimirror.lifeto.co/wiki.ggftw.com/trickster/Staff_of_Purification.html" | |||
target="_blank">1x Staff of Purification</a></strong> | |||
</div> | |||
<div class="quest-section-content"> | |||
<span class="quest-badge">Guaranteed Drop</span> | |||
</div> | |||
</div> | |||
<!-- Rewards Section --> | |||
<div class="quest-section"> | |||
<h5 class="quest-rewards-title">Rewards</h5> | |||
<div class="quest-rewards-list"> | |||
<div class="quest-reward-item"> | |||
<div class="image-container"> | |||
<img | |||
src="https://wikimirror.lifeto.co/asset.103.ggftw.net/wiki/to-w/images/9/90/Crystal_Coupon.gif" | |||
alt="Daily Coupon"> | |||
1x Daily Coupon + | |||
</div> | |||
<div class="image-container"> | |||
<img | |||
src="https://wikimirror.lifeto.co/asset.103.ggftw.net/wiki/to-w/images/d/d6/100k_Galder_Check.gif" | |||
alt="Daily Coupon"> | |||
1x 100k Galder Check + | |||
</div> | |||
<div class="image-container"> | |||
<img src="https://mewsie.world/CoraTOWiki/images/0/06/Coracoupon.png" | |||
alt="Cora Coupon"> | |||
75% chance of 2x Cora Coupon </div> | |||
<div class="image-container"> | |||
<img src="https://wikimirror.lifeto.co/asset.103.ggftw.net/wiki/to-w/images/f/fe/Bonus_Egg.gif" | |||
alt="Bonus Eggs"> | |||
75% chance of 3x Bonus Eggs </div> | |||
</div> | |||
</div> | |||
</div> | |||
</div> | |||
</div> | |||
<!-- Location Details --> | |||
<div class="quest-location-details"> | |||
Pharoah Boy, Top Right of Azteca | |||
</div> | |||
<!-- Item Drop Information --> | |||
<div class="quest-drop-info"> | |||
Guaranteed drop from <strong>Punisher Aposis</strong> in Relics Fields 1-4 <div class="image-container"> | |||
<img src="https://wikimirror.lifeto.co/asset.103.ggftw.net/wiki/to-w/images/e/e3/Aposis.gif" | |||
alt="Punisher Aposis"> | |||
<strong><a href="https://wikimirror.lifeto.co/wiki.ggftw.com/trickster/Punisher_Aposis.html" | |||
target="_blank">Punisher Aposis</a></strong> | |||
</div> | |||
</div> | |||
</div> | |||
</div> | |||
<div id="oops-warf" class="nested-content"> | |||
<div class="quest-card"> | |||
<!-- Quest Header --> | |||
<div class="quest-header"> | |||
<h1 class="quest-title">Oops Warf Daily</h1> | |||
<span class="quest-type">Hunt</span> | |||
</div> | |||
<!-- Quest Sections Grid --> | |||
<div class="quest-sections"> | |||
<!-- Location Section --> | |||
<div class="quest-section"> | |||
<h5 class="quest-section-title">Location</h5> | |||
<div class="quest-section-icon"></div> | |||
<div class="quest-detail-item"> | |||
<div class="image-container"> | |||
<img src="https://mewsie.world/CoraTOWiki/images/6/61/OopsMarine.png" alt="Oops Warf Location" | |||
class="quest-location-image"> | |||
<strong><a href="https://wikimirror.lifeto.co/wiki.ggftw.com/trickster/Oops_Warf.html" | |||
target="_blank">Oops Warf</a></strong> | |||
</div> | |||
</div> | |||
<div class="quest-detail-item"> | |||
<div class="image-container"> | |||
<img | |||
src="https://mewsie.world/CoraTOWiki/images/thumb/2/29/Marinel_location_oops_warf.png/300px-Marinel_location_oops_warf.png" | |||
alt="Oops Warf Overview" class="quest-location-image"> | |||
</div> | |||
</div> | |||
<div class="quest-section-content"></div> | |||
</div> | |||
<!-- Quest NPC Section --> | |||
<div class="quest-section"> | |||
<h5 class="quest-section-title">Quest NPC</h5> | |||
<div class="quest-section-icon"></div> | |||
<div class="image-container"> | |||
<img src="https://wikimirror.lifeto.co/asset.103.ggftw.net/wiki/to-w/images/4/4f/Marinel.gif" | |||
alt="Marinel NPC"> | |||
<strong><a | |||
href="https://wikimirror.lifeto.co/wiki.ggftw.com/trickster/Marinel_-_Daily_Quest_-_Oops_Wharf.html" | |||
target="_blank">Marinel</a></strong> | |||
</div> | |||
<div class="quest-section-content"></div> | |||
<h5 class="quest-section-title">Requested Item</h5> | |||
<div class="quest-section-icon"></div> | |||
<div class="image-container"> | |||
<img src="https://wikimirror.lifeto.co/asset.103.ggftw.net/wiki/to-w/images/4/4f/Thick_Rope.gif" | |||
alt="Thick Rope"> | |||
<strong><a href="https://wikimirror.lifeto.co/wiki.ggftw.com/trickster/Thick_Rope.html" | |||
target="_blank">2x Thick Rope</a></strong> | |||
</div> | |||
<div class="quest-section-content"> | |||
<span class="quest-badge">Guaranteed Drop</span> | |||
</div> | |||
</div> | |||
<!-- Rewards Section --> | |||
<div class="quest-section"> | |||
<h5 class="quest-rewards-title">Rewards</h5> | |||
<div class="quest-rewards-list"> | |||
<div class="quest-reward-item"> | |||
<div class="image-container"> | |||
<img | |||
src="https://wikimirror.lifeto.co/asset.103.ggftw.net/wiki/to-w/images/9/90/Crystal_Coupon.gif" | |||
alt="Daily Coupon"> | |||
1x Daily Coupon + | |||
</div> | |||
<div class="image-container"> | |||
<img | |||
src="https://wikimirror.lifeto.co/asset.103.ggftw.net/wiki/to-w/images/d/d6/100k_Galder_Check.gif" | |||
alt="Daily Coupon"> | |||
1x 100k Galder Check + | |||
</div> | |||
<div class="image-container"> | |||
<img src="https://mewsie.world/CoraTOWiki/images/0/06/Coracoupon.png" | |||
alt="Cora Coupon"> | |||
75% chance of 2x Cora Coupon </div> | |||
<div class="image-container"> | |||
<img src="https://wikimirror.lifeto.co/asset.103.ggftw.net/wiki/to-w/images/f/fe/Bonus_Egg.gif" | |||
alt="Bonus Eggs"> | |||
75% chance of 3x Bonus Eggs </div> | |||
</div> | |||
</div> | |||
</div> | |||
</div> | |||
</div> | |||
<!-- Location Details --> | |||
<div class="quest-location-details"> | |||
Marinel, bottom right of Oops Warf | |||
</div> | |||
<!-- Item Drop Information --> | |||
<div class="quest-drop-info"> | |||
Drillable in any Oops Field | |||
</div> | |||
</div> | |||
</div> | |||
<div id="mermaid-palace" class="nested-content"> | |||
<div class="quest-card"> | |||
<!-- Quest Header --> | |||
<div class="quest-header"> | |||
<h1 class="quest-title">Mermaid Palace Daily</h1> | |||
<span class="quest-type">Hunt</span> | |||
</div> | |||
<!-- Quest Sections Grid --> | |||
<div class="quest-sections"> | |||
<!-- Location Section --> | |||
<div class="quest-section"> | |||
<h5 class="quest-section-title">Location</h5> | |||
<div class="quest-section-icon"></div> | |||
<div class="quest-detail-item"> | |||
<div class="image-container"> | |||
<img src="https://mewsie.world/CoraTOWiki/images/3/30/MermaidElicia.png" | |||
alt="Mermaid Palace Location" class="quest-location-image"> | |||
<strong><a | |||
href="https://wikimirror.lifeto.co/wiki.ggftw.com/trickster/Mermaid_Palace_Field_4_-_Rock_Square.html" | |||
target="_blank">Mermaid Field 4</a></strong> | |||
</div> | |||
</div> | |||
<div class="quest-detail-item"> | |||
<div class="image-container"> | |||
<img | |||
src="https://mewsie.world/CoraTOWiki/images/thumb/f/f7/Entertainer_elicia_mermaid_location.png/300px-Entertainer_elicia_mermaid_location.png" | |||
alt="Mermaid Palace Overview" class="quest-location-image"> | |||
</div> | |||
</div> | |||
<div class="quest-section-content"></div> | |||
</div> | |||
<!-- Quest NPC Section --> | |||
<div class="quest-section"> | |||
<h5 class="quest-section-title">Quest NPC</h5> | |||
<div class="quest-section-icon"></div> | |||
<div class="image-container"> | |||
<img | |||
src="https://wikimirror.lifeto.co/asset.103.ggftw.net/wiki/to-w/images/b/be/Entertainer_Elicia.gif" | |||
alt="Entertainer Alicia NPC"> | |||
<strong><a | |||
href="https://wikimirror.lifeto.co/wiki.ggftw.com/trickster/Entertainer_Elicia_-_Daily_Quest_-_Mermaid_Palace.html" | |||
target="_blank">Entertainer Alicia</a></strong> | |||
</div> | |||
<div class="quest-section-content"></div> | |||
<h5 class="quest-section-title">Requested Item</h5> | |||
<div class="quest-section-icon"></div> | |||
<div class="image-container"> | |||
<img src="https://wikimirror.lifeto.co/asset.103.ggftw.net/wiki/to-w/images/3/3e/Merrow%27s_Gills.gif" | |||
alt="Executioner's Gills"> | |||
<strong><a href="https://wikimirror.lifeto.co/wiki.ggftw.com/trickster/Executioner%27s_Gills.html" | |||
target="_blank">2x Executioner's Gills</a></strong> | |||
</div> | |||
<div class="quest-section-content"> | |||
<span class="quest-badge">Guaranteed Drop</span> | |||
</div> | |||
</div> | |||
<!-- Rewards Section --> | |||
<div class="quest-section"> | |||
<h5 class="quest-rewards-title">Rewards</h5> | |||
<div class="quest-rewards-list"> | |||
<div class="quest-reward-item"> | |||
<div class="image-container"> | |||
<img | |||
src="https://wikimirror.lifeto.co/asset.103.ggftw.net/wiki/to-w/images/9/90/Crystal_Coupon.gif" | |||
alt="Daily Coupon"> | |||
1x Daily Coupon + | |||
</div> | |||
<div class="image-container"> | |||
<img | |||
src="https://wikimirror.lifeto.co/asset.103.ggftw.net/wiki/to-w/images/d/d6/100k_Galder_Check.gif" | |||
alt="Daily Coupon"> | |||
1x 100k Galder Check + | |||
</div> | |||
<div class="image-container"> | |||
<img src="https://mewsie.world/CoraTOWiki/images/0/06/Coracoupon.png" | |||
alt="Cora Coupon"> | |||
75% chance of 2x Cora Coupon </div> | |||
<div class="image-container"> | |||
<img src="https://wikimirror.lifeto.co/asset.103.ggftw.net/wiki/to-w/images/f/fe/Bonus_Egg.gif" | |||
alt="Bonus Eggs"> | |||
75% chance of 3x Bonus Eggs </div> | |||
</div> | |||
</div> | |||
</div> | |||
</div> | |||
</div> | |||
<!-- Location Details --> | |||
<div class="quest-location-details"> | |||
Entertainer Alicia, top right of field 4 by the portal to the Gate | |||
</div> | |||
<!-- Item Drop Information --> | |||
<div class="quest-drop-info"> | |||
Guaranteed drop from <strong>Punisher Merman</strong> in Mermaid Fields 1-4 <div class="image-container"> | |||
<img src="https://wikimirror.lifeto.co/asset.103.ggftw.net/wiki/to-w/images/6/65/Merman_Ale.gif" | |||
alt="Punisher Merman"> | |||
<strong><a href="https://wikimirror.lifeto.co/wiki.ggftw.com/trickster/Punisher_Mermaid.html" | |||
target="_blank">Punisher Merman</a></strong> | |||
</div> | |||
</div> | |||
</div> | |||
</div> | |||
<div id="ghost-blue" class="nested-content"> | |||
<div class="quest-card"> | |||
<!-- Quest Header --> | |||
<div class="quest-header"> | |||
<h1 class="quest-title">Ghost Blue Daily</h1> | |||
<span class="quest-type">Hunt</span> | |||
</div> | |||
<!-- Quest Sections Grid --> | |||
<div class="quest-sections"> | |||
<!-- Location Section --> | |||
<div class="quest-section"> | |||
<h5 class="quest-section-title">Location</h5> | |||
<div class="quest-section-icon"></div> | |||
<div class="quest-detail-item"> | |||
<div class="image-container"> | |||
<img src="https://mewsie.world/CoraTOWiki/images/5/5a/GhostBStella.png" alt="Ghost Blue Location" | |||
class="quest-location-image"> | |||
<strong><a href="https://wikimirror.lifeto.co/wiki.ggftw.com/trickster/Ghost_Blue.html" | |||
target="_blank">Aquarius</a></strong> | |||
</div> | |||
</div> | |||
<div class="quest-detail-item"> | |||
<div class="image-container"> | |||
<img | |||
src="https://mewsie.world/CoraTOWiki/images/thumb/1/18/Stargazer_stella_ghost_blue.png/300px-Stargazer_stella_ghost_blue.png" | |||
alt="Ghost Blue Overview" class="quest-location-image"> | |||
</div> | |||
</div> | |||
<div class="quest-section-content"></div> | |||
</div> | |||
<!-- Quest NPC Section --> | |||
<div class="quest-section"> | |||
<h5 class="quest-section-title">Quest NPC</h5> | |||
<div class="quest-section-icon"></div> | |||
<div class="image-container"> | |||
<img | |||
src="https://wikimirror.lifeto.co/asset.103.ggftw.net/wiki/to-w/images/e/e5/Star_Gazer_Stella.gif" | |||
alt="Star Gazer Stella NPC"> | |||
<strong><a | |||
href="https://wikimirror.lifeto.co/wiki.ggftw.com/trickster/Star_Gazer_Stella_-_Daily_Quest_-_Ghost_Blue.html" | |||
target="_blank">Star Gazer Stella</a></strong> | |||
</div> | |||
<div class="quest-section-content"></div> | |||
<h5 class="quest-section-title">Requested Item</h5> | |||
<div class="quest-section-icon"></div> | |||
<div class="image-container"> | |||
<img | |||
src="https://wikimirror.lifeto.co/asset.103.ggftw.net/wiki/to-w/images/0/0c/Envelope_with_Photo.gif" | |||
alt="Stela's Profile"> | |||
<strong><a href="https://wikimirror.lifeto.co/wiki.ggftw.com/trickster/Shtella%27s_Profile.html" | |||
target="_blank">2x Stela's Profile</a></strong> | |||
</div> | |||
<div class="quest-section-content"> | |||
<span class="quest-badge">Random Drop</span> | |||
</div> | |||
</div> | |||
<!-- Rewards Section --> | |||
<div class="quest-section"> | |||
<h5 class="quest-rewards-title">Rewards</h5> | |||
<div class="quest-rewards-list"> | |||
<div class="quest-reward-item"> | |||
<div class="image-container"> | |||
<img | |||
src="https://wikimirror.lifeto.co/asset.103.ggftw.net/wiki/to-w/images/9/90/Crystal_Coupon.gif" | |||
alt="Daily Coupon"> | |||
1x Daily Coupon + | |||
</div> | |||
<div class="image-container"> | |||
<img | |||
src="https://wikimirror.lifeto.co/asset.103.ggftw.net/wiki/to-w/images/d/d6/100k_Galder_Check.gif" | |||
alt="Daily Coupon"> | |||
1x 100k Galder Check + | |||
</div> | |||
<div class="image-container"> | |||
<img src="https://mewsie.world/CoraTOWiki/images/0/06/Coracoupon.png" | |||
alt="Cora Coupon"> | |||
75% chance of 2x Cora Coupon </div> | |||
<div class="image-container"> | |||
<img src="https://wikimirror.lifeto.co/asset.103.ggftw.net/wiki/to-w/images/f/fe/Bonus_Egg.gif" | |||
alt="Bonus Eggs"> | |||
75% chance of 3x Bonus Eggs </div> | |||
</div> | |||
</div> | |||
</div> | |||
</div> | |||
</div> | |||
<!-- Location Details --> | |||
<div class="quest-location-details"> | |||
Stargazer Stella, in Aquarius to the left of the Shop portal | |||
</div> | |||
<!-- Item Drop Information --> | |||
<div class="quest-drop-info"> | |||
Random drop from monsters in: | |||
<ul> | |||
<li>Mermaid Fields</li> | |||
<li>Ghost Blue Fields</li> | |||
<li>Rose Garden Fields</li> | |||
</ul> | |||
<strong>NOTE</strong>: Requires <a | |||
href="https://wikimirror.lifeto.co/wiki.ggftw.com/trickster/Star_Gazing.html" target="_blank">Stella | |||
Reading Quest</a>!! | |||
</div> | |||
</div> | |||
</div> | |||
<div id="rose-garden" class="nested-content"> | |||
<div class="quest-card"> | |||
<!-- Quest Header --> | |||
<div class="quest-header"> | |||
<h1 class="quest-title">Rose Garden Daily</h1> | |||
<span class="quest-type">Hunt</span> | |||
</div> | |||
<!-- Quest Sections Grid --> | |||
<div class="quest-sections"> | |||
<!-- Location Section --> | |||
<div class="quest-section"> | |||
<h5 class="quest-section-title">Location</h5> | |||
<div class="quest-section-icon"></div> | |||
<div class="quest-detail-item"> | |||
<div class="image-container"> | |||
<img src="https://mewsie.world/CoraTOWiki/images/4/4d/RoseIan.png" alt="Rose Garden Location" | |||
class="quest-location-image"> | |||
<strong><a href="https://wikimirror.lifeto.co/wiki.ggftw.com/trickster/Rose_Garden_Field_1.html" | |||
target="_blank">Rose Field 1</a></strong> | |||
</div> | |||
</div> | |||
<div class="quest-detail-item"> | |||
<div class="image-container"> | |||
<img | |||
src="https://mewsie.world/CoraTOWiki/images/thumb/b/b4/Homeless_ian_rose_field_1.png/300px-Homeless_ian_rose_field_1.png" | |||
alt="Rose Garden Overview" class="quest-location-image"> | |||
</div> | |||
</div> | |||
<div class="quest-section-content"></div> | |||
</div> | |||
<!-- Quest NPC Section --> | |||
<div class="quest-section"> | |||
<h5 class="quest-section-title">Quest NPC</h5> | |||
<div class="quest-section-icon"></div> | |||
<div class="image-container"> | |||
<img src="https://wikimirror.lifeto.co/asset.103.ggftw.net/wiki/to-w/images/e/ee/Homeless_Ian.gif" | |||
alt="Homeless Ian NPC"> | |||
<strong><a | |||
href="https://wikimirror.lifeto.co/wiki.ggftw.com/trickster/Homeless_Ian_-_Daily_Quest_-_Rose_Garden.html" | |||
target="_blank">Homeless Ian</a></strong> | |||
</div> | |||
<div class="quest-section-content"></div> | |||
<h5 class="quest-section-title">Requested Item</h5> | |||
<div class="quest-section-icon"></div> | |||
<div class="image-container"> | |||
<img src="https://wikimirror.lifeto.co/asset.103.ggftw.net/wiki/to-w/images/7/74/Crow%27s_Claw.gif" | |||
alt="Punisher B.V.'s Claws"> | |||
<strong><a href="https://wikimirror.lifeto.co/wiki.ggftw.com/trickster/Punisher_B.V.html" | |||
target="_blank">2x Punisher B.V.'s Claws</a></strong> | |||
</div> | |||
<div class="quest-section-content"> | |||
<span class="quest-badge">Guaranteed Drop</span> | |||
</div> | |||
</div> | |||
<!-- Rewards Section --> | |||
<div class="quest-section"> | |||
<h5 class="quest-rewards-title">Rewards</h5> | |||
<div class="quest-rewards-list"> | |||
<div class="quest-reward-item"> | |||
<div class="image-container"> | |||
<img | |||
src="https://wikimirror.lifeto.co/asset.103.ggftw.net/wiki/to-w/images/9/90/Crystal_Coupon.gif" | |||
alt="Daily Coupon"> | |||
1x Daily Coupon + | |||
</div> | |||
<div class="image-container"> | |||
<img | |||
src="https://wikimirror.lifeto.co/asset.103.ggftw.net/wiki/to-w/images/d/d6/100k_Galder_Check.gif" | |||
alt="Daily Coupon"> | |||
1x 100k Galder Check + | |||
</div> | |||
<div class="image-container"> | |||
<img src="https://mewsie.world/CoraTOWiki/images/0/06/Coracoupon.png" | |||
alt="Cora Coupon"> | |||
75% chance of 2x Cora Coupon </div> | |||
<div class="image-container"> | |||
<img src="https://wikimirror.lifeto.co/asset.103.ggftw.net/wiki/to-w/images/f/fe/Bonus_Egg.gif" | |||
alt="Bonus Eggs"> | |||
75% chance of 3x Bonus Eggs </div> | |||
</div> | |||
</div> | |||
</div> | |||
</div> | |||
</div> | |||
<!-- Location Details --> | |||
<div class="quest-location-details"> | |||
Homeless Ian, in Rose Field 1 near the Event Garden Portal stairs and right of Genius Cochma and Rosemary | |||
</div> | |||
<!-- Item Drop Information --> | |||
<div class="quest-drop-info"> | |||
Guaranteed drop from <strong>Punisher Beast Vincento</strong> in Rose Garden Fields 1-4 <div | |||
class="image-container"> | |||
<img src="https://wikimirror.lifeto.co/asset.103.ggftw.net/wiki/to-w/images/8/81/Beast_Vincento.gif" | |||
alt="Punisher Beast Vincento"> | |||
<strong><a href="https://wikimirror.lifeto.co/wiki.ggftw.com/trickster/Punisher_Beast_Vincento.html" | |||
target="_blank">Punisher Beast Vincento</a></strong> | |||
</div> | |||
</div> | |||
</div> | |||
</div> | |||
<div id="black-swamp-normal" class="nested-content"> | |||
<div class="quest-card"> | |||
<!-- Quest Header --> | |||
<div class="quest-header"> | |||
<h1 class="quest-title">Black Swamp Daily</h1> | |||
<span class="quest-type">Drill</span> | |||
</div> | |||
<!-- Quest Sections Grid --> | |||
<div class="quest-sections"> | |||
<!-- Location Section --> | |||
<div class="quest-section"> | |||
<h5 class="quest-section-title">Location</h5> | |||
<div class="quest-section-icon"></div> | |||
<div class="quest-detail-item"> | |||
<div class="image-container"> | |||
<img src="https://mewsie.world/CoraTOWiki/images/9/98/BlackSRoset.png" alt="Carbigal Location" | |||
class="quest-location-image"> | |||
<strong><a href="https://wikimirror.lifeto.co/wiki.ggftw.com/trickster/Carbigal.html" | |||
target="_blank">Carbigal</a></strong> | |||
</div> | |||
</div> | |||
<div class="quest-detail-item"> | |||
<div class="image-container"> | |||
<img | |||
src="https://mewsie.world/CoraTOWiki/images/thumb/a/ac/Hair_of_rosetta_black_swamp.png/300px-Hair_of_rosetta_black_swamp.png" | |||
alt="Black Swamp Overview" class="quest-location-image"> | |||
</div> | |||
</div> | |||
<div class="quest-section-content"></div> | |||
</div> | |||
<!-- Quest NPC Section --> | |||
<div class="quest-section"> | |||
<h5 class="quest-section-title">Quest NPC</h5> | |||
<div class="quest-section-icon"></div> | |||
<div class="image-container"> | |||
<a href="https://wikimirror.lifeto.co/wiki.ggftw.com/trickster/Hair_of_Rosetta_-_Daily_Quest_-_Black_Swamp.html" | |||
target="_blank"> | |||
<img | |||
src="https://wikimirror.lifeto.co/asset.103.ggftw.net/wiki/to-w/images/b/bf/Hair_of_Rosetta.gif" | |||
alt="Hair of Rosetta NPC"> | |||
</a> | |||
<strong><a | |||
href="https://wikimirror.lifeto.co/wiki.ggftw.com/trickster/Hair_of_Rosetta_-_Daily_Quest_-_Black_Swamp.html" | |||
target="_blank">Hair of Rosetta</a></strong> | |||
</div> | |||
<div class="quest-section-content"></div> | |||
<h5 class="quest-section-title">Requested Item</h5> | |||
<div class="quest-section-icon"></div> | |||
<div class="image-container"> | |||
<img src="https://wikimirror.lifeto.co/asset.103.ggftw.net/wiki/to-w/images/1/1c/Swamp_Leaf.gif" | |||
alt="Swamp Leaf"> | |||
<strong><a href="https://wikimirror.lifeto.co/wiki.ggftw.com/trickster/Swamp_Leaf.html" | |||
target="_blank">2x Swamp Leaf</a></strong> | |||
</div> | |||
<div class="quest-section-content"> | |||
<span class="quest-badge">Drillable Item</span> | |||
</div> | |||
</div> | |||
<!-- Rewards Section --> | |||
<div class="quest-section"> | |||
<h5 class="quest-rewards-title">Rewards</h5> | |||
<div class="quest-rewards-list"> | |||
<div class="quest-reward-item"> | |||
<div class="image-container"> | |||
<img | |||
src="https://wikimirror.lifeto.co/asset.103.ggftw.net/wiki/to-w/images/9/90/Crystal_Coupon.gif" | |||
alt="Daily Coupon"> | |||
1x Daily Coupon + | |||
</div> | |||
<div class="image-container"> | |||
<img src="https://mewsie.world/CoraTOWiki/images/0/06/Coracoupon.png" | |||
alt="Cora Coupon"> | |||
75% chance of 2x Cora Coupon </div> | |||
<div class="image-container"> | |||
<img src="https://wikimirror.lifeto.co/asset.103.ggftw.net/wiki/to-w/images/f/fe/Bonus_Egg.gif" | |||
alt="Bonus Eggs"> | |||
75% chance of 3x Bonus Eggs </div> | |||
</div> | |||
</div> | |||
</div> | |||
</div> | |||
</div> | |||
<!-- Location Details --> | |||
<div class="quest-location-details"> | |||
Hair of Rosetta, at the top right of Carbigal near Pastor Tau | |||
</div> | |||
<!-- Item Drop Information --> | |||
<div class="quest-drop-info"> | |||
Drillable in any Swamp Field | |||
</div> | |||
</div> | |||
</div> | |||
<div id="snow-hill-normal" class="nested-content"> | |||
<div class="quest-card"> | |||
<!-- Quest Header --> | |||
<div class="quest-header"> | |||
<h1 class="quest-title">Snow Hill Daily</h1> | |||
<span class="quest-type">Hunt</span> | |||
</div> | |||
<!-- Quest Sections Grid --> | |||
<div class="quest-sections"> | |||
<!-- Location Section --> | |||
<div class="quest-section"> | |||
<h5 class="quest-section-title">Location</h5> | |||
<div class="quest-section-icon"></div> | |||
<div class="quest-detail-item"> | |||
<div class="image-container"> | |||
<img src="https://mewsie.world/CoraTOWiki/images/6/69/SnowWinni.png" alt="Laplanoel Location" | |||
class="quest-location-image"> | |||
<strong><a href="https://wikimirror.lifeto.co/wiki.ggftw.com/trickster/Laplanoel.html" | |||
target="_blank">Laplanoel</a></strong> | |||
</div> | |||
</div> | |||
<div class="quest-detail-item"> | |||
<div class="image-container"> | |||
<img | |||
src="https://mewsie.world/CoraTOWiki/images/thumb/e/ea/Winnie_snow_hill.png/300px-Winnie_snow_hill.png" | |||
alt="Snow Hill Overview" class="quest-location-image"> | |||
</div> | |||
</div> | |||
<div class="quest-section-content"></div> | |||
</div> | |||
<!-- Quest NPC Section --> | |||
<div class="quest-section"> | |||
<h5 class="quest-section-title">Quest NPC</h5> | |||
<div class="quest-section-icon"></div> | |||
<div class="image-container"> | |||
<a href="https://wikimirror.lifeto.co/wiki.ggftw.com/trickster/Winnie_-_Daily_Quest_-_Snow_Hill.html" | |||
target="_blank"> | |||
<img src="https://wikimirror.lifeto.co/asset.103.ggftw.net/wiki/to-w/images/3/3d/Winnie.gif" | |||
alt="Winnie NPC"> | |||
</a> | |||
<strong><a | |||
href="https://wikimirror.lifeto.co/wiki.ggftw.com/trickster/Winnie_-_Daily_Quest_-_Snow_Hill.html" | |||
target="_blank">Winnie</a></strong> | |||
</div> | |||
<div class="quest-section-content"></div> | |||
<h5 class="quest-section-title">Requested Item</h5> | |||
<div class="quest-section-icon"></div> | |||
<div class="image-container"> | |||
<img src="https://wikimirror.lifeto.co/asset.103.ggftw.net/wiki/to-w/images/4/42/Magic_Crystal.gif" | |||
alt="Icicler's Crystal"> | |||
<strong><a href="https://wikimirror.lifeto.co/wiki.ggftw.com/trickster/Icicler%27s_Crystal.html" | |||
target="_blank">2x Icicler's Crystal</a></strong> | |||
</div> | |||
<div class="quest-section-content"> | |||
<span class="quest-badge">Guaranteed Drop</span> | |||
</div> | |||
</div> | |||
<!-- Rewards Section --> | |||
<div class="quest-section"> | |||
<h5 class="quest-rewards-title">Rewards</h5> | |||
<div class="quest-rewards-list"> | |||
<div class="quest-reward-item"> | |||
<div class="image-container"> | |||
<img | |||
src="https://wikimirror.lifeto.co/asset.103.ggftw.net/wiki/to-w/images/9/90/Crystal_Coupon.gif" | |||
alt="Daily Coupon"> | |||
1x Daily Coupon + | |||
</div> | |||
<div class="image-container"> | |||
<img | |||
src="https://wikimirror.lifeto.co/asset.103.ggftw.net/wiki/to-w/images/d/d6/100k_Galder_Check.gif" | |||
alt="Daily Coupon"> | |||
1x 100k Galder Check + | |||
</div> | |||
<div class="image-container"> | |||
<img src="https://mewsie.world/CoraTOWiki/images/0/06/Coracoupon.png" | |||
alt="Cora Coupon"> | |||
75% chance of 2x Cora Coupon </div> | |||
<div class="image-container"> | |||
<img src="https://wikimirror.lifeto.co/asset.103.ggftw.net/wiki/to-w/images/f/fe/Bonus_Egg.gif" | |||
alt="Bonus Eggs"> | |||
75% chance of 3x Bonus Eggs </div> | |||
</div> | |||
</div> | |||
</div> | |||
</div> | |||
</div> | |||
<!-- Location Details --> | |||
<div class="quest-location-details"> | |||
Winnie, at the bottom-right of Laplanoel town center | |||
</div> | |||
<!-- Item Drop Information --> | |||
<div class="quest-drop-info"> | |||
Guaranteed drop from <strong>Punisher Icicler</strong> in Snow Fields 1-4 <div class="image-container"> | |||
<img src="https://wikimirror.lifeto.co/asset.103.ggftw.net/wiki/to-w/images/3/3b/Icicler.gif" | |||
alt="Punisher Icicler"> | |||
<strong><a href="https://wikimirror.lifeto.co/wiki.ggftw.com/trickster/Punisher_Icicler.html" | |||
target="_blank">Punisher Icicler</a></strong> | |||
</div> | |||
</div> | |||
</div> | |||
</div> | |||
<div id="techichi-normal" class="nested-content"> | |||
<div class="quest-card"> | |||
<!-- Quest Header --> | |||
<div class="quest-header"> | |||
<h1 class="quest-title">Techichi Daily</h1> | |||
<span class="quest-type">Hunt</span> | |||
</div> | |||
<!-- Quest Sections Grid --> | |||
<div class="quest-sections"> | |||
<!-- Location Section --> | |||
<div class="quest-section"> | |||
<h5 class="quest-section-title">Location</h5> | |||
<div class="quest-section-icon"></div> | |||
<div class="quest-detail-item"> | |||
<div class="image-container"> | |||
<img src="https://mewsie.world/CoraTOWiki/images/thumb/6/6e/TechiStella.png/180px-TechiStella.png" | |||
alt="Neil's Camp Location" class="quest-location-image"> | |||
<strong><a href="https://wikimirror.lifeto.co/wiki.ggftw.com/trickster/Neil_Camp.html" | |||
target="_blank">Neil's Camp</a></strong> | |||
</div> | |||
</div> | |||
<div class="quest-detail-item"> | |||
<div class="image-container"> | |||
<img | |||
src="https://mewsie.world/CoraTOWiki/images/thumb/b/be/Stargazer_stella_neil_camp.png/300px-Stargazer_stella_neil_camp.png" | |||
alt="Techichi Overview" class="quest-location-image"> | |||
</div> | |||
</div> | |||
<div class="quest-section-content"></div> | |||
</div> | |||
<!-- Quest NPC Section --> | |||
<div class="quest-section"> | |||
<h5 class="quest-section-title">Quest NPC</h5> | |||
<div class="quest-section-icon"></div> | |||
<div class="image-container"> | |||
<img | |||
src="https://wikimirror.lifeto.co/asset.103.ggftw.net/wiki/to-w/images/e/e5/Star_Gazer_Stella.gif" | |||
alt="Star Gazer Stella NPC"> | |||
<strong><a | |||
href="https://wikimirror.lifeto.co/wiki.ggftw.com/trickster/Star_Gazer_Stella_-_Daily_Quest_-_Techichi_Volcano.html" | |||
target="_blank">Star Gazer Stella</a></strong> | |||
</div> | |||
<div class="quest-section-content"></div> | |||
<h5 class="quest-section-title">Requested Item</h5> | |||
<div class="quest-section-icon"></div> | |||
<div class="image-container"> | |||
<img | |||
src="https://wikimirror.lifeto.co/asset.103.ggftw.net/wiki/to-w/images/0/0c/Envelope_with_Photo.gif" | |||
alt="Stellar's Profile"> | |||
<strong><a href="https://wikimirror.lifeto.co/wiki.ggftw.com/trickster/Shtella%27s_Profile.html" | |||
target="_blank">1x Stella's Profile</a></strong> | |||
</div> | |||
<div class="quest-section-content"> | |||
<span class="quest-badge">Random Drop</span> | |||
</div> | |||
</div> | |||
<!-- Rewards Section --> | |||
<div class="quest-section"> | |||
<h5 class="quest-rewards-title">Rewards</h5> | |||
<div class="quest-rewards-list"> | |||
<div class="quest-reward-item"> | |||
<div class="image-container"> | |||
<img | |||
src="https://wikimirror.lifeto.co/asset.103.ggftw.net/wiki/to-w/images/9/90/Crystal_Coupon.gif" | |||
alt="Daily Coupon"> | |||
1x Daily Coupon + | |||
</div> | |||
<div class="image-container"> | |||
<img | |||
src="https://wikimirror.lifeto.co/asset.103.ggftw.net/wiki/to-w/images/d/d6/100k_Galder_Check.gif" | |||
alt="Daily Coupon"> | |||
1x 100k Galder Check + | |||
</div> | |||
<div class="image-container"> | |||
<img src="https://mewsie.world/CoraTOWiki/images/0/06/Coracoupon.png" | |||
alt="Cora Coupon"> | |||
75% chance of 2x Cora Coupon </div> | |||
<div class="image-container"> | |||
<img src="https://wikimirror.lifeto.co/asset.103.ggftw.net/wiki/to-w/images/f/fe/Bonus_Egg.gif" | |||
alt="Bonus Eggs"> | |||
75% chance of 3x Bonus Eggs </div> | |||
</div> | |||
</div> | |||
</div> | |||
</div> | |||
</div> | |||
<!-- Location Details --> | |||
<div class="quest-location-details"> | |||
Star Gazer Stella, bottom right of Neil's Camp by Kyu and the local drive-in | |||
</div> | |||
<!-- Item Drop Information --> | |||
<div class="quest-drop-info"> | |||
Random drop from monsters in: | |||
<ul> | |||
<li>Techichi Fields</li> | |||
<li>Tapasco Fields</li> | |||
</ul> | |||
<strong>NOTE</strong>: Requires <a | |||
href="https://wikimirror.lifeto.co/wiki.ggftw.com/trickster/Star_Gazing.html" target="_blank">Stella | |||
Reading Quest</a>!! | |||
</div> | |||
</div> | |||
</div> | |||
<div id="tapasco-normal" class="nested-content"> | |||
<div class="quest-card"> | |||
<!-- Quest Header --> | |||
<div class="quest-header"> | |||
<h1 class="quest-title">Tapasco Daily</h1> | |||
<span class="quest-type">Hunt</span> | |||
</div> | |||
<!-- Quest Sections Grid --> | |||
<div class="quest-sections"> | |||
<!-- Location Section --> | |||
<div class="quest-section"> | |||
<h5 class="quest-section-title">Location</h5> | |||
<div class="quest-section-icon"></div> | |||
<div class="quest-detail-item"> | |||
<div class="image-container"> | |||
<img src="https://mewsie.world/CoraTOWiki/images/3/3a/TapascoKerberos.png" | |||
alt="Gate of Tapasco Volcano Location" class="quest-location-image"> | |||
<strong><a href="https://wikimirror.lifeto.co/wiki.ggftw.com/trickster/Gate_of_Tapasco_Volcano.html" | |||
target="_blank">Gate of Tapasco Volcano</a></strong> | |||
</div> | |||
</div> | |||
<div class="quest-detail-item"> | |||
<div class="image-container"> | |||
<img | |||
src="https://mewsie.world/CoraTOWiki/images/thumb/f/fb/Guardian_kerberos_tap_gate.png/300px-Guardian_kerberos_tap_gate.png" | |||
alt="Tapasco Overview" class="quest-location-image"> | |||
</div> | |||
</div> | |||
<div class="quest-section-content"></div> | |||
</div> | |||
<!-- Quest NPC Section --> | |||
<div class="quest-section"> | |||
<h5 class="quest-section-title">Quest NPC</h5> | |||
<div class="quest-section-icon"></div> | |||
<div class="image-container"> | |||
<img | |||
src="https://wikimirror.lifeto.co/asset.103.ggftw.net/wiki/to-w/images/1/19/Guardian_Kerberos.gif" | |||
alt="Guardian Kerberos NPC"> | |||
<strong><a | |||
href="https://wikimirror.lifeto.co/wiki.ggftw.com/trickster/Guardian_Kerberos_-_Daily_Quest_-_Tapasco_Volcano.html" | |||
target="_blank">Guardian Kerberos</a></strong> | |||
</div> | |||
<div class="quest-section-content"></div> | |||
<h5 class="quest-section-title">Requested Item</h5> | |||
<div class="quest-section-icon"></div> | |||
<div class="image-container"> | |||
<img src="https://wikimirror.lifeto.co/asset.103.ggftw.net/wiki/to-w/images/6/6d/Yeongbi-Chon.gif" | |||
alt="HP Recovery Potion"> | |||
<strong><a href="https://wikimirror.lifeto.co/wiki.ggftw.com/trickster/HP_Recovery_Potion.html" | |||
target="_blank">2x HP Recovery Potion</a></strong> | |||
</div> | |||
<div class="quest-section-content"> | |||
<span class="quest-badge">Guaranteed Drop</span> | |||
</div> | |||
</div> | |||
<!-- Rewards Section --> | |||
<div class="quest-section"> | |||
<h5 class="quest-rewards-title">Rewards</h5> | |||
<div class="quest-rewards-list"> | |||
<div class="quest-reward-item"> | |||
<div class="image-container"> | |||
<img | |||
src="https://wikimirror.lifeto.co/asset.103.ggftw.net/wiki/to-w/images/9/90/Crystal_Coupon.gif" | |||
alt="Daily Coupon"> | |||
1x Daily Coupon + | |||
</div> | |||
<div class="image-container"> | |||
<img | |||
src="https://wikimirror.lifeto.co/asset.103.ggftw.net/wiki/to-w/images/d/d6/100k_Galder_Check.gif" | |||
alt="Daily Coupon"> | |||
1x 100k Galder Check + | |||
</div> | |||
<div class="image-container"> | |||
<img src="https://mewsie.world/CoraTOWiki/images/0/06/Coracoupon.png" | |||
alt="Cora Coupon"> | |||
75% chance of 2x Cora Coupon </div> | |||
<div class="image-container"> | |||
<img src="https://wikimirror.lifeto.co/asset.103.ggftw.net/wiki/to-w/images/f/fe/Bonus_Egg.gif" | |||
alt="Bonus Eggs"> | |||
75% chance of 3x Bonus Eggs </div> | |||
</div> | |||
</div> | |||
</div> | |||
</div> | |||
</div> | |||
<!-- Location Details --> | |||
<div class="quest-location-details"> | |||
Guardian Kerberos, directly below <a href="https://mewsie.world/CoraTOWiki/index.php/Hologramsie" | |||
target="_blank">Hologramsie</a> near the Tap 1 field portal at Tap Gate | |||
</div> | |||
<!-- Item Drop Information --> | |||
<div class="quest-drop-info"> | |||
Guaranteed drop from <strong>Punisher Fire Golem</strong> in Tap Fields 1-4 | |||
<div class="image-container"> | |||
<img src="https://wikimirror.lifeto.co/asset.103.ggftw.net/wiki/to-w/images/0/0e/Fire_Golem.gif" | |||
alt="Punisher Fire Golem"> | |||
<strong><a href="https://wikimirror.lifeto.co/wiki.ggftw.com/trickster/Punisher_Fire_Golem.html" | |||
target="_blank">Punisher Fire Golem</a></strong> | |||
</div> | |||
</div> | |||
</div> | |||
</div> | |||
<div id="abyss-normal" class="nested-content"> | |||
<div class="quest-card"> | |||
<!-- Quest Header --> | |||
<div class="quest-header"> | |||
<h1 class="quest-title">Abyss Daily</h1> | |||
<span class="quest-type">Drill</span> | |||
</div> | |||
<!-- Quest Sections Grid --> | |||
<div class="quest-sections"> | |||
<!-- Location Section --> | |||
<div class="quest-section"> | |||
<h5 class="quest-section-title">Location</h5> | |||
<div class="quest-section-icon"></div> | |||
<div class="quest-detail-item"> | |||
<div class="image-container"> | |||
<img src="https://mewsie.world/CoraTOWiki/images/a/a4/Platonia_location_sarah.png?20260325191127" alt="Abyss Location" | |||
class="quest-location-image"> | |||
<strong><a href="https://wikimirror.lifeto.co/wiki.ggftw.com/trickster/Abyss_Town_-_Platonia.html" | |||
target="_blank">Abyss Town - Platonia</a></strong> | |||
</div> | |||
</div> | |||
<div class="quest-detail-item"> | |||
<div class="image-container"> | |||
<img src="https://mewsie.world/CoraTOWiki/images/2/2f/Abyss_sarah_location.png?20260325190725" | |||
alt="Abyss Overview" class="quest-location-image"> | |||
</div> | |||
</div> | |||
<div class="quest-section-content"></div> | |||
</div> | |||
<!-- Quest NPC Section --> | |||
<div class="quest-section"> | |||
<h5 class="quest-section-title">Quest NPC</h5> | |||
<div class="quest-section-icon"></div> | |||
<div class="image-container"> | |||
<img src="https://wikimirror.lifeto.co/asset.103.ggftw.net/wiki/to-w/images/5/50/Madam_Sarah.gif" | |||
alt="Madam Sarah NPC"> | |||
<strong><a | |||
href="https://wikimirror.lifeto.co/wiki.ggftw.com/trickster/Madam_Sarah_-_Daily_Quest_-_Abyss.html" | |||
target="_blank">Madam Sarah</a></strong> | |||
</div> | |||
<div class="quest-section-content"></div> | |||
<h5 class="quest-section-title">Requested Item</h5> | |||
<div class="quest-section-icon"></div> | |||
<div class="image-container"> | |||
<img src="https://wikimirror.lifeto.co/asset.103.ggftw.net/wiki/to-w/images/d/d7/Orc_Cosh.gif" | |||
alt="Random Part"> | |||
<strong><a href="https://wikimirror.lifeto.co/wiki.ggftw.com/trickster/Random_Part.html" | |||
target="_blank">1x Random Part</a></strong> | |||
</div> | |||
<div class="image-container"> | |||
<img src="https://wikimirror.lifeto.co/asset.103.ggftw.net/wiki/to-w/images/5/58/Rusty_Bearing.gif" | |||
alt="Random Bearing"> | |||
<strong><a href="https://wikimirror.lifeto.co/wiki.ggftw.com/trickster/Random_Bearing.html" | |||
target="_blank">1x Random Bearing</a></strong> | |||
</div> | |||
<div class="quest-section-content"> | |||
<span class="quest-badge">Guaranteed Drop</span> | |||
</div> | |||
</div> | |||
<!-- Rewards Section --> | |||
<div class="quest-section"> | |||
<h5 class="quest-rewards-title">Rewards</h5> | |||
<div class="quest-rewards-list"> | |||
<div class="quest-reward-item"> | |||
<div class="image-container"> | |||
<img | |||
src="https://wikimirror.lifeto.co/asset.103.ggftw.net/wiki/to-w/images/9/90/Crystal_Coupon.gif" | |||
alt="Daily Coupon"> | |||
1x Daily Coupon + | |||
</div> | |||
<div class="image-container"> | |||
<img src="https://mewsie.world/CoraTOWiki/images/0/06/Coracoupon.png" | |||
alt="Cora Coupon"> | |||
75% chance of 2x Cora Coupon </div> | |||
<div class="image-container"> | |||
<img src="https://wikimirror.lifeto.co/asset.103.ggftw.net/wiki/to-w/images/f/fe/Bonus_Egg.gif" | |||
alt="Bonus Eggs"> | |||
75% chance of 3x Bonus Eggs </div> | |||
</div> | |||
</div> | |||
</div> | |||
</div> | |||
</div> | |||
<!-- Location Details --> | |||
<div class="quest-location-details"> | |||
Madam Sarah, at the top of Platonia | |||
</div> | |||
<!-- Item Drop Information --> | |||
<div class="quest-drop-info"> | |||
Drillable in any Abyss Field | |||
</div> | |||
</div> | |||
</div> | |||
</div> | |||
</section> | |||
<!----------------------------------------------------------- SHADOW DAILIES TAB -------------------------------------------------------> | |||
<section id="tab-shadow-dailies" class="tab-content" role="tabpanel"> | |||
<div class="section-header"> | |||
<h2>About Shadow Dailies</h2> | |||
<p class="section-lead">Shadow Dailies are special daily quests that require you to hunt Shadow monsters in exchange for Fortune Cards and Star Tears to extend your fortunes. | |||
These quests are available from level 180 and above.</p> | |||
</div> | |||
<div class="guide-section"> | |||
<div class="guide-content full-width"> | |||
<div class="info-box"> | |||
<p>Shadow Dailies are special dailies you can do after you obtain guardian to grind low to mid level drop | |||
rate fortune cards and Star Tears! If you do all 12 in a day, you can get unlimited fortune (each star | |||
tear covers 2h of fortune so 2*12=24!), but they are Star Tears EV, so you cannot trade them.</p> | |||
<span div class="quest-detail-label"> | |||
<img src="https://wikimirror.lifeto.co/asset.103.ggftw.net/wiki/to-w/images/f/fe/Stella_auto.gif" | |||
alt="Stella"> | |||
<strong>To see Stella</strong>, you must use Mind's Eye in the appropriate location.</span> | |||
<p>Each quest is guaranteed to drop both a Star Card Pack No. 5 and a Star Tears EV on this server.</p> | |||
</div> | |||
</div> | |||
</div> | |||
<!-- Nested Tabs for Shadow Dailies by Location and Level --> | |||
<nav class="nested-tabs" role="tablist"> | |||
<button class="nested-tab active" role="tab" aria-selected="true" data-tab="coral-town-lv180"><span | |||
class="full-text">Coral Town - Blooming Cora lv 180</span><span class="short-text">Coral | |||
Town</span></button> | |||
<button class="nested-tab" role="tab" aria-selected="false" data-tab="desert-town-lv180"><span | |||
class="full-text">Beach Town - Paradise lv 195</span><span class="short-text">Beach Town</span></button> | |||
<button class="nested-tab" role="tab" aria-selected="false" data-tab="megalopolis-lv180"><span | |||
class="full-text">Megalopolis Square lv 210</span><span class="short-text">Megalopolis</span></button> | |||
<button class="nested-tab" role="tab" aria-selected="false" data-tab="azteca-lv180"><span | |||
class="full-text">Azteca | |||
lv 225</span><span class="short-text">Azteca</span></button> | |||
<button class="nested-tab" role="tab" aria-selected="false" data-tab="oops-warf-lv180"><span | |||
class="full-text">Oops | |||
Warf lv 240</span><span class="short-text">Oops Warf</span></button> | |||
<button class="nested-tab" role="tab" aria-selected="false" data-tab="ghost-blue-lv180"><span | |||
class="full-text">Ghost Blue Seabed Town - Aquarius lv 255</span><span class="short-text">Ghost | |||
Blue</span></button> | |||
<button class="nested-tab" role="tab" aria-selected="false" data-tab="rose-garden-lv180"><span | |||
class="full-text">Event Garden - Ceremonia lv 270</span><span class="short-text">Event | |||
Garden</span></button> | |||
<button class="nested-tab" role="tab" aria-selected="false" data-tab="black-swamp-lv180"><span | |||
class="full-text">Swamp Town - Carbigal, lv 285</span><span class="short-text">Swamp Town</span></button> | |||
<button class="nested-tab" role="tab" aria-selected="false" data-tab="snow-hill-lv180"><span | |||
class="full-text">Snow | |||
Hill Town - Laplanoel lv 300</span><span class="short-text">Snow Hill</span></button> | |||
<button class="nested-tab" role="tab" aria-selected="false" data-tab="techichi-lv180"><span | |||
class="full-text">Techichi Town - Neil's Camp lv 315</span><span | |||
class="short-text">Techichi</span></button> | |||
<button class="nested-tab" role="tab" aria-selected="false" data-tab="tapasco-lv180"><span | |||
class="full-text">Gate of | |||
Tapasco Volcano lv 330</span><span class="short-text">Gate of Tapasco</span></button> | |||
<button class="nested-tab" role="tab" aria-selected="false" data-tab="abyss-town-lv345">Abyss Town - Platonia | |||
lv | |||
345</button> | |||
</nav> | |||
<!-- Nested content for each shadow daily location --> | |||
<div id="coral-town-lv180" class="nested-content active"> | |||
<div class="quest-card"> | |||
<!-- Quest Header --> | |||
<div class="quest-header"> | |||
<h1 class="quest-title">Coral Town Shadow Daily</h1> | |||
<span class="quest-type">Hunt</span> | |||
</div> | |||
<!-- Quest Sections Grid --> | |||
<div class="quest-sections"> | |||
<!-- Location Section --> | |||
<div class="quest-section"> | |||
<h5 class="quest-section-title">Location</h5> | |||
<div class="quest-section-icon"></div> | |||
<div class="quest-detail-item"> | |||
<div class="image-container"> | |||
<img src="https://mewsie.world/CoraTOWiki/images/7/78/Stella_shadow_location_blooming_cora.png" | |||
alt="Coral Town Map" class="quest-location-image"> | |||
<strong><a href="https://wikimirror.lifeto.co/wiki.ggftw.com/trickster/Stella_-_Shadow_Star_1.html" | |||
target="_blank">Coral Town - Blooming Cora</a></strong> | |||
</div> | |||
</div> | |||
<div class="quest-section-content"> | |||
<span class="quest-badge">Level 180 Required</span> | |||
</div> | |||
</div> | |||
<!-- Requested Item Section --> | |||
<div class="quest-section"> | |||
<h5 class="quest-section-title">Requested Item</h5> | |||
<div class="quest-section-icon"></div> | |||
<div class="image-container"> | |||
<img src="https://mewsie.world/CoraTOWiki/images/a/a1/Giant_nail.png" alt="Giant Nail"> | |||
<strong><a href="https://wikimirror.lifeto.co/wiki.ggftw.com/trickster/Giant_Nail.html" | |||
target="_blank">5x Giant Nail</a></strong> | |||
</div> | |||
<div class="quest-section-content"> | |||
<span class="quest-badge">Shadow Drop</span> | |||
</div> | |||
</div> | |||
</div> | |||
<!-- Item Drop Information --> | |||
<div class="quest-drop-info"> | |||
<strong>Monsters:</strong> | |||
<div class="image-grid"> | |||
<div class="image-container"> | |||
<img class="image-container" width="100" | |||
src="https://mewsie.world/CoraTOWiki/images/3/35/Tottochi_gif.gif" alt="Shadow Totochi"> | |||
<strong><br>Shadow Totochi (Field 1)</strong> | |||
</div> | |||
<div class="image-container"> | |||
<img class="image-container" src="https://mewsie.world/CoraTOWiki/images/8/8e/Clione_gif.gif" | |||
alt="Shadow Clione"> | |||
<strong>Shadow Clione (Field 3)</strong> | |||
</div> | |||
<div class="image-container"> | |||
<img class="image-container" width="90" | |||
src="https://mewsie.world/CoraTOWiki/images/d/d2/Thiefmon_gif.gif" alt="Shadow Thiefmon"> | |||
<strong><br>Shadow Thiefmon (Field 3)</strong> | |||
</div> | |||
</div> | |||
</div> | |||
</div> | |||
</div> | |||
<div id="desert-town-lv180" class="nested-content"> | |||
<div class="quest-card"> | |||
<!-- Quest Header --> | |||
<div class="quest-header"> | |||
<h1 class="quest-title">Desert Town Shadow Daily</h1> | |||
<span class="quest-type">Hunt</span> | |||
</div> | |||
<!-- Quest Sections Grid --> | |||
<div class="quest-sections"> | |||
<!-- Location Section --> | |||
<div class="quest-section"> | |||
<h5 class="quest-section-title">Location</h5> | |||
<div class="quest-section-icon"></div> | |||
<div class="quest-detail-item"> | |||
<div class="image-container"> | |||
<img src="https://mewsie.world/CoraTOWiki/images/b/bb/Stella_location_paradise.png" | |||
alt="Desert Town Map" class="quest-location-image"> | |||
<strong><a href="https://wikimirror.lifeto.co/wiki.ggftw.com/trickster/Stella_-_Shadow_Star_2.html" | |||
target="_blank">Beach Town - Paradise</a></strong> | |||
</div> | |||
</div> | |||
<div class="quest-section-content"> | |||
<span class="quest-badge">Level 195 Required</span> | |||
</div> | |||
</div> | |||
<!-- Requested Item Section --> | |||
<div class="quest-section"> | |||
<h5 class="quest-section-title">Requested Item</h5> | |||
<div class="quest-section-icon"></div> | |||
<div class="image-container"> | |||
<img src="https://mewsie.world/CoraTOWiki/images/6/65/Talisman_of_darkness_icon.png" | |||
alt="Broken Cannonball"> | |||
<strong><a href="https://wikimirror.lifeto.co/wiki.ggftw.com/trickster/Talisman_of_Darkness.html" | |||
target="_blank">5x Talisman of Darkness</a></strong> | |||
</div> | |||
<div class="quest-section-content"> | |||
<span class="quest-badge">Shadow Drop</span> | |||
</div> | |||
</div> | |||
</div> | |||
<!-- Item Drop Information --> | |||
<div class="quest-drop-info"> | |||
<strong>Monsters:</strong> | |||
<div class="image-grid"> | |||
<div class="image-container"> | |||
<img class="image-container" src="https://mewsie.world/CoraTOWiki/images/3/3e/Shell_Trap_gif.gif" | |||
alt="Shadow Shell Trap"> | |||
<strong><br>Shadow Shell Trap (Field 1)</strong> | |||
</div> | |||
<div class="image-container"> | |||
<img class="image-container" width="75" src="https://mewsie.world/CoraTOWiki/images/3/38/Mole_gif.gif" | |||
alt="Shadow Golden Mole"> | |||
<strong>Shadow Golden Mole (Field 1)</strong> | |||
</div> | |||
<div class="image-container"> | |||
<img class="image-container" width="105" | |||
src="https://mewsie.world/CoraTOWiki/images/f/f5/Fanta_Fish_gif.gif" alt="Shadow Fanta Fish"> | |||
<strong>Shadow Fanta Fish (Field 2)</strong> | |||
</div> | |||
<div class="image-container"> | |||
<img class="image-container" src="https://mewsie.world/CoraTOWiki/images/d/db/Sand_Demon_gif.gif" | |||
alt="Shadow Sand Demon"> | |||
<strong>Shadow Sand Demon (Field 3)</strong> | |||
</div> | |||
<div class="image-container"> | |||
<img class="image-container" width="80" | |||
src="https://mewsie.world/CoraTOWiki/images/3/3a/Pineapple_gif.gif" alt="Shadow Pineapple"> | |||
<strong>Shadow Pineapple (Field 3)</strong> | |||
</div> | |||
<div class="image-container"> | |||
<img class="image-container" src="https://mewsie.world/CoraTOWiki/images/6/61/Fan_Lizard_gif.gif" | |||
alt="Shadow Fan Lizard"> | |||
<strong>Shadow Fan Lizard (Field 4)</strong> | |||
</div> | |||
<div class="image-container"> | |||
<img class="image-container" src="https://mewsie.world/CoraTOWiki/images/e/e8/Cannon_Shell_gif.gif" | |||
alt="Shadow Cannon Shell"> | |||
<strong>Shadow Cannon Shell (Field 4)</strong> | |||
</div> | |||
</div> | |||
</div> | |||
</div> | |||
</div> | |||
<div id="megalopolis-lv180" class="nested-content"> | |||
<div class="quest-card"> | |||
<!-- Quest Header --> | |||
<div class="quest-header"> | |||
<h1 class="quest-title">Megalopolis Shadow Daily</h1> | |||
<span class="quest-type">Hunt</span> | |||
</div> | |||
<!-- Quest Sections Grid --> | |||
<div class="quest-sections"> | |||
<!-- Location Section --> | |||
<div class="quest-section"> | |||
<h5 class="quest-section-title">Location</h5> | |||
<div class="quest-section-icon"></div> | |||
<div class="quest-detail-item"> | |||
<div class="image-container"> | |||
<img src="https://mewsie.world/CoraTOWiki/images/3/34/Stella_mega_location.png" | |||
alt="Megalopolis Map" class="quest-location-image"> | |||
<strong><a href="https://wikimirror.lifeto.co/wiki.ggftw.com/trickster/Stella_-_Shadow_Star_3.html" | |||
target="_blank">Megalopolis Square</a></strong> | |||
</div> | |||
</div> | |||
<div class="quest-section-content"> | |||
<span class="quest-badge">Level 210 Required</span> | |||
</div> | |||
</div> | |||
<!-- Requested Item Section --> | |||
<div class="quest-section"> | |||
<h5 class="quest-section-title">Requested Item</h5> | |||
<div class="quest-section-icon"></div> | |||
<div class="image-container"> | |||
<img src="https://mewsie.world/CoraTOWiki/images/a/a0/Hammer_item_icon.png" alt="Broken Glasses"> | |||
<strong><a href="https://wikimirror.lifeto.co/wiki.ggftw.com/trickster/Petite_Hammer.html" | |||
target="_blank">5x Petite Hammer</a></strong> | |||
</div> | |||
<div class="quest-section-content"> | |||
<span class="quest-badge">Shadow Drop</span> | |||
</div> | |||
</div> | |||
</div> | |||
<!-- Item Drop Information --> | |||
<div class="quest-drop-info"> | |||
<strong>Monsters:</strong> | |||
<div class="image-grid"> | |||
<div class="image-container"> | |||
<img class="image-container" width="95" | |||
src="https://mewsie.world/CoraTOWiki/images/6/6a/Green_Chipmunk_gif.gif" alt="Shadow Queen Yamu"> | |||
<strong><br>Shadow Queen Yamu (Southeast Forest)</strong> | |||
</div> | |||
<div class="image-container"> | |||
<img class="image-container" src="https://mewsie.world/CoraTOWiki/images/2/25/Wasp_gif.gif" | |||
alt="Shadow Forest Wasp"> | |||
<strong>Shadow Forest Wasp (Southwest Forest)</strong> | |||
</div> | |||
<div class="image-container"> | |||
<img class="image-container" src="https://mewsie.world/CoraTOWiki/images/5/58/Mantis_gif.gif" | |||
alt="Shadow Forest Mantis"> | |||
<strong>Shadow Forest Mantis (Southwest Forest)</strong> | |||
</div> | |||
</div> | |||
</div> | |||
</div> | |||
</div> | |||
<div id="azteca-lv180" class="nested-content"> | |||
<div class="quest-card"> | |||
<!-- Quest Header --> | |||
<div class="quest-header"> | |||
<h1 class="quest-title">Azteca Shadow Daily</h1> | |||
<span class="quest-type">Hunt</span> | |||
</div> | |||
<!-- Quest Sections Grid --> | |||
<div class="quest-sections"> | |||
<!-- Location Section --> | |||
<div class="quest-section"> | |||
<h5 class="quest-section-title">Location</h5> | |||
<div class="quest-section-icon"></div> | |||
<div class="quest-detail-item"> | |||
<div class="image-container"> | |||
<img src="https://mewsie.world/CoraTOWiki/images/f/fc/Stella_location_azteca.png" alt="Azteca Map" | |||
class="quest-location-image"> | |||
<strong class="image-caption"><a | |||
href="https://wikimirror.lifeto.co/wiki.ggftw.com/trickster/Stella_-_Shadow_Star_4.html" | |||
target="_blank">Relics Town - Azteca</a></strong> | |||
</div> | |||
</div> | |||
<div class="quest-section-content"> | |||
<span class="quest-badge">Level 225 Required</span> | |||
</div> | |||
</div> | |||
<!-- Requested Item Section --> | |||
<div class="quest-section"> | |||
<h5 class="quest-section-title">Requested Item</h5> | |||
<div class="quest-section-icon"></div> | |||
<div class="image-container"> | |||
<img src="https://mewsie.world/CoraTOWiki/images/6/6e/Lock_of_hair_icon.png" alt="Broken Staff"> | |||
<strong class="image-caption"><a | |||
href="https://wikimirror.lifeto.co/wiki.ggftw.com/trickster/Lock_of_Hair.html" target="_blank">5x | |||
Lock of Hair</a></strong> | |||
</div> | |||
<div class="quest-section-content"> | |||
<span class="quest-badge">Shadow Drop</span> | |||
</div> | |||
</div> | |||
</div> | |||
<!-- Monsters Section --> | |||
<div class="quest-drop-info"> | |||
<strong>Monsters:</strong> | |||
<div class="image-grid"> | |||
<div class="image-container"> | |||
<img class="image-container" src="https://mewsie.world/CoraTOWiki/images/5/5a/Mandragora_gif.gif" | |||
alt="Shadow Mandragora"> | |||
<strong><br>Shadow Mandragora (Path to, Field 1)</strong> | |||
</div> | |||
<div class="image-container"> | |||
<img class="image-container" src="https://mewsie.world/CoraTOWiki/images/f/f2/Aposis_gif.gif" | |||
alt="Shadow Aposis"> | |||
<strong>Shadow Aposis (Field 3, Field 4)</strong> | |||
</div> | |||
</div> | |||
</div> | |||
</div> | |||
</div> | |||
<div id="oops-warf-lv180" class="nested-content"> | |||
<div class="quest-card"> | |||
<!-- Quest Header --> | |||
<div class="quest-header"> | |||
<h1 class="quest-title">Oops Warf Shadow Daily</h1> | |||
<span class="quest-type">Hunt</span> | |||
</div> | |||
<!-- Quest Sections Grid --> | |||
<div class="quest-sections"> | |||
<!-- Location Section --> | |||
<div class="quest-section"> | |||
<h5 class="quest-section-title">Location</h5> | |||
<div class="quest-section-icon"></div> | |||
<div class="quest-detail-item"> | |||
<div class="image-container"> | |||
<img src="https://mewsie.world/CoraTOWiki/images/7/75/Stella_location_oops.png" alt="Oops Warf Map" | |||
class="quest-location-image"> | |||
<strong class="image-caption"><a | |||
href="https://wikimirror.lifeto.co/wiki.ggftw.com/trickster/Stella_-_Shadow_Star_5.html" | |||
target="_blank">Oops Wharf</a></strong> | |||
</div> | |||
</div> | |||
<div class="quest-section-content"> | |||
<span class="quest-badge">Level 240 Required</span> | |||
</div> | |||
</div> | |||
<!-- Requested Item Section --> | |||
<div class="quest-section"> | |||
<h5 class="quest-section-title">Requested Item</h5> | |||
<div class="quest-section-icon"></div> | |||
<div class="image-container"> | |||
<img src="https://mewsie.world/CoraTOWiki/images/7/7b/Hair_tie_icon.png" alt="Broken Anchor"> | |||
<strong class="image-caption"><a | |||
href="https://wikimirror.lifeto.co/wiki.ggftw.com/trickster/Hair_Tie.html" target="_blank">5x Hair | |||
Tie</a></strong> | |||
</div> | |||
<div class="quest-section-content"> | |||
<span class="quest-badge">Shadow Drop</span> | |||
</div> | |||
</div> | |||
</div> | |||
<!-- Monsters Section --> | |||
<div class="quest-drop-info"> | |||
<strong>Monsters:</strong> | |||
<div class="image-grid"> | |||
<div class="image-container"> | |||
<img class="image-container" src="https://mewsie.world/CoraTOWiki/images/9/9e/Sea_Tiger_gif.gif" | |||
alt="Shadow Sea Tiger"> | |||
<strong>Shadow Sea Tiger (Path to Oops)</strong> | |||
</div> | |||
<div class="image-container"> | |||
<img class="image-container" width="90" src="https://mewsie.world/CoraTOWiki/images/d/d8/Quiem.gif" | |||
alt="Shadow Quiem"> | |||
<strong>Shadow Quiem (Oops Field 1, Field 3)</strong> | |||
</div> | |||
<div class="image-container"> | |||
<img class="image-container" src="https://mewsie.world/CoraTOWiki/images/6/6c/Crow.gif" | |||
alt="Shadow Crow"> | |||
<strong>Shadow Crow (Oops Field 2, Field 3)</strong> | |||
</div> | |||
<div class="image-container"> | |||
<img class="image-container" width="120" | |||
src="https://mewsie.world/CoraTOWiki/images/d/d2/Black_Foe.gif" alt="Shadow Black Foe"> | |||
<strong><br>Shadow Black Foe (Oops Field 4)</strong> | |||
</div> | |||
<div class="image-container"> | |||
<img class="image-container" width="105" | |||
src="https://mewsie.world/CoraTOWiki/images/e/e1/Master_Foe.gif" alt="Shadow Master Foe"> | |||
<strong>Shadow Master Foe (Oops Field 4)</strong> | |||
</div> | |||
<div class="image-container"> | |||
<img class="image-container" src="https://mewsie.world/CoraTOWiki/images/7/73/Mermaid_Little.gif" | |||
alt="Shadow Mermaid Little"> | |||
<strong>Shadow Mermaid Little (Mermaid Field 1, Field 2)</strong> | |||
</div> | |||
<div class="image-container"> | |||
<img class="image-container" width="140" | |||
src="https://mewsie.world/CoraTOWiki/images/0/0c/Fish_Guardian_Tink.gif" | |||
alt="Shadow Fish Guardian Tink"> | |||
<strong>Shadow Fish Guardian Tink (Mermaid Field 2, Field 3)</strong> | |||
</div> | |||
<div class="image-container"> | |||
<img class="image-container" src="https://mewsie.world/CoraTOWiki/images/8/88/Fish_Guardian_Bell.gif" | |||
alt="Shadow Fish Guardian Bell"> | |||
<strong>Shadow Fish Guardian Bell (Mermaid Field 3)</strong> | |||
</div> | |||
<div class="image-container"> | |||
<img class="image-container" src="https://mewsie.world/CoraTOWiki/images/f/f0/Merman_Aku.gif" | |||
alt="Shadow Merman Aku"> | |||
<strong>Shadow Merman Aku (Mermaid Field 4)</strong> | |||
</div> | |||
<div class="image-container"> | |||
<img class="image-container" src="https://mewsie.world/CoraTOWiki/images/6/65/Merman_Ale.gif" | |||
alt="Shadow Merman Ale"> | |||
<strong>Shadow Merman Ale (Mermaid Field 4)</strong> | |||
</div> | |||
</div> | |||
</div> | |||
</div> | |||
</div> | |||
<div id="ghost-blue-lv180" class="nested-content"> | |||
<div class="quest-card"> | |||
<!-- Quest Header --> | |||
<div class="quest-header"> | |||
<h1 class="quest-title">Ghost Blue Shadow Daily</h1> | |||
<span class="quest-type">Hunt</span> | |||
</div> | |||
<!-- Quest Sections Grid --> | |||
<div class="quest-sections"> | |||
<!-- Location Section --> | |||
<div class="quest-section"> | |||
<h5 class="quest-section-title">Location</h5> | |||
<div class="quest-section-icon"></div> | |||
<div class="quest-detail-item"> | |||
<div class="image-container"> | |||
<img src="https://mewsie.world/CoraTOWiki/images/6/6c/Stella_location_aquarius.png" | |||
alt="Ghost Blue Map" class="quest-location-image"> | |||
<strong><a href="https://wikimirror.lifeto.co/wiki.ggftw.com/trickster/Stella_-_Shadow_Star_6.html" | |||
target="_blank">Ghost Blue Seabed Town - Aquarius</a></strong> | |||
</div> | |||
</div> | |||
<div class="quest-section-content"> | |||
<span class="quest-badge">Level 255 Required</span> | |||
</div> | |||
</div> | |||
<!-- Requested Item Section --> | |||
<div class="quest-section"> | |||
<h5 class="quest-section-title">Requested Item</h5> | |||
<div class="quest-section-icon"></div> | |||
<div class="image-container"> | |||
<img src="https://mewsie.world/CoraTOWiki/images/f/fc/Candle_icon.png" alt="Broken Trident"> | |||
<strong><a href="https://wikimirror.lifeto.co/wiki.ggftw.com/trickster/Candle_of_Shadow.html" | |||
target="_blank">5x Candle of Shadow</a></strong> | |||
</div> | |||
<div class="quest-section-content"> | |||
<span class="quest-badge">Shadow Drop</span> | |||
</div> | |||
</div> | |||
</div> | |||
<!-- Monsters Section --> | |||
<div class="quest-drop-info"> | |||
<strong>Monsters:</strong> | |||
<div class="image-grid"> | |||
<div class="image-container"> | |||
<img class="image-container" src="https://mewsie.world/CoraTOWiki/images/3/3a/Plug_Bat.gif" | |||
alt="Shadow Plug Bat"> | |||
<strong>Shadow Plug Bat (Path to 1, Path to 2)</strong> | |||
</div> | |||
<div class="image-container"> | |||
<img class="image-container" width="120" | |||
src="https://mewsie.world/CoraTOWiki/images/8/8b/Pirate_Boxer.gif" alt="Shadow Pirate Boxer"> | |||
<strong>Shadow Pirate Boxer (Path to 2)</strong> | |||
</div> | |||
<div class="image-container"> | |||
<img class="image-container" src="https://mewsie.world/CoraTOWiki/images/9/91/Torpedo_Fish.gif" | |||
alt="Shadow Torpedo Fish"> | |||
<strong>Shadow Torpedo Fish (Field 2, Field 3)</strong> | |||
</div> | |||
<div class="image-container"> | |||
<img class="image-container" width="87" | |||
src="https://mewsie.world/CoraTOWiki/images/0/0d/Cora_Pyupyu.gif" alt="Shadow Cora Pyupyu"> | |||
<strong>Shadow Cora Pyupyu (Field 2, Field 3)</strong> | |||
</div> | |||
<div class="image-container"> | |||
<img class="image-container" src="https://mewsie.world/CoraTOWiki/images/c/ce/Siremaid.gif" | |||
alt="Shadow Siremaid"> | |||
<strong>Shadow Siremaid (Field 4)</strong> | |||
</div> | |||
<div class="image-container"> | |||
<img class="image-container" src="https://mewsie.world/CoraTOWiki/images/a/a6/Pirate_Ghost.gif" | |||
alt="Shadow Pirate Ghost"> | |||
<strong>Shadow Pirate Ghost (Field 4)</strong> | |||
</div> | |||
</div> | |||
</div> | |||
</div> | |||
</div> | |||
<div id="rose-garden-lv180" class="nested-content"> | |||
<div class="quest-card"> | |||
<!-- Quest Header --> | |||
<div class="quest-header"> | |||
<h1 class="quest-title">Rose Garden Shadow Daily</h1> | |||
<span class="quest-type">Hunt</span> | |||
</div> | |||
<!-- Quest Sections Grid --> | |||
<div class="quest-sections"> | |||
<!-- Location Section --> | |||
<div class="quest-section"> | |||
<h5 class="quest-section-title">Location</h5> | |||
<div class="quest-section-icon"></div> | |||
<div class="quest-detail-item"> | |||
<div class="image-container"> | |||
<img src="https://mewsie.world/CoraTOWiki/images/6/64/Stella_location_event_garden.png" | |||
alt="Rose Garden Map" class="quest-location-image"> | |||
<strong><a href="https://wikimirror.lifeto.co/wiki.ggftw.com/trickster/Stella_-_Shadow_Star_7.html" | |||
target="_blank">Event Garden - Ceremonia</a></strong> | |||
</div> | |||
</div> | |||
<div class="quest-section-content"> | |||
<span class="quest-badge">Level 270 Required</span> | |||
</div> | |||
</div> | |||
<!-- Requested Item Section --> | |||
<div class="quest-section"> | |||
<h5 class="quest-section-title">Requested Item</h5> | |||
<div class="quest-section-icon"></div> | |||
<div class="image-container"> | |||
<img src="https://mewsie.world/CoraTOWiki/images/c/c3/Needle.png" alt="Broken Claw"> | |||
<strong><a href="https://wikimirror.lifeto.co/wiki.ggftw.com/trickster/Sharp_Needle.html" | |||
target="_blank">5x Sharp Needle</a></strong> | |||
</div> | |||
<div class="quest-section-content"> | |||
<span class="quest-badge">Shadow Drop</span> | |||
</div> | |||
</div> | |||
</div> | |||
<!-- Monsters Section --> | |||
<div class="quest-drop-info"> | |||
<strong>Monsters:</strong> | |||
<div class="image-grid"> | |||
<div class="image-container"> | |||
<img class="image-container" src="https://mewsie.world/CoraTOWiki/images/3/38/Dancer_Isabelle.gif" | |||
alt="Shadow Dancer Isabelle"> | |||
<strong>Shadow Dancer Isabelle (Field 1)</strong> | |||
</div> | |||
<div class="image-container"> | |||
<img class="image-container" src="https://mewsie.world/CoraTOWiki/images/3/34/Captain_Charman.gif" | |||
alt="Shadow Captain Charman"> | |||
<strong>Shadow Captain Charman (Field 2)</strong> | |||
</div> | |||
<div class="image-container"> | |||
<img class="image-container" src="https://mewsie.world/CoraTOWiki/images/d/d2/Captain_Arman.gif" | |||
alt="Shadow Captain Arman"> | |||
<strong>Shadow Captain Arman (Field 2)</strong> | |||
</div> | |||
<div class="image-container"> | |||
<img class="image-container" width="115" | |||
src="https://mewsie.world/CoraTOWiki/images/3/3c/Madam_Fondue.gif" alt="Shadow Madam Fondue"> | |||
<strong>Shadow Madam Fondue (Field 3, Field 4)</strong> | |||
</div> | |||
<div class="image-container"> | |||
<img class="image-container" src="https://mewsie.world/CoraTOWiki/images/8/81/Beast_Vincento.gif" | |||
alt="Shadow Beast Vincento"> | |||
<strong>Shadow Beast Vincento (Field 4)</strong> | |||
</div> | |||
</div> | |||
</div> | |||
</div> | |||
</div> | |||
<div id="black-swamp-lv180" class="nested-content"> | |||
<div class="quest-card"> | |||
<!-- Quest Header --> | |||
<div class="quest-header"> | |||
<h1 class="quest-title">Black Swamp Shadow Daily</h1> | |||
<span class="quest-type">Hunt</span> | |||
</div> | |||
<!-- Quest Sections Grid --> | |||
<div class="quest-sections"> | |||
<!-- Location Section --> | |||
<div class="quest-section"> | |||
<h5 class="quest-section-title">Location</h5> | |||
<div class="quest-section-icon"></div> | |||
<div class="quest-detail-item"> | |||
<div class="image-container"> | |||
<img src="https://mewsie.world/CoraTOWiki/images/2/28/Stella_location_swamp.png" | |||
alt="Black Swamp Map" class="quest-location-image"> | |||
<strong><a href="https://wikimirror.lifeto.co/wiki.ggftw.com/trickster/Stella_-_Shadow_Star_8.html" | |||
target="_blank">Swamp Town - Carbigal</a></strong> | |||
</div> | |||
</div> | |||
<div class="quest-section-content"> | |||
<span class="quest-badge">Level 285 Required</span> | |||
</div> | |||
</div> | |||
<!-- Requested Item Section --> | |||
<div class="quest-section"> | |||
<h5 class="quest-section-title">Requested Item</h5> | |||
<div class="quest-section-icon"></div> | |||
<div class="image-container"> | |||
<img src="https://mewsie.world/CoraTOWiki/images/3/37/Blueflames.png" alt="Broken Leaf"> | |||
<strong><a href="https://wikimirror.lifeto.co/wiki.ggftw.com/trickster/Shadow_Flames.html" | |||
target="_blank">5x Shadow Flames</a></strong> | |||
</div> | |||
<div class="quest-section-content"> | |||
<span class="quest-badge">Shadow Drop</span> | |||
</div> | |||
</div> | |||
</div> | |||
<!-- Item Drop Information --> | |||
<div class="quest-drop-info"> | |||
<strong>Monsters:</strong> | |||
<div class="image-grid"> | |||
<div class="image-container"> | |||
<img class="image-container" width="137" src="https://mewsie.world/CoraTOWiki/images/a/aa/Monkya.gif" | |||
alt="Shadow Monkya"> | |||
<strong><br>Shadow Monkya (Field 3)</strong> | |||
</div> | |||
<div class="image-container"> | |||
<img class="image-container" width="130" src="https://mewsie.world/CoraTOWiki/images/9/94/Arachne.gif" | |||
alt="Shadow Arachne"> | |||
<strong>Shadow Arachne (Field 4, Field 5, Field 6)</strong> | |||
</div> | |||
<div class="image-container"> | |||
<img class="image-container" width="120" | |||
src="https://mewsie.world/CoraTOWiki/images/6/6b/Mud_Bigfoot.gif" alt="Shadow Mud Bigfoot"> | |||
<strong>Shadow Mud Bigfoot (Field 6)</strong> | |||
</div> | |||
</div> | |||
</div> | |||
</div> | |||
</div> | |||
<div id="snow-hill-lv180" class="nested-content"> | |||
<div class="quest-card"> | |||
<!-- Quest Header --> | |||
<div class="quest-header"> | |||
<h1 class="quest-title">Snow Hill Shadow Daily</h1> | |||
<span class="quest-type">Hunt</span> | |||
</div> | |||
<!-- Quest Sections Grid --> | |||
<div class="quest-sections"> | |||
<!-- Location Section --> | |||
<div class="quest-section"> | |||
<h5 class="quest-section-title">Location</h5> | |||
<div class="quest-section-icon"></div> | |||
<div class="quest-detail-item"> | |||
<div class="image-container"> | |||
<img src="https://mewsie.world/CoraTOWiki/images/3/3b/Stella_location_snow_hill.png" | |||
alt="Snow Hill Map" class="quest-location-image"> | |||
<strong><a href="https://wikimirror.lifeto.co/wiki.ggftw.com/trickster/Stella_-_Shadow_Star_9.html" | |||
target="_blank">Snow Hill Town - Laplanoel</a></strong> | |||
</div> | |||
</div> | |||
<div class="quest-section-content"> | |||
<span class="quest-badge">Level 300 Required</span> | |||
</div> | |||
</div> | |||
<!-- Requested Item Section --> | |||
<div class="quest-section"> | |||
<h5 class="quest-section-title">Requested Item</h5> | |||
<div class="quest-section-icon"></div> | |||
<div class="image-container"> | |||
<img src="https://mewsie.world/CoraTOWiki/images/a/a3/Grass_doll.png" alt="Broken Ice Crystal"> | |||
<strong><a href="https://wikimirror.lifeto.co/wiki.ggftw.com/trickster/Voodoo_Doll.html" | |||
target="_blank">5x Voodoo Doll</a></strong> | |||
</div> | |||
<div class="quest-section-content"> | |||
<span class="quest-badge">Shadow Drop</span> | |||
</div> | |||
</div> | |||
</div> | |||
<!-- Item Drop Information --> | |||
<div class="quest-drop-info"> | |||
<strong>Monsters:</strong> | |||
<div class="image-grid"> | |||
<div class="image-container"> | |||
<img class="image-container" src="https://mewsie.world/CoraTOWiki/images/8/83/Joker.gif" | |||
alt="Shadow Joker"> | |||
<strong>Shadow Joker (Northwest Forest, Frost Forest 1)</strong> | |||
</div> | |||
<div class="image-container"> | |||
<img class="image-container" width="115" src="https://mewsie.world/CoraTOWiki/images/b/b3/Goma.gif" | |||
alt="Shadow Goma"> | |||
<strong>Shadow Goma (Frost Forest 1, Frost Forest 2)</strong> | |||
</div> | |||
<div class="image-container"> | |||
<img class="image-container" width="130" | |||
src="https://mewsie.world/CoraTOWiki/images/6/62/Santa_Bear.gif" alt="Shadow Santa Bear"> | |||
<strong>Shadow Santa Bear (Field 2)</strong> | |||
</div> | |||
<div class="image-container"> | |||
<img class="image-container" src="https://mewsie.world/CoraTOWiki/images/5/5f/Ice_Cream.gif" | |||
alt="Shadow Ice Cream"> | |||
<strong>Shadow Ice Cream (Field 3)</strong> | |||
</div> | |||
<div class="image-container"> | |||
<img class="image-container" src="https://mewsie.world/CoraTOWiki/images/e/e9/Yeti.gif" | |||
alt="Shadow Yeti"> | |||
<strong>Shadow Yeti (Field 3)</strong> | |||
</div> | |||
<div class="image-container"> | |||
<img class="image-container" src="https://mewsie.world/CoraTOWiki/images/3/3b/Icicler.gif" | |||
alt="Shadow Icicler"> | |||
<strong>Shadow Icicler (Field 4)</strong> | |||
</div> | |||
</div> | |||
</div> | |||
</div> | |||
</div> | |||
<div id="techichi-lv180" class="nested-content"> | |||
<div class="quest-card"> | |||
<!-- Quest Header --> | |||
<div class="quest-header"> | |||
<h1 class="quest-title">Techichi Shadow Daily</h1> | |||
<span class="quest-type">Hunt</span> | |||
</div> | |||
<!-- Quest Sections Grid --> | |||
<div class="quest-sections"> | |||
<!-- Location Section --> | |||
<div class="quest-section"> | |||
<h5 class="quest-section-title">Location</h5> | |||
<div class="quest-section-icon"></div> | |||
<div class="quest-detail-item"> | |||
<div class="image-container"> | |||
<img src="https://mewsie.world/CoraTOWiki/images/5/53/Stella_location_techichi.png" | |||
alt="Techichi Map" class="quest-location-image"> | |||
<strong><a href="https://wikimirror.lifeto.co/wiki.ggftw.com/trickster/Stella_-_Shadow_Star_10.html" | |||
target="_blank">Techichi Town - Neil's Camp</a></strong> | |||
</div> | |||
</div> | |||
<div class="quest-section-content"> | |||
<span class="quest-badge">Level 315 Required</span> | |||
</div> | |||
</div> | |||
<!-- Requested Item Section --> | |||
<div class="quest-section"> | |||
<h5 class="quest-section-title">Requested Item</h5> | |||
<div class="quest-section-icon"></div> | |||
<div class="image-container"> | |||
<img src="https://mewsie.world/CoraTOWiki/images/1/15/Redscroll.png" alt="Broken Lava Rock"> | |||
<strong><a href="https://wikimirror.lifeto.co/wiki.ggftw.com/trickster/Mysterious_Spell_Scroll.html" | |||
target="_blank">5x Mysterious Spell Scroll</a></strong> | |||
</div> | |||
<div class="quest-section-content"> | |||
<span class="quest-badge">Shadow Drop</span> | |||
</div> | |||
</div> | |||
</div> | |||
<!-- Item Drop Information --> | |||
<div class="quest-drop-info"> | |||
<strong>Monsters:</strong> | |||
<div class="image-grid"> | |||
<div class="image-container"> | |||
<img class="image-container" src="https://mewsie.world/CoraTOWiki/images/a/a9/Roaster.gif" | |||
alt="Shadow Roaster"> | |||
<strong>Shadow Roaster (Path to 1, Path to 2)</strong> | |||
</div> | |||
<div class="image-container"> | |||
<img class="image-container" width="132" | |||
src="https://mewsie.world/CoraTOWiki/images/7/78/Kilimanjaro.gif" alt="Shadow Kilimanjaro"> | |||
<strong>Shadow Kilimanjaro (Path to 2, Field 1)</strong> | |||
</div> | |||
<div class="image-container"> | |||
<img class="image-container" width="98" | |||
src="https://mewsie.world/CoraTOWiki/images/0/00/Ponchichi.gif" alt="Shadow Ponchichi"> | |||
<strong>Shadow Ponchichi (Field 2, Field 1)</strong> | |||
</div> | |||
<div class="image-container"> | |||
<img class="image-container" src="https://mewsie.world/CoraTOWiki/images/9/97/Orpeo.gif" | |||
alt="Shadow Orpeo"> | |||
<strong>Shadow Orpeo (Field 3)</strong> | |||
</div> | |||
<div class="image-container"> | |||
<img class="image-container" src="https://mewsie.world/CoraTOWiki/images/5/5d/Orconio.gif" | |||
alt="Shadow Orconio"> | |||
<strong>Shadow Orconio (Field 3)</strong> | |||
</div> | |||
<div class="image-container"> | |||
<img class="image-container" src="https://mewsie.world/CoraTOWiki/images/c/c6/Dekumanus.gif" | |||
alt="Shadow Dekumanus"> | |||
<strong>Shadow Dekumanus (Field 4)</strong> | |||
</div> | |||
</div> | |||
</div> | |||
</div> | |||
</div> | |||
<div id="tapasco-lv180" class="nested-content"> | |||
<div class="quest-card"> | |||
<!-- Quest Header --> | |||
<div class="quest-header"> | |||
<h1 class="quest-title">Tapasco Shadow Daily</h1> | |||
<span class="quest-type">Hunt</span> | |||
</div> | |||
<!-- Quest Sections Grid --> | |||
<div class="quest-sections"> | |||
<!-- Location Section --> | |||
<div class="quest-section"> | |||
<h5 class="quest-section-title">Location</h5> | |||
<div class="quest-section-icon"></div> | |||
<div class="quest-detail-item"> | |||
<div class="image-container"> | |||
<img src="https://mewsie.world/CoraTOWiki/images/5/59/Stella_location_tap.png" alt="Tapasco Map" | |||
class="quest-location-image"> | |||
<strong><a href="https://wikimirror.lifeto.co/wiki.ggftw.com/trickster/Stella_-_Shadow_Star_11.html" | |||
target="_blank">Gate of Tapasco Volcano</a></strong> | |||
</div> | |||
</div> | |||
<div class="quest-section-content"> | |||
<span class="quest-badge">Level 330 Required</span> | |||
</div> | |||
</div> | |||
<!-- Requested Item Section --> | |||
<div class="quest-section"> | |||
<h5 class="quest-section-title">Requested Item</h5> | |||
<div class="quest-section-icon"></div> | |||
<div class="image-container"> | |||
<img src="https://mewsie.world/CoraTOWiki/images/b/b4/Bluemarble.png" alt="Broken Fire Core"> | |||
<strong><a href="https://wikimirror.lifeto.co/wiki.ggftw.com/trickster/Lost_Marble.html" | |||
target="_blank">5x Lost Marble</a></strong> | |||
</div> | |||
<div class="quest-section-content"> | |||
<span class="quest-badge">Shadow Drop</span> | |||
</div> | |||
</div> | |||
</div> | |||
<!-- Item Drop Information --> | |||
<div class="quest-drop-info"> | |||
<strong>Monsters:</strong> | |||
<div class="image-grid"> | |||
<div class="image-container"> | |||
<img class="image-container" width="125" | |||
src="https://mewsie.world/CoraTOWiki/images/b/b1/Red_Salamander.gif" alt="Shadow Red Salamander"> | |||
<strong>Shadow Red Salamander (Field 1)</strong> | |||
</div> | |||
<div class="image-container"> | |||
<img class="image-container" width="125" | |||
src="https://mewsie.world/CoraTOWiki/images/f/f8/Blue_Salamander.gif" alt="Shadow Blue Salamander"> | |||
<strong>Shadow Blue Salamander (Field 2)</strong> | |||
</div> | |||
<div class="image-container"> | |||
<img class="image-container" src="https://mewsie.world/CoraTOWiki/images/3/3b/Funky_Orc.gif" | |||
alt="Shadow Funky Orc"> | |||
<strong>Shadow Funky Orc (Field 3)</strong> | |||
</div> | |||
<div class="image-container"> | |||
<img class="image-container" width="110" | |||
src="https://mewsie.world/CoraTOWiki/images/2/2a/Reggae_Orc.gif" alt="Shadow Reggae Orc"> | |||
<strong><br>Shadow Reggae Orc (Field 3, Field 4)</strong> | |||
</div> | |||
<div class="image-container"> | |||
<img class="image-container" width="140" | |||
src="https://mewsie.world/CoraTOWiki/images/0/0e/Fire_Golem.gif" alt="Shadow Fire Golem"> | |||
<strong>Shadow Fire Golem (Field 2, Field 4)</strong> | |||
</div> | |||
</div> | |||
</div> | |||
</div> | |||
</div> | |||
<div id="abyss-town-lv345" class="nested-content"> | |||
<div class="quest-card"> | |||
<!-- Quest Header --> | |||
<div class="quest-header"> | |||
<h1 class="quest-title">Abyss Town - Platonia Shadow Daily</h1> | |||
<span class="quest-type">Hunt</span> | |||
</div> | |||
<!-- Quest Sections Grid --> | |||
<div class="quest-sections"> | |||
<!-- Location Section --> | |||
<div class="quest-section"> | |||
<h5 class="quest-section-title">Location</h5> | |||
<div class="quest-section-icon"></div> | |||
<div class="quest-detail-item"> | |||
<div class="image-container"> | |||
<img src="https://mewsie.world/CoraTOWiki/images/1/12/Stella_location_abyss.png" | |||
alt="Abyss Town - Platonia Location" class="quest-location-image"> | |||
<strong><a href="https://wikimirror.lifeto.co/wiki.ggftw.com/trickster/Stella_-_Shadow_Star_12.html" | |||
target="_blank">Abyss Town - Platonia</a></strong> | |||
</div> | |||
</div> | |||
<div class="quest-section-content"> | |||
<span class="quest-badge">Level 345 Required</span> | |||
</div> | |||
</div> | |||
<!-- Requested Item Section --> | |||
<div class="quest-section"> | |||
<h5 class="quest-section-title">Requested Item</h5> | |||
<div class="quest-section-icon"></div> | |||
<div class="image-container"> | |||
<img src="https://mewsie.world/CoraTOWiki/images/b/b4/Bluemarble.png" alt="Sealing Gem"> | |||
<strong><a href="https://wikimirror.lifeto.co/wiki.ggftw.com/trickster/Sealing_Gem.html" | |||
target="_blank">5x Sealing Gem</a></strong> | |||
</div> | |||
<div class="quest-section-content"> | |||
<span class="quest-badge">Shadow Drop</span> | |||
</div> | |||
</div> | |||
</div> | |||
<!-- Item Drop Information --> | |||
<div class="quest-drop-info"> | |||
<strong>Monsters:</strong> | |||
<div class="image-grid"> | |||
<div class="image-container"> | |||
<img class="image-container" width="125" src="https://mewsie.world/CoraTOWiki/images/f/f6/Channa.gif" | |||
alt="Shadow Channa"> | |||
<strong><br>Shadow Channa (Field 4)</strong> | |||
</div> | |||
<div class="image-container"> | |||
<img class="image-container" src="https://mewsie.world/CoraTOWiki/images/1/12/Ghost_Diver.gif" | |||
alt="Shadow Ghost Diver"> | |||
<strong>Shadow Ghost Diver (Field 1, Field 4)</strong> | |||
</div> | |||
</div> | |||
</div> | |||
</div> | |||
</div> | |||
</section> | |||
<!----------------------------------------------------------- SHAMAN GIRL JIA TAB ------------------------------------------------------> | |||
<section id="tab-shaman-girl-jia" class="tab-content" role="tabpanel"> | |||
<!-- Navigation Tabs --> | |||
<nav class="nested-tabs" role="tablist" aria-label="Quest locations"> | |||
<button id="tabbtn-overview" class="nested-tab active" role="tab" aria-selected="true" | |||
aria-controls="tab-overview" data-tab="tab-overview" tabindex="0"> | |||
<span class="full-text">Overview</span><span class="short-text">Overview</span> | |||
</button> | |||
<button id="tabbtn-eclipse" class="nested-tab" role="tab" aria-selected="false" aria-controls="tab-eclipse" | |||
data-tab="tab-eclipse" tabindex="-1"> | |||
<span class="full-text">Eclipse-Mind's Eye</span><span class="short-text">Eclipse</span> | |||
</button> | |||
<button id="tabbtn-tracker" class="nested-tab" role="tab" aria-selected="false" aria-controls="tab-tracker" | |||
data-tab="tab-tracker" tabindex="-1"> | |||
<span class="full-text">Quest Tracker</span><span class="short-text">Tracker</span> | |||
</button> | |||
<button id="tabbtn-coral" class="nested-tab" role="tab" aria-selected="false" aria-controls="tab-coral" | |||
data-tab="tab-coral" tabindex="-1"> | |||
<span class="full-text">Coral Beach</span><span class="short-text">Coral</span> | |||
</button> | |||
<button id="tabbtn-desert" class="nested-tab" role="tab" aria-selected="false" aria-controls="tab-desert" | |||
data-tab="tab-desert" tabindex="-1"> | |||
<span class="full-text">Desert Beach</span><span class="short-text">Desert</span> | |||
</button> | |||
<button id="tabbtn-mega" class="nested-tab" role="tab" aria-selected="false" aria-controls="tab-mega" | |||
data-tab="tab-mega" tabindex="-1"> | |||
<span class="full-text">Megalopolis</span><span class="short-text">Mega</span> | |||
</button> | |||
<button id="tabbtn-caballa" class="nested-tab" role="tab" aria-selected="false" aria-controls="tab-caballa" | |||
data-tab="tab-caballa" tabindex="-1"> | |||
<span class="full-text">Caballa Relics</span><span class="short-text">Caballa</span> | |||
</button> | |||
<button id="tabbtn-oops" class="nested-tab" role="tab" aria-selected="false" aria-controls="tab-oops" | |||
data-tab="tab-oops" tabindex="-1"> | |||
<span class="full-text">Oops Wharf</span><span class="short-text">Oops</span> | |||
</button> | |||
<button id="tabbtn-ghost" class="nested-tab" role="tab" aria-selected="false" aria-controls="tab-ghost" | |||
data-tab="tab-ghost" tabindex="-1"> | |||
<span class="full-text">Ghost Blue</span><span class="short-text">Ghost</span> | |||
</button> | |||
<button id="tabbtn-rose" class="nested-tab" role="tab" aria-selected="false" aria-controls="tab-rose" | |||
data-tab="tab-rose" tabindex="-1"> | |||
<span class="full-text">Rose Garden</span><span class="short-text">Rose</span> | |||
</button> | |||
<button id="tabbtn-swamp" class="nested-tab" role="tab" aria-selected="false" aria-controls="tab-swamp" | |||
data-tab="tab-swamp" tabindex="-1"> | |||
<span class="full-text">Black Swamp</span><span class="short-text">Swamp</span> | |||
</button> | |||
<button id="tabbtn-snow" class="nested-tab" role="tab" aria-selected="false" aria-controls="tab-snow" | |||
data-tab="tab-snow" tabindex="-1"> | |||
<span class="full-text">Snow Hill</span><span class="short-text">Snow</span> | |||
</button> | |||
<button id="tabbtn-techichi" class="nested-tab" role="tab" aria-selected="false" aria-controls="tab-techichi" | |||
data-tab="tab-techichi" tabindex="-1"> | |||
<span class="full-text">Techichi Volcano</span><span class="short-text">Techichi</span> | |||
</button> | |||
<button id="tabbtn-tapasco" class="nested-tab" role="tab" aria-selected="false" aria-controls="tab-tapasco" | |||
data-tab="tab-tapasco" tabindex="-1"> | |||
<span class="full-text">Tapasco Volcano</span><span class="short-text">Tapasco</span> | |||
</button> | |||
<button id="tabbtn-abyss" class="nested-tab" role="tab" aria-selected="false" aria-controls="tab-abyss" | |||
data-tab="tab-abyss" tabindex="-1"> | |||
<span class="full-text">Abyss</span><span class="short-text">Abyss</span> | |||
</button> | |||
</nav> | |||
<!-- OVERVIEW TAB --> | |||
<div id="tab-overview" class="nested-content active"> | |||
<!-- Introduction Cards --> | |||
<div class="guide-intro"> | |||
<div class="highlights-grid"> | |||
<div class="guide-card"> | |||
<div class="guide-card-icon">🌑</div> | |||
<h3>What is Shadow World?</h3> | |||
<p>An advanced quest system available at level 180+ featuring shadow versions of familiar monsters with | |||
enhanced stats and unique rewards across 12 different locations.</p> | |||
</div> | |||
<div class="guide-card"> | |||
<div class="guide-card-icon">👁️</div> | |||
<h3>Mind's Eye Required</h3> | |||
<p>Essential skill obtained from Eclipse NPC that allows you to see and interact with shadow entities | |||
throughout the game world.</p> | |||
</div> | |||
<div class="guide-card"> | |||
<div class="guide-card-icon">🎯</div> | |||
<h3>51 Shadow Quests</h3> | |||
<p>Complete progression system spanning levels 180-250+ with location-specific NPCs offering different | |||
quests based on your level and area.</p> | |||
</div> | |||
</div> | |||
</div> | |||
<!-- Navigation Guide --> | |||
<div class="guide-navigation"> | |||
<h2 class="guide-section-title">How to Navigate This Guide</h2> | |||
<div class="navigation-steps"> | |||
<div class="nav-step"> | |||
<div class="step-number">1</div> | |||
<h3 class="step-title">Essential Setup</h3> | |||
<p class="step-description">Start with these fundamental tabs to prepare your character for Shadow World | |||
adventures.</p> | |||
<div class="step-tabs"> | |||
<span class="step-tab">Eclipse</span> | |||
<span class="step-tab">Quest Tracker</span> | |||
</div> | |||
</div> | |||
<div class="nav-step"> | |||
<div class="step-number">2</div> | |||
<h3 class="step-title">Early Locations (Lv 180-220)</h3> | |||
<p class="step-description">Begin your shadow journey with these beginner-friendly locations and their | |||
specific quests.</p> | |||
<div class="step-tabs"> | |||
<span class="step-tab">Coral Beach</span> | |||
<span class="step-tab">Desert Beach</span> | |||
<span class="step-tab">Megalopolis</span> | |||
</div> | |||
</div> | |||
<div class="nav-step"> | |||
<div class="step-number">3</div> | |||
<h3 class="step-title">Mid-Level Areas (Lv 220-240)</h3> | |||
<p class="step-description">Progress through intermediate locations with increased difficulty and better | |||
rewards.</p> | |||
<div class="step-tabs"> | |||
<span class="step-tab">Caballa Relics</span> | |||
<span class="step-tab">Oops Wharf</span> | |||
<span class="step-tab">Ghost Blue</span> | |||
<span class="step-tab">Rose Garden</span> | |||
</div> | |||
</div> | |||
<div class="nav-step"> | |||
<div class="step-number">4</div> | |||
<h3 class="step-title">Advanced Zones (Lv 240+)</h3> | |||
<p class="step-description">Challenge yourself in high-level areas with the strongest shadow monsters | |||
and best rewards.</p> | |||
<div class="step-tabs"> | |||
<span class="step-tab">Black Swamp</span> | |||
<span class="step-tab">Snow Hill</span> | |||
<span class="step-tab">Techichi Volcano</span> | |||
<span class="step-tab">Tapasco Volcano</span> | |||
<span class="step-tab">Abyss</span> | |||
</div> | |||
</div> | |||
</div> | |||
</div> | |||
<!-- Quest Types --> | |||
<div class="quest-types"> | |||
<h2 class="guide-section-title">Understanding Shadow World Tabs</h2> | |||
<div class="quest-types-grid"> | |||
<div class="quest-type-card"> | |||
<div class="quest-type-header"> | |||
<h3 class="quest-type-title">Eclipse Tab</h3> | |||
<p class="quest-type-subtitle">Essential Prerequisites</p> | |||
</div> | |||
<div class="quest-type-content"> | |||
<ul class="quest-features"> | |||
<li>Complete Mind's Eye quest walkthrough</li> | |||
<li>Required items and NPC locations</li> | |||
<li>Step-by-step instructions</li> | |||
<li>Unlock the entire Shadow World system</li> | |||
</ul> | |||
</div> | |||
</div> | |||
<div class="quest-type-card"> | |||
<div class="quest-type-header"> | |||
<h3 class="quest-type-title">Quest Tracker</h3> | |||
<p class="quest-type-subtitle">Progress Monitoring</p> | |||
</div> | |||
<div class="quest-type-content"> | |||
<ul class="quest-features"> | |||
<li>Track all 51 shadow quests simultaneously</li> | |||
<li>Visual progress indicators</li> | |||
<li>Completion status for each location</li> | |||
<li>Organized by difficulty and level</li> | |||
</ul> | |||
</div> | |||
</div> | |||
<div class="quest-type-card"> | |||
<div class="quest-type-header"> | |||
<h3 class="quest-type-title">Location Tabs</h3> | |||
<p class="quest-type-subtitle">Detailed Area Guides</p> | |||
</div> | |||
<div class="quest-type-content"> | |||
<ul class="quest-features"> | |||
<li>Monster stats and locations</li> | |||
<li>Quest requirements and rewards</li> | |||
<li>NPC locations and dialogue</li> | |||
<li>Level recommendations and tips</li> | |||
</ul> | |||
</div> | |||
</div> | |||
</div> | |||
</div> | |||
<!-- Level Progression --> | |||
<!-- Tips Section --> | |||
<div class="guide-tips"> | |||
<h2 class="guide-section-title">Essential Tips & Strategies</h2> | |||
<div class="tips-grid"> | |||
<div class="tip-card"> | |||
<div class="tip-icon">👁️</div> | |||
<h3 class="tip-title">Mind's Eye Active</h3> | |||
<p class="tip-content">Always keep Mind's Eye skill active. Without it, you cannot see shadow NPCs or | |||
monsters anywhere in the game world.</p> | |||
</div> | |||
<div class="tip-card"> | |||
<div class="tip-icon">🐾</div> | |||
<h3 class="tip-title">Guardian Required</h3> | |||
<p class="tip-content">Keep your Guardian active during all shadow activities. It's required for | |||
accessing Shadow World content.</p> | |||
</div> | |||
<div class="tip-card"> | |||
<div class="tip-icon">📊</div> | |||
<h3 class="tip-title">Use Quest Tracker</h3> | |||
<p class="tip-content">Monitor your progress across all 12 locations simultaneously using the Quest | |||
Tracker tab for efficient completion.</p> | |||
</div> | |||
<div class="tip-card"> | |||
<div class="tip-icon">⚔️</div> | |||
<h3 class="tip-title">Shadow Monsters Stronger</h3> | |||
<p class="tip-content">Shadow monsters have enhanced stats compared to regular versions. Prepare with | |||
better equipment and consumables.</p> | |||
</div> | |||
<div class="tip-card"> | |||
<div class="tip-icon">🗺️</div> | |||
<h3 class="tip-title">Level Progression Matters</h3> | |||
<p class="tip-content">Complete quests in order for optimal experience gain. Don't attempt areas too | |||
early or too late for your level.</p> | |||
</div> | |||
<div class="tip-card"> | |||
<div class="tip-icon">🎯</div> | |||
<h3 class="tip-title">Location-Specific NPCs</h3> | |||
<p class="tip-content">Each area has its own Shaman Girl Jia offering different quests based on your | |||
level and the specific location.</p> | |||
</div> | |||
</div> | |||
</div> | |||
</div> | |||
<!-- ECLIPSE TAB --> | |||
<div id="tab-eclipse" class="nested-content "> | |||
<!-- Hero Introduction --> | |||
<div class="eclipse-hero"> | |||
<h2 class="eclipse-hero-title">Eclipse - Another View for the World</h2> | |||
<p class="eclipse-hero-subtitle">Complete guide to obtaining Mind's Eye skill and accessing Shadow World</p> | |||
</div> | |||
<!-- Quick Stats Overview --> | |||
<div class="eclipse-stats-grid"> | |||
<div class="eclipse-stat-card"> | |||
<span class="eclipse-stat-icon">⭐</span> | |||
<div class="eclipse-stat-title">Level Required</div> | |||
<div class="eclipse-stat-value">180+</div> | |||
</div> | |||
<div class="eclipse-stat-card"> | |||
<span class="eclipse-stat-icon">🎯</span> | |||
<div class="eclipse-stat-title">Quest Type</div> | |||
<div class="eclipse-stat-value">One-Time</div> | |||
</div> | |||
<div class="eclipse-stat-card"> | |||
<span class="eclipse-stat-icon">👁️</span> | |||
<div class="eclipse-stat-title">Reward</div> | |||
<div class="eclipse-stat-value">Mind's Eye Skill</div> | |||
</div> | |||
</div> | |||
<!-- Prerequisites Section --> | |||
<div class="eclipse-content-card"> | |||
<div class="eclipse-card-header"> | |||
<div class="eclipse-card-icon">📋</div> | |||
<h3 class="eclipse-card-title">Prerequisites</h3> | |||
</div> | |||
<div class="eclipse-items-grid"> | |||
<div class="eclipse-item-card"> | |||
<div class="eclipse-item-title">Character Level</div> | |||
<div class="eclipse-item-description">Minimum Level 180+ required (Eclipse's Message auto-received) | |||
</div> | |||
</div> | |||
<div class="eclipse-item-card"> | |||
<div class="eclipse-item-title">Guardian</div> | |||
<div class="eclipse-item-description">Hatched from <a | |||
href="https://wikimirror.lifeto.co/wiki.ggftw.com/trickster/Poseidon_Seed.html" | |||
target="_blank">Poseidon Seed</a></div> | |||
</div> | |||
</div> | |||
</div> | |||
<!-- Eclipse NPC Section --> | |||
<div class="eclipse-content-card"> | |||
<div class="eclipse-card-header"> | |||
<div class="eclipse-card-icon">📍</div> | |||
<h3 class="eclipse-card-title">Eclipse NPC Location</h3> | |||
</div> | |||
<p><strong>Location:</strong> <a | |||
href="https://wikimirror.lifeto.co/wiki.ggftw.com/trickster/Garden_of_Skill_Master.html" | |||
target="_blank">Garden of Skill Master</a></p> | |||
<p>Eclipse is the essential NPC who grants the Mind's Eye skill. This skill allows you to see and interact | |||
with Shadow NPCs and monsters throughout the game world.</p> | |||
</div> | |||
<!-- Required Items --> | |||
<div class="eclipse-content-card"> | |||
<div class="eclipse-card-header"> | |||
<div class="eclipse-card-icon">🎒</div> | |||
<h3 class="eclipse-card-title">Required Items</h3> | |||
</div> | |||
<div class="eclipse-items-grid"> | |||
<div class="eclipse-item-card"> | |||
<div class="eclipse-item-title">P. Anemone Card</div> | |||
<div class="eclipse-item-description">From <a | |||
href="https://wikimirror.lifeto.co/wiki.ggftw.com/trickster/Popeyed_Anemone.html" | |||
target="_blank">Popeyed Anemone</a> (Lv. 105)</div> | |||
</div> | |||
<div class="eclipse-item-card"> | |||
<div class="eclipse-item-title">Dimensional Key</div> | |||
<div class="eclipse-item-description">From <a | |||
href="https://wikimirror.lifeto.co/wiki.ggftw.com/trickster/Eclipse_-_Aid_from_Eclipse.html" | |||
target="_blank">Eclipse - Aid from Eclipse quest</a></div> | |||
</div> | |||
</div> | |||
</div> | |||
<!-- Step-by-Step Guide --> | |||
<div class="eclipse-content-card"> | |||
<div class="eclipse-card-header"> | |||
<div class="eclipse-card-icon">📝</div> | |||
<h3 class="eclipse-card-title">Step-by-Step Guide</h3> | |||
</div> | |||
<div class="eclipse-step-container"> | |||
<div class="eclipse-step"> | |||
<div class="eclipse-step-number">1</div> | |||
<div class="eclipse-step-content"> | |||
<div class="eclipse-step-title">Prepare Prerequisites</div> | |||
<div class="eclipse-step-description">Make sure you have reached Level 180 and hatched a Guardian from | |||
<a href="https://wikimirror.lifeto.co/wiki.ggftw.com/trickster/Poseidon_Seed.html" | |||
target="_blank">Poseidon Seed</a>. | |||
</div> | |||
<div class="eclipse-step-description">Check these guides if needed: <a | |||
href="https://wikimirror.lifeto.co/wiki.ggftw.com/trickster/Soul_Seed_Quests_Guide.html" | |||
target="_blank">Soul Seed</a> and <a | |||
href="https://wikimirror.lifeto.co/wiki.ggftw.com/trickster/Soul_Guardian_Quests_Guide.html" | |||
target="_blank">Soul Guardian</a></div> | |||
</div> | |||
</div> | |||
<div class="eclipse-step"> | |||
<div class="eclipse-step-number">2</div> | |||
<div class="eclipse-step-content"> | |||
<div class="eclipse-step-title">Gather Required Items</div> | |||
<div class="eclipse-step-description"><strong>P. Anemone Card</strong> - From <a | |||
href="https://wikimirror.lifeto.co/wiki.ggftw.com/trickster/Popeyed_Anemone.html" | |||
target="_blank">Popeyed Anemone</a> (Lv. 105)</div> | |||
<div class="eclipse-step-description"><strong>Dimensional Key</strong> - From <a | |||
href="https://wikimirror.lifeto.co/wiki.ggftw.com/trickster/Eclipse_-_Aid_from_Eclipse.html" | |||
target="_blank">Eclipse - Aid from Eclipse quest</a></div> | |||
</div> | |||
</div> | |||
<div class="eclipse-step"> | |||
<div class="eclipse-step-number">3</div> | |||
<div class="eclipse-step-content"> | |||
<div class="eclipse-step-title">Complete Eclipse Quest</div> | |||
<div class="eclipse-step-description">Visit Eclipse in Garden of Skill Master and complete the quest | |||
to receive the Mind's Eye skill.</div> | |||
</div> | |||
</div> | |||
<div class="eclipse-step"> | |||
<div class="eclipse-step-number">4</div> | |||
<div class="eclipse-step-content"> | |||
<div class="eclipse-step-title">Start Shadow World Quests</div> | |||
<div class="eclipse-step-description">With Mind's Eye active, you can now see and interact with Shaman | |||
Girl Jia in various towns to begin Shadow World quests.</div> | |||
</div> | |||
</div> | |||
</div> | |||
</div> | |||
<!-- Important Notes --> | |||
<div class="eclipse-warning"> | |||
<div class="eclipse-warning-header"> | |||
<span class="eclipse-warning-icon">⚠️</span> | |||
<h4 class="eclipse-warning-title">Important Notes</h4> | |||
</div> | |||
<ul class="eclipse-warning-list"> | |||
<li>Eclipse quest is a <strong>one-time only</strong> quest</li> | |||
<li>No Base or TM Experience is gained from this quest</li> | |||
<li>Mind's Eye skill is <strong>required</strong> for all Shadow World activities</li> | |||
<li>Keep your Guardian active when doing Shadow World quests</li> | |||
</ul> | |||
</div> | |||
</div> | |||
<!-- Quest Tracker Section --> | |||
<div id="tab-tracker" class="nested-content"> | |||
<div class="section-header"> | |||
<h2>Quest Tracker</h2> | |||
</div> | |||
<!-- Progress Overview --> | |||
<div class="quest-tracker-overview"> | |||
<div class="progress-stats"> | |||
<div class="stat-item"> | |||
<span class="stat-label">Total Progress:</span> | |||
<span class="stat-value" id="total-progress">0/40</span> | |||
</div> | |||
<div class="stat-item"> | |||
<span class="stat-label">Completion:</span> | |||
<span class="stat-value" id="completion-percentage">0%</span> | |||
</div> | |||
</div> | |||
<div class="progress-bar-container"> | |||
<div class="progress-bar"> | |||
<div class="progress-fill" id="progress-fill" style="width: 0%"></div> | |||
</div> | |||
</div> | |||
<div class="tracker-actions"> | |||
<button type="button" class="reset-progress-btn" id="reset-progress">Reset All Progress</button> | |||
</div> | |||
</div> | |||
<!-- Quest List by Location --> | |||
<div class="quest-tracker-locations"> | |||
<!-- Coral Beach --> | |||
<div class="location-section"> | |||
<h3 class="location-title">Coral Beach</h3> | |||
<div class="quest-list"> | |||
<div class="quest-item"> | |||
<label class="quest-checkbox-label"> | |||
<input type="checkbox" class="quest-checkbox" data-quest="coral-torobbie"> | |||
<span class="checkmark"></span> | |||
<span class="quest-name">Shadow Torobbie (Lv. 180-183)</span> | |||
</label> | |||
</div> | |||
<div class="quest-item"> | |||
<label class="quest-checkbox-label"> | |||
<input type="checkbox" class="quest-checkbox" data-quest="coral-bad-fury"> | |||
<span class="checkmark"></span> | |||
<span class="quest-name">Shadow Bad Fury (Lv. 184-187)</span> | |||
</label> | |||
</div> | |||
<div class="quest-item"> | |||
<label class="quest-checkbox-label"> | |||
<input type="checkbox" class="quest-checkbox" data-quest="coral-little-cora"> | |||
<span class="checkmark"></span> | |||
<span class="quest-name">Shadow Little Cora (Lv. 188-191)</span> | |||
</label> | |||
</div> | |||
<div class="quest-item"> | |||
<label class="quest-checkbox-label"> | |||
<input type="checkbox" class="quest-checkbox" data-quest="coral-bustshell"> | |||
<span class="checkmark"></span> | |||
<span class="quest-name">Shadow Bustshell (Lv. 192-195)</span> | |||
</label> | |||
</div> | |||
<div class="quest-item"> | |||
<label class="quest-checkbox-label"> | |||
<input type="checkbox" class="quest-checkbox" data-quest="coral-addax"> | |||
<span class="checkmark"></span> | |||
<span class="quest-name">Shadow Addax (Lv. 196+)</span> | |||
</label> | |||
</div> | |||
</div> | |||
</div> | |||
<!-- Desert Beach --> | |||
<div class="location-section"> | |||
<h3 class="location-title">Desert Beach</h3> | |||
<div class="quest-list"> | |||
<div class="quest-item"> | |||
<label class="quest-checkbox-label"> | |||
<input type="checkbox" class="quest-checkbox" data-quest="desert-fanta-slime"> | |||
<span class="checkmark"></span> | |||
<span class="quest-name">Shadow Fanta Slime (Lv. 195-198)</span> | |||
</label> | |||
</div> | |||
<div class="quest-item"> | |||
<label class="quest-checkbox-label"> | |||
<input type="checkbox" class="quest-checkbox" data-quest="desert-hula-octopus"> | |||
<span class="checkmark"></span> | |||
<span class="quest-name">Shadow Hula Octopus (Lv. 199-202)</span> | |||
</label> | |||
</div> | |||
<div class="quest-item"> | |||
<label class="quest-checkbox-label"> | |||
<input type="checkbox" class="quest-checkbox" data-quest="desert-sea-scorpion"> | |||
<span class="checkmark"></span> | |||
<span class="quest-name">Shadow Sea Scorpion (Lv. 203-205)</span> | |||
</label> | |||
</div> | |||
<div class="quest-item"> | |||
<label class="quest-checkbox-label"> | |||
<input type="checkbox" class="quest-checkbox" data-quest="desert-oran-g"> | |||
<span class="checkmark"></span> | |||
<span class="quest-name">Shadow Oran G (Lv. 206-209)</span> | |||
</label> | |||
</div> | |||
<div class="quest-item"> | |||
<label class="quest-checkbox-label"> | |||
<input type="checkbox" class="quest-checkbox" data-quest="desert-basic-mummy"> | |||
<span class="checkmark"></span> | |||
<span class="quest-name">Shadow Basic Mummy (Lv. 210+)</span> | |||
</label> | |||
</div> | |||
</div> | |||
</div> | |||
<!-- Megalopolis --> | |||
<div class="location-section"> | |||
<h3 class="location-title">Megalopolis</h3> | |||
<div class="quest-list"> | |||
<div class="quest-item"> | |||
<label class="quest-checkbox-label"> | |||
<input type="checkbox" class="quest-checkbox" data-quest="mega-yamu"> | |||
<span class="checkmark"></span> | |||
<span class="quest-name">Shadow Yamu (Lv. 210-213)</span> | |||
</label> | |||
</div> | |||
<div class="quest-item"> | |||
<label class="quest-checkbox-label"> | |||
<input type="checkbox" class="quest-checkbox" data-quest="mega-pochi"> | |||
<span class="checkmark"></span> | |||
<span class="quest-name">Shadow Pochi (Lv. 213-217)</span> | |||
</label> | |||
</div> | |||
<div class="quest-item"> | |||
<label class="quest-checkbox-label"> | |||
<input type="checkbox" class="quest-checkbox" data-quest="mega-sppo"> | |||
<span class="checkmark"></span> | |||
<span class="quest-name">Shadow Sppo (Lv. 218-221)</span> | |||
</label> | |||
</div> | |||
<div class="quest-item"> | |||
<label class="quest-checkbox-label"> | |||
<input type="checkbox" class="quest-checkbox" data-quest="mega-forest-tickler"> | |||
<span class="checkmark"></span> | |||
<span class="quest-name">Shadow Forest Tickler (Lv. 222-225)</span> | |||
</label> | |||
</div> | |||
<div class="quest-item"> | |||
<label class="quest-checkbox-label"> | |||
<input type="checkbox" class="quest-checkbox" data-quest="mega-turvy"> | |||
<span class="checkmark"></span> | |||
<span class="quest-name">Shadow Turvy (Lv. 226+)</span> | |||
</label> | |||
</div> | |||
</div> | |||
</div> | |||
<!-- Caballa Relics --> | |||
<div class="location-section"> | |||
<h3 class="location-title">Caballa Relics</h3> | |||
<div class="quest-list"> | |||
<div class="quest-item"> | |||
<label class="quest-checkbox-label"> | |||
<input type="checkbox" class="quest-checkbox" data-quest="caballa-leaf-bird"> | |||
<span class="checkmark"></span> | |||
<span class="quest-name">Shadow Leaf Bird (Lv. 225-228)</span> | |||
</label> | |||
</div> | |||
<div class="quest-item"> | |||
<label class="quest-checkbox-label"> | |||
<input type="checkbox" class="quest-checkbox" data-quest="caballa-stone-soldier"> | |||
<span class="checkmark"></span> | |||
<span class="quest-name">Shadow Stone Soldier (Lv. 229-232)</span> | |||
</label> | |||
</div> | |||
<div class="quest-item"> | |||
<label class="quest-checkbox-label"> | |||
<input type="checkbox" class="quest-checkbox" data-quest="caballa-mimic"> | |||
<span class="checkmark"></span> | |||
<span class="quest-name">Shadow Mimic (Lv. 233-236)</span> | |||
</label> | |||
</div> | |||
<div class="quest-item"> | |||
<label class="quest-checkbox-label"> | |||
<input type="checkbox" class="quest-checkbox" data-quest="caballa-guiana"> | |||
<span class="checkmark"></span> | |||
<span class="quest-name">Shadow Guiana (Lv. 237-240)</span> | |||
</label> | |||
</div> | |||
<div class="quest-item"> | |||
<label class="quest-checkbox-label"> | |||
<input type="checkbox" class="quest-checkbox" data-quest="caballa-lima"> | |||
<span class="checkmark"></span> | |||
<span class="quest-name">Shadow Lima (Lv. 241+)</span> | |||
</label> | |||
</div> | |||
</div> | |||
</div> | |||
<!-- Oops Wharf --> | |||
<div class="location-section"> | |||
<h3 class="location-title">Oops Wharf</h3> | |||
<div class="quest-list"> | |||
<div class="quest-item"> | |||
<label class="quest-checkbox-label"> | |||
<input type="checkbox" class="quest-checkbox" data-quest="oops-ironclad-turtle"> | |||
<span class="checkmark"></span> | |||
<span class="quest-name">Shadow Ironclad Turtle (Lv. 240-243)</span> | |||
</label> | |||
</div> | |||
<div class="quest-item"> | |||
<label class="quest-checkbox-label"> | |||
<input type="checkbox" class="quest-checkbox" data-quest="oops-requi"> | |||
<span class="checkmark"></span> | |||
<span class="quest-name">Shadow Requi (Lv. 244-247)</span> | |||
</label> | |||
</div> | |||
<div class="quest-item"> | |||
<label class="quest-checkbox-label"> | |||
<input type="checkbox" class="quest-checkbox" data-quest="oops-black-foe"> | |||
<span class="checkmark"></span> | |||
<span class="quest-name">Shadow Black Foe (Lv. 248-251)</span> | |||
</label> | |||
</div> | |||
<div class="quest-item"> | |||
<label class="quest-checkbox-label"> | |||
<input type="checkbox" class="quest-checkbox" data-quest="oops-cone-stone"> | |||
<span class="checkmark"></span> | |||
<span class="quest-name">Shadow Cone Stone (Lv. 252+)</span> | |||
</label> | |||
</div> | |||
<div class="quest-item"> | |||
<label class="quest-checkbox-label"> | |||
<input type="checkbox" class="quest-checkbox" data-quest="oops-pirate-boxer"> | |||
<span class="checkmark"></span> | |||
<span class="quest-name">Shadow Pirate Boxer B (Lv. 252+)</span> | |||
</label> | |||
</div> | |||
</div> | |||
</div> | |||
<!-- Ghost Blue --> | |||
<div class="location-section"> | |||
<h3 class="location-title">Ghost Blue</h3> | |||
<div class="quest-list"> | |||
<div class="quest-item"> | |||
<label class="quest-checkbox-label"> | |||
<input type="checkbox" class="quest-checkbox" data-quest="ghost-mushumushu"> | |||
<span class="checkmark"></span> | |||
<span class="quest-name">Shadow Mushumushu (Lv. 255-258)</span> | |||
</label> | |||
</div> | |||
<div class="quest-item"> | |||
<label class="quest-checkbox-label"> | |||
<input type="checkbox" class="quest-checkbox" data-quest="ghost-popeyed-anemone"> | |||
<span class="checkmark"></span> | |||
<span class="quest-name">Shadow Popeyed Anemone (Lv. 259-262)</span> | |||
</label> | |||
</div> | |||
<div class="quest-item"> | |||
<label class="quest-checkbox-label"> | |||
<input type="checkbox" class="quest-checkbox" data-quest="ghost-monguse"> | |||
<span class="checkmark"></span> | |||
<span class="quest-name">Shadow Monguse (Lv. 263-266)</span> | |||
</label> | |||
</div> | |||
<div class="quest-item"> | |||
<label class="quest-checkbox-label"> | |||
<input type="checkbox" class="quest-checkbox" data-quest="ghost-merrow"> | |||
<span class="checkmark"></span> | |||
<span class="quest-name">Shadow Merrow (Lv. 267-270)</span> | |||
</label> | |||
</div> | |||
<div class="quest-item"> | |||
<label class="quest-checkbox-label"> | |||
<input type="checkbox" class="quest-checkbox" data-quest="ghost-nora-joe"> | |||
<span class="checkmark"></span> | |||
<span class="quest-name">Shadow Nora Joe (Lv. 271+)</span> | |||
</label> | |||
</div> | |||
</div> | |||
</div> | |||
<!-- Rose Garden --> | |||
<div class="location-section"> | |||
<h3 class="location-title">Rose Garden</h3> | |||
<div class="quest-list"> | |||
<div class="quest-item"> | |||
<label class="quest-checkbox-label"> | |||
<input type="checkbox" class="quest-checkbox" data-quest="rose-dancer-michel"> | |||
<span class="checkmark"></span> | |||
<span class="quest-name">Shadow Dancer Michel (Lv. 267-270)</span> | |||
</label> | |||
</div> | |||
<div class="quest-item"> | |||
<label class="quest-checkbox-label"> | |||
<input type="checkbox" class="quest-checkbox" data-quest="rose-captain-norman"> | |||
<span class="checkmark"></span> | |||
<span class="quest-name">Shadow Captain Norman (Lv. 271-274)</span> | |||
</label> | |||
</div> | |||
<div class="quest-item"> | |||
<label class="quest-checkbox-label"> | |||
<input type="checkbox" class="quest-checkbox" data-quest="rose-madam-chiffon"> | |||
<span class="checkmark"></span> | |||
<span class="quest-name">Shadow Madam Chiffon (Lv. 275-278)</span> | |||
</label> | |||
</div> | |||
<div class="quest-item"> | |||
<label class="quest-checkbox-label"> | |||
<input type="checkbox" class="quest-checkbox" data-quest="rose-maid-lydia"> | |||
<span class="checkmark"></span> | |||
<span class="quest-name">Shadow Maid Lydia (Lv. 282-285)</span> | |||
</label> | |||
</div> | |||
<div class="quest-item"> | |||
<label class="quest-checkbox-label"> | |||
<input type="checkbox" class="quest-checkbox" data-quest="rose-bone-warrior"> | |||
<span class="checkmark"></span> | |||
<span class="quest-name">Shadow Bone Warrior (Lv. 286+)</span> | |||
</label> | |||
</div> | |||
</div> | |||
</div> | |||
<!-- Black Swamp --> | |||
<div class="location-section"> | |||
<h3 class="location-title">Black Swamp</h3> | |||
<div class="quest-list"> | |||
<div class="quest-item"> | |||
<label class="quest-checkbox-label"> | |||
<input type="checkbox" class="quest-checkbox" data-quest="swamp-lotus-wormhole"> | |||
<span class="checkmark"></span> | |||
<span class="quest-name">Shadow Lotus Wormhole (Lv. 285+)</span> | |||
</label> | |||
</div> | |||
</div> | |||
</div> | |||
<!-- Snow Hill --> | |||
<div class="location-section"> | |||
<h3 class="location-title">Snow Hill</h3> | |||
<div class="quest-list"> | |||
<div class="quest-item"> | |||
<label class="quest-checkbox-label"> | |||
<input type="checkbox" class="quest-checkbox" data-quest="snow-king-yamu"> | |||
<span class="checkmark"></span> | |||
<span class="quest-name">Shadow King Yamu (Lv. 300-303)</span> | |||
</label> | |||
</div> | |||
<div class="quest-item"> | |||
<label class="quest-checkbox-label"> | |||
<input type="checkbox" class="quest-checkbox" data-quest="snow-bug-bear"> | |||
<span class="checkmark"></span> | |||
<span class="quest-name">Shadow Bug Bear (Lv. 304-307)</span> | |||
</label> | |||
</div> | |||
<div class="quest-item"> | |||
<label class="quest-checkbox-label"> | |||
<input type="checkbox" class="quest-checkbox" data-quest="snow-polar-bear"> | |||
<span class="checkmark"></span> | |||
<span class="quest-name">Shadow Polar Bear (Lv. 308-311)</span> | |||
</label> | |||
</div> | |||
<div class="quest-item"> | |||
<label class="quest-checkbox-label"> | |||
<input type="checkbox" class="quest-checkbox" data-quest="snow-niwerth"> | |||
<span class="checkmark"></span> | |||
<span class="quest-name">Shadow Niwerth (Lv. 312-315)</span> | |||
</label> | |||
</div> | |||
<div class="quest-item"> | |||
<label class="quest-checkbox-label"> | |||
<input type="checkbox" class="quest-checkbox" data-quest="snow-coolem"> | |||
<span class="checkmark"></span> | |||
<span class="quest-name">Shadow Coolem (Lv. 316+)</span> | |||
</label> | |||
</div> | |||
</div> | |||
</div> | |||
<!-- Techichi Volcano --> | |||
<div class="location-section"> | |||
<h3 class="location-title">Techichi Volcano</h3> | |||
<div class="quest-list"> | |||
<div class="quest-item"> | |||
<label class="quest-checkbox-label"> | |||
<input type="checkbox" class="quest-checkbox" data-quest="techichi-fossil-soldier"> | |||
<span class="checkmark"></span> | |||
<span class="quest-name">Shadow Fossil Soldier (Lv. 315-318)</span> | |||
</label> | |||
</div> | |||
<div class="quest-item"> | |||
<label class="quest-checkbox-label"> | |||
<input type="checkbox" class="quest-checkbox" data-quest="techichi-laki"> | |||
<span class="checkmark"></span> | |||
<span class="quest-name">Shadow Laki (Lv. 319-322)</span> | |||
</label> | |||
</div> | |||
<div class="quest-item"> | |||
<label class="quest-checkbox-label"> | |||
<input type="checkbox" class="quest-checkbox" data-quest="techichi-aabon"> | |||
<span class="checkmark"></span> | |||
<span class="quest-name">Shadow Aabon (Lv. 323-325)</span> | |||
</label> | |||
</div> | |||
<div class="quest-item"> | |||
<label class="quest-checkbox-label"> | |||
<input type="checkbox" class="quest-checkbox" data-quest="techichi-malefic-matron"> | |||
<span class="checkmark"></span> | |||
<span class="quest-name">Shadow Malefic Matron (Lv. 326-329)</span> | |||
</label> | |||
</div> | |||
<div class="quest-item"> | |||
<label class="quest-checkbox-label"> | |||
<input type="checkbox" class="quest-checkbox" data-quest="techichi-burning-kili"> | |||
<span class="checkmark"></span> | |||
<span class="quest-name">Shadow Burning Kili (Lv. 330+)</span> | |||
</label> | |||
</div> | |||
</div> | |||
</div> | |||
<!-- Tapasco Volcano --> | |||
<div class="location-section"> | |||
<h3 class="location-title">Tapasco Volcano</h3> | |||
<div class="quest-list"> | |||
<div class="quest-item"> | |||
<label class="quest-checkbox-label"> | |||
<input type="checkbox" class="quest-checkbox" data-quest="tapasco-fire-moth"> | |||
<span class="checkmark"></span> | |||
<span class="quest-name">Shadow Fire Moth (Lv. 330-333)</span> | |||
</label> | |||
</div> | |||
<div class="quest-item"> | |||
<label class="quest-checkbox-label"> | |||
<input type="checkbox" class="quest-checkbox" data-quest="tapasco-funky-orc"> | |||
<span class="checkmark"></span> | |||
<span class="quest-name">Shadow Funky Orc (Lv. 334-337)</span> | |||
</label> | |||
</div> | |||
<div class="quest-item"> | |||
<label class="quest-checkbox-label"> | |||
<input type="checkbox" class="quest-checkbox" data-quest="tapasco-regent-orc"> | |||
<span class="checkmark"></span> | |||
<span class="quest-name">Shadow Regent Orc (Lv. 338+)</span> | |||
</label> | |||
</div> | |||
</div> | |||
</div> | |||
<!-- Abyss --> | |||
<div class="location-section"> | |||
<h3 class="location-title">Abyss</h3> | |||
<div class="quest-list"> | |||
<div class="quest-item"> | |||
<label class="quest-checkbox-label"> | |||
<input type="checkbox" class="quest-checkbox" data-quest="abyss-krybeth"> | |||
<span class="checkmark"></span> | |||
<span class="quest-name">Shadow Krybeth (Lv. 345-348)</span> | |||
</label> | |||
</div> | |||
<div class="quest-item"> | |||
<label class="quest-checkbox-label"> | |||
<input type="checkbox" class="quest-checkbox" data-quest="abyss-skelefish"> | |||
<span class="checkmark"></span> | |||
<span class="quest-name">Shadow Skelefish (Lv. 349+)</span> | |||
</label> | |||
</div> | |||
</div> | |||
</div> | |||
</div> | |||
</div> | |||
<!-- CORAL BEACH TAB --> | |||
<div id="tab-coral" class="nested-content"> | |||
<div class="section-header"> | |||
<h2>Dark Spirit Punishment 1 - Coral Beach</h2> | |||
</div> | |||
<div class="quest-info-card"> | |||
<div class="quest-card-header"> | |||
<h3>Quest Details</h3> | |||
<span class="quest-number-badge">#1</span> | |||
</div> | |||
<div class="quest-details-grid"> | |||
<div class="quest-detail-item"> | |||
<h5 class="quest-section-title">NPC:</h5> | |||
<div class="quest-detail-label"> | |||
<img class="image-container" | |||
src="https://wikimirror.lifeto.co/asset.103.ggftw.net/wiki/to-w/images/6/6b/Shaman_Girl_Jia.gif" | |||
alt="Shaman Girl Jia"> | |||
<p class="quest-detail-value">Shaman Girl Jia</p> | |||
</div> | |||
</div> | |||
<div class="quest-detail-item"> | |||
<h5 class="quest-section-title">Location:</h5> | |||
<div class="quest-detail-label"> | |||
<img class="quest-location-image" | |||
src="https://mewsie.world/CoraTOWiki/images/b/b0/ShamanJia-CoralBeach.png?20251018161415" | |||
alt="Coral Beach Location"> | |||
<p class="quest-detail-value"> <br>Coral Town - Blooming Cora</br></p> | |||
</div> | |||
</div> | |||
<div class="quest-detail-item"> | |||
<h5 class="quest-section-title">Requirement:</h5> | |||
<div class="quest-detail-label"> | |||
<img class="quest-location-image" | |||
src="https://wikimirror.lifeto.co/asset.103.ggftw.net/wiki/to-w/images/f/f9/Mind%27s_Eye.jpg" | |||
alt="Mind's Eye"> | |||
<p class="quest-detail-value"> <br>Level 180+, Mind's Eye skill active</br></p> | |||
</div> | |||
</div> | |||
</div> | |||
</div> | |||
<div class="monster-info-grid"> | |||
<div class="monster-info-card" data-level="180-183"> | |||
<div class="monster-card-header"> | |||
<h4><a href="https://wikimirror.lifeto.co/wiki.ggftw.com/trickster/Shadow_Torobbie.html" | |||
target="_blank">Shadow Torobbie</a></h4> | |||
<span class="monster-level-badge">Lv. 324</span> | |||
</div> | |||
<div class="image-container"> | |||
<a href="https://wikimirror.lifeto.co/asset.103.ggftw.net/wiki/to-w/images/5/55/Torobbie.gif" | |||
target="_blank"> | |||
<img src="https://wikimirror.lifeto.co/asset.103.ggftw.net/wiki/to-w/images/5/55/Torobbie.gif" | |||
alt="Shadow Torobbie" width="120"> | |||
</a> | |||
</div> | |||
<div class="monster-stats-details"> | |||
<div class="monster-stat-info"> | |||
<span class="monster-stat-label">Player Level:</span> | |||
<span class="monster-stat-value">180-183</span> | |||
</div> | |||
<div class="monster-stat-info"> | |||
<span class="monster-stat-label">Location:</span> | |||
<span class="monster-stat-value"><a | |||
href="https://wikimirror.lifeto.co/wiki.ggftw.com/trickster/Coral_Beach_Field_1_-_Blue_Wave.html" | |||
target="_blank">Coral Beach Field 1 - Blue Wave</a></span> | |||
</div> | |||
<div class="monster-stat-info"> | |||
<span class="monster-stat-label">Kill Count:</span> | |||
<span class="monster-stat-value">3 monsters</span> | |||
</div> | |||
<div class="monster-stat-info"> | |||
<span class="monster-stat-label">Time Limit:</span> | |||
<span class="monster-stat-value">15 minutes</span> | |||
</div> | |||
<div class="monster-rewards-section"> | |||
<div class="monster-reward-item"> | |||
<span class="monster-reward-label">Reward:</span> | |||
<span class="monster-reward-value">100k Galder Check + <a | |||
href="https://mewsie.world/CoraTOWiki/index.php/Cora_Boxes" target="_blank">Major Cora Box</a></span> | |||
</div> | |||
</div> | |||
</div> | |||
</div> | |||
<div class="monster-info-card" data-level="184-187"> | |||
<div class="monster-card-header"> | |||
<h4><a href="https://wikimirror.lifeto.co/wiki.ggftw.com/trickster/Shadow_Bad_Fury.html" | |||
target="_blank">Shadow Bad Fury</a></h4> | |||
<span class="monster-level-badge">Lv. 327</span> | |||
</div> | |||
<div class="image-container"> | |||
<a href="https://wikimirror.lifeto.co/asset.103.ggftw.net/wiki/to-w/images/d/d2/Bad_Fury.gif" | |||
target="_blank"> | |||
<img src="https://wikimirror.lifeto.co/asset.103.ggftw.net/wiki/to-w/images/d/d2/Bad_Fury.gif" | |||
alt="Shadow Bad Fury" width="120"> | |||
</a> | |||
</div> | |||
<div class="monster-stats-details"> | |||
<div class="monster-stat-info"> | |||
<span class="monster-stat-label">Player Level:</span> | |||
<span class="monster-stat-value">184-187</span> | |||
</div> | |||
<div class="monster-stat-info"> | |||
<span class="monster-stat-label">Location:</span> | |||
<span class="monster-stat-value"><a | |||
href="https://wikimirror.lifeto.co/wiki.ggftw.com/trickster/Coral_Beach_Field_2_-_Passionate_Sun.html" | |||
target="_blank">Coral Beach Field 2 - Passionate Sun</a></span> | |||
</div> | |||
<div class="monster-stat-info"> | |||
<span class="monster-stat-label">Kill Count:</span> | |||
<span class="monster-stat-value">3 monsters</span> | |||
</div> | |||
<div class="monster-stat-info"> | |||
<span class="monster-stat-label">Time Limit:</span> | |||
<span class="monster-stat-value">10 minutes</span> | |||
</div> | |||
<div class="monster-rewards-section"> | |||
<div class="monster-reward-item"> | |||
<span class="monster-reward-label">Reward:</span> | |||
<span class="monster-reward-value">100k Galder Check + <a | |||
href="https://mewsie.world/CoraTOWiki/index.php/Cora_Boxes" target="_blank">Major Cora Box</a></span> | |||
</div> | |||
</div> | |||
</div> | |||
</div> | |||
<div class="monster-info-card" data-level="188-191"> | |||
<div class="monster-card-header"> | |||
<h4><a href="https://wikimirror.lifeto.co/wiki.ggftw.com/trickster/Shadow_Little_Cora.html" | |||
target="_blank">Shadow Little Cora</a></h4> | |||
<span class="monster-level-badge">Lv. 333</span> | |||
</div> | |||
<div class="image-container"> | |||
<a href="https://wikimirror.lifeto.co/asset.103.ggftw.net/wiki/to-w/images/f/f0/Little_Cora.gif" | |||
target="_blank"> | |||
<img src="https://wikimirror.lifeto.co/asset.103.ggftw.net/wiki/to-w/images/f/f0/Little_Cora.gif" | |||
alt="Shadow Little Cora" width="120"> | |||
</a> | |||
</div> | |||
<div class="monster-stats-details"> | |||
<div class="monster-stat-info"> | |||
<span class="monster-stat-label">Player Level:</span> | |||
<span class="monster-stat-value">188-191</span> | |||
</div> | |||
<div class="monster-stat-info"> | |||
<span class="monster-stat-label">Location:</span> | |||
<span class="monster-stat-value"><a | |||
href="https://wikimirror.lifeto.co/wiki.ggftw.com/trickster/Coral_Beach_Field_2_-_Passionate_Sun.html" | |||
target="_blank">Coral Beach Field 2 - Passionate Sun</a></span> | |||
</div> | |||
<div class="monster-stat-info"> | |||
<span class="monster-stat-label">Kill Count:</span> | |||
<span class="monster-stat-value">3 monsters</span> | |||
</div> | |||
<div class="monster-stat-info"> | |||
<span class="monster-stat-label">Time Limit:</span> | |||
<span class="monster-stat-value">11 minutes</span> | |||
</div> | |||
<div class="monster-rewards-section"> | |||
<div class="monster-reward-item"> | |||
<span class="monster-reward-label">Reward:</span> | |||
<span class="monster-reward-value">100k Galder Check + <a | |||
href="https://mewsie.world/CoraTOWiki/index.php/Cora_Boxes" target="_blank">Major Cora Box</a></span> | |||
</div> | |||
</div> | |||
</div> | |||
</div> | |||
<div class="monster-info-card" data-level="192-195"> | |||
<div class="monster-card-header"> | |||
<h4><a href="https://wikimirror.lifeto.co/wiki.ggftw.com/trickster/Shadow_Bustshell.html" | |||
target="_blank">Shadow Bustshell</a></h4> | |||
<span class="monster-level-badge">Lv. 339</span> | |||
</div> | |||
<div class="image-container"> | |||
<a href="https://wikimirror.lifeto.co/asset.103.ggftw.net/wiki/to-w/images/1/1c/Bustshell.gif" | |||
target="_blank"> | |||
<img src="https://wikimirror.lifeto.co/asset.103.ggftw.net/wiki/to-w/images/1/1c/Bustshell.gif" | |||
alt="Shadow Bustshell" width="120"> | |||
</a> | |||
</div> | |||
<div class="monster-stats-details"> | |||
<div class="monster-stat-info"> | |||
<span class="monster-stat-label">Player Level:</span> | |||
<span class="monster-stat-value">192-195</span> | |||
</div> | |||
<div class="monster-stat-info"> | |||
<span class="monster-stat-label">Location:</span> | |||
<span class="monster-stat-value"><a | |||
href="https://wikimirror.lifeto.co/wiki.ggftw.com/trickster/Coral_Beach_Field_2_-_Passionate_Sun.html" | |||
target="_blank">Coral Beach Field 2 - Passionate Sun</a></span> | |||
</div> | |||
<div class="monster-stat-info"> | |||
<span class="monster-stat-label">Kill Count:</span> | |||
<span class="monster-stat-value">3 monsters</span> | |||
</div> | |||
<div class="monster-stat-info"> | |||
<span class="monster-stat-label">Time Limit:</span> | |||
<span class="monster-stat-value">11 minutes</span> | |||
</div> | |||
<div class="monster-rewards-section"> | |||
<div class="monster-reward-item"> | |||
<span class="monster-reward-label">Reward:</span> | |||
<span class="monster-reward-value">100k Galder Check + <a | |||
href="https://mewsie.world/CoraTOWiki/index.php/Cora_Boxes" target="_blank">Major Cora Box</a></span> | |||
</div> | |||
</div> | |||
</div> | |||
</div> | |||
<div class="monster-info-card" data-level="196+"> | |||
<div class="monster-card-header"> | |||
<h4><a href="https://wikimirror.lifeto.co/wiki.ggftw.com/trickster/Shadow_Addax.html" | |||
target="_blank">Shadow Addax</a></h4> | |||
<span class="monster-level-badge">Lv. 349</span> | |||
</div> | |||
<div class="image-container"> | |||
<a href="https://wikimirror.lifeto.co/asset.103.ggftw.net/wiki/to-w/images/b/bb/Addax.gif" | |||
target="_blank"> | |||
<img src="https://wikimirror.lifeto.co/asset.103.ggftw.net/wiki/to-w/images/b/bb/Addax.gif" | |||
alt="Shadow Addax" width="120"> | |||
</a> | |||
</div> | |||
<div class="monster-stats-details"> | |||
<div class="monster-stat-info"> | |||
<span class="monster-stat-label">Player Level:</span> | |||
<span class="monster-stat-value">196+</span> | |||
</div> | |||
<div class="monster-stat-info"> | |||
<span class="monster-stat-label">Location:</span> | |||
<span class="monster-stat-value"><a | |||
href="https://wikimirror.lifeto.co/wiki.ggftw.com/trickster/Coral_Beach_-_Dark_Cave.html" | |||
target="_blank">Coral Beach - Dark Cave</a></span> | |||
</div> | |||
<div class="monster-stat-info"> | |||
<span class="monster-stat-label">Kill Count:</span> | |||
<span class="monster-stat-value">3 monsters</span> | |||
</div> | |||
<div class="monster-stat-info"> | |||
<span class="monster-stat-label">Time Limit:</span> | |||
<span class="monster-stat-value">10 minutes</span> | |||
</div> | |||
<div class="monster-rewards-section"> | |||
<div class="monster-reward-item"> | |||
<span class="monster-reward-label">Reward:</span> | |||
<span class="monster-reward-value">100k Galder Check + <a | |||
href="https://mewsie.world/CoraTOWiki/index.php/Cora_Boxes" target="_blank">Major Cora Box</a></span> | |||
</div> | |||
</div> | |||
</div> | |||
</div> | |||
</div> | |||
</div> | |||
<!-- DESERT BEACH TAB --> | |||
<div id="tab-desert" class="nested-content"> | |||
<div class="section-header"> | |||
<h2>Dark Spirit Punishment 2 - Desert Beach</h2> | |||
</div> | |||
<div class="quest-info-card"> | |||
<div class="quest-card-header"> | |||
<h3>Quest Details</h3> | |||
<span class="quest-number-badge">#2</span> | |||
</div> | |||
<div class="quest-details-grid"> | |||
<div class="quest-detail-item"> | |||
<h5 class="quest-section-title">NPC:</h5> | |||
<div class="quest-detail-label"> | |||
<img class="image-container" | |||
src="https://wikimirror.lifeto.co/asset.103.ggftw.net/wiki/to-w/images/6/6b/Shaman_Girl_Jia.gif" | |||
alt="Shaman Girl Jia"> | |||
<p class="quest-detail-value">Shaman Girl Jia</p> | |||
</div> | |||
</div> | |||
<div class="quest-detail-item"> | |||
<h5 class="quest-section-title">Location:</h5> | |||
<div class="quest-detail-label"> | |||
<img class="quest-location-image" | |||
src="https://mewsie.world/CoraTOWiki/images/5/5b/ShamanJia-DesertBeach.png" | |||
alt="Desert Beach Location"> | |||
<p class="quest-detail-value"> <br>Beach Town - Paradise</br></p> | |||
</div> | |||
</div> | |||
<div class="quest-detail-item"> | |||
<h5 class="quest-section-title">Requirement:</h5> | |||
<div class="quest-detail-label"> | |||
<img class="quest-location-image" | |||
src="https://wikimirror.lifeto.co/asset.103.ggftw.net/wiki/to-w/images/f/f9/Mind%27s_Eye.jpg" | |||
alt="Desert Beach Location"> | |||
<p class="quest-detail-value"> <br>Level 195+, Mind's Eye skill active</br></p> | |||
</div> | |||
</div> | |||
</div> | |||
<div class="monster-info-grid"> | |||
<div class="monster-info-card" data-level="195-198"> | |||
<div class="monster-card-header"> | |||
<h4><a href="https://wikimirror.lifeto.co/wiki.ggftw.com/trickster/Shadow_Fanta_Slime.html" | |||
target="_blank">Shadow Fanta Slime</a></h4> | |||
<span class="monster-level-badge">Lv. 351</span> | |||
</div> | |||
<div class="image-container"> | |||
<img src="https://wikimirror.lifeto.co/asset.103.ggftw.net/wiki/to-w/images/8/83/Fanta_Slime.gif" | |||
alt="Shadow Fanta Slime" width="75"> | |||
</div> | |||
<div class="monster-stats-details"> | |||
<div class="monster-stat-info"> | |||
<span class="monster-stat-label">Player Level:</span> | |||
<span class="monster-stat-value">195-198</span> | |||
</div> | |||
<div class="monster-stat-info"> | |||
<span class="monster-stat-label">Location:</span> | |||
<span class="monster-stat-value"><a | |||
href="https://wikimirror.lifeto.co/wiki.ggftw.com/trickster/Desert_Beach_Field_1_-_Delta_Island.html" | |||
target="_blank">Desert Beach Field 1 - Delta Island</a></span> | |||
</div> | |||
<div class="monster-stat-info"> | |||
<span class="monster-stat-label">Kill Count:</span> | |||
<span class="monster-stat-value">3 monsters</span> | |||
</div> | |||
<div class="monster-stat-info"> | |||
<span class="monster-stat-label">Time Limit:</span> | |||
<span class="monster-stat-value">12 minutes</span> | |||
</div> | |||
<div class="monster-rewards-section"> | |||
<div class="monster-reward-item"> | |||
<span class="monster-reward-label">Reward:</span> | |||
<span class="monster-reward-value">100k Galder Check + <a | |||
href="https://mewsie.world/CoraTOWiki/index.php/Cora_Boxes" target="_blank">Major Cora Box</a></span> | |||
</div> | |||
</div> | |||
</div> | |||
</div> | |||
<div class="monster-info-card" data-level="199-202"> | |||
<div class="monster-card-header"> | |||
<h4><a href="https://wikimirror.lifeto.co/wiki.ggftw.com/trickster/Shadow_Hula_Octopus.html" | |||
target="_blank">Shadow Hula Octopus</a></h4> | |||
<span class="monster-level-badge">Lv. 355</span> | |||
</div> | |||
<div class="image-container"> | |||
<img src="https://wikimirror.lifeto.co/asset.103.ggftw.net/wiki/to-w/images/5/5d/Octopus.gif" | |||
alt="Shadow Hula Octopus" width="120"> | |||
</div> | |||
<div class="monster-stats-details"> | |||
<div class="monster-stat-info"> | |||
<span class="monster-stat-label">Player Level:</span> | |||
<span class="monster-stat-value">199-202</span> | |||
</div> | |||
<div class="monster-stat-info"> | |||
<span class="monster-stat-label">Location:</span> | |||
<span class="monster-stat-value"><a | |||
href="https://wikimirror.lifeto.co/wiki.ggftw.com/trickster/Desert_Beach_Field_2_-_Sand_Palace.html" | |||
target="_blank">Desert Beach Field 2 - Sand Palace</a></span> | |||
</div> | |||
<div class="monster-stat-info"> | |||
<span class="monster-stat-label">Kill Count:</span> | |||
<span class="monster-stat-value">3 monsters</span> | |||
</div> | |||
<div class="monster-stat-info"> | |||
<span class="monster-stat-label">Time Limit:</span> | |||
<span class="monster-stat-value">12 minutes</span> | |||
</div> | |||
<div class="monster-rewards-section"> | |||
<div class="monster-reward-item"> | |||
<span class="monster-reward-label">Reward:</span> | |||
<span class="monster-reward-value">100k Galder Check + <a | |||
href="https://mewsie.world/CoraTOWiki/index.php/Cora_Boxes" target="_blank">Major Cora Box</a></span> | |||
</div> | |||
</div> | |||
</div> | |||
</div> | |||
<div class="monster-info-card" data-level="203-205"> | |||
<div class="monster-card-header"> | |||
<h4><a href="https://wikimirror.lifeto.co/wiki.ggftw.com/trickster/Shadow_Sea_Scorpion.html" | |||
target="_blank">Shadow Sea Scorpion</a></h4> | |||
<span class="monster-level-badge">Lv. 357</span> | |||
</div> | |||
<div class="image-container"> | |||
<a href="https://wikimirror.lifeto.co/asset.103.ggftw.net/wiki/to-w/images/9/96/Sea_Scorpion.gif" | |||
target="_blank"> | |||
<img src="https://wikimirror.lifeto.co/asset.103.ggftw.net/wiki/to-w/images/9/96/Sea_Scorpion.gif" | |||
alt="Shadow Sea Scorpion" width="120"> | |||
</a> | |||
</div> | |||
<div class="monster-stats-details"> | |||
<div class="monster-stat-info"> | |||
<span class="monster-stat-label">Player Level:</span> | |||
<span class="monster-stat-value">203-205</span> | |||
</div> | |||
<div class="monster-stat-info"> | |||
<span class="monster-stat-label">Location:</span> | |||
<span class="monster-stat-value"><a | |||
href="https://wikimirror.lifeto.co/wiki.ggftw.com/trickster/Desert_Beach_Field_3_-_Statue_of_Anubis.html" | |||
target="_blank">Desert Beach Field 3 - Statue of Anubis</a></span> | |||
</div> | |||
<div class="monster-stat-info"> | |||
<span class="monster-stat-label">Kill Count:</span> | |||
<span class="monster-stat-value">3 monsters</span> | |||
</div> | |||
<div class="monster-stat-info"> | |||
<span class="monster-stat-label">Time Limit:</span> | |||
<span class="monster-stat-value">11 minutes</span> | |||
</div> | |||
<div class="monster-rewards-section"> | |||
<div class="monster-reward-item"> | |||
<span class="monster-reward-label">Reward:</span> | |||
<span class="monster-reward-value">100k Galder Check + <a | |||
href="https://mewsie.world/CoraTOWiki/index.php/Cora_Boxes" target="_blank">Major Cora Box</a></span> | |||
</div> | |||
</div> | |||
</div> | |||
</div> | |||
<div class="monster-info-card" data-level="206-209"> | |||
<div class="monster-card-header"> | |||
<h4><a href="https://wikimirror.lifeto.co/wiki.ggftw.com/trickster/Shadow_Oran_G.html" | |||
target="_blank">Shadow Oran G</a></h4> | |||
<span class="monster-level-badge">Lv. 362</span> | |||
</div> | |||
<div class="image-container"> | |||
<a href="https://wikimirror.lifeto.co/asset.103.ggftw.net/wiki/to-w/images/8/8a/Oran_G.gif" | |||
target="_blank"> | |||
<img src="https://wikimirror.lifeto.co/asset.103.ggftw.net/wiki/to-w/images/3/3b/Orange_Bettle.gif" | |||
alt="Shadow Oran G" width="120"> | |||
</a> | |||
</div> | |||
<div class="monster-stats-details"> | |||
<div class="monster-stat-info"> | |||
<span class="monster-stat-label">Player Level:</span> | |||
<span class="monster-stat-value">206-209</span> | |||
</div> | |||
<div class="monster-stat-info"> | |||
<span class="monster-stat-label">Location:</span> | |||
<span class="monster-stat-value"><a | |||
href="https://wikimirror.lifeto.co/wiki.ggftw.com/trickster/Pyramid_Dungeon_1_-_Hall_of_the_Slave.html" | |||
target="_blank">Pyramid Dungeon 1 - Hall of the Slave</a></span> | |||
</div> | |||
<div class="monster-stat-info"> | |||
<span class="monster-stat-label">Kill Count:</span> | |||
<span class="monster-stat-value">3 monsters</span> | |||
</div> | |||
<div class="monster-stat-info"> | |||
<span class="monster-stat-label">Time Limit:</span> | |||
<span class="monster-stat-value">11 minutes</span> | |||
</div> | |||
<div class="monster-rewards-section"> | |||
<div class="monster-reward-item"> | |||
<span class="monster-reward-label">Reward:</span> | |||
<span class="monster-reward-value">100k Galder Check + <a | |||
href="https://mewsie.world/CoraTOWiki/index.php/Cora_Boxes" target="_blank">Major Cora Box</a></span> | |||
</div> | |||
</div> | |||
</div> | |||
</div> | |||
<div class="monster-info-card" data-level="210+"> | |||
<div class="monster-card-header"> | |||
<h4><a href="https://wikimirror.lifeto.co/wiki.ggftw.com/trickster/Shadow_Basic_Mummy.html" | |||
target="_blank">Shadow Basic Mummy</a></h4> | |||
<span class="monster-level-badge">Lv. 370</span> | |||
</div> | |||
<div class="image-container"> | |||
<img src="https://wikimirror.lifeto.co/asset.103.ggftw.net/wiki/to-w/images/d/dd/Mummy.gif" | |||
alt="Shadow Basic Mummy" width="120"> | |||
</div> | |||
<div class="monster-stats-details"> | |||
<div class="monster-stat-info"> | |||
<span class="monster-stat-label">Player Level:</span> | |||
<span class="monster-stat-value">210+</span> | |||
</div> | |||
<div class="monster-stat-info"> | |||
<span class="monster-stat-label">Location:</span> | |||
<span class="monster-stat-value"><a | |||
href="https://wikimirror.lifeto.co/wiki.ggftw.com/trickster/Pyramid_Dungeon_3_-_Hall_of_Bastet.html" | |||
target="_blank">Pyramid Dungeon 3 - Hall of Bastet</a> / <a | |||
href="https://wikimirror.lifeto.co/wiki.ggftw.com/trickster/Pyramid_Dungeon_4_-_Hall_of_the_Dead.html" | |||
target="_blank">Pyramid Dungeon 4 - Hall of the Dead</a> / <a | |||
href="https://wikimirror.lifeto.co/wiki.ggftw.com/trickster/Pyramid_Dungeon_6_-_Hall_of_the_Queen.html" | |||
target="_blank">Pyramid Dungeon 6 - Hall of the Queen</a></span> | |||
</div> | |||
<div class="monster-stat-info"> | |||
<span class="monster-stat-label">Kill Count:</span> | |||
<span class="monster-stat-value">3 monsters</span> | |||
</div> | |||
<div class="monster-stat-info"> | |||
<span class="monster-stat-label">Time Limit:</span> | |||
<span class="monster-stat-value">10 minutes</span> | |||
</div> | |||
<div class="monster-rewards-section"> | |||
<div class="monster-reward-item"> | |||
<span class="monster-reward-label">Reward:</span> | |||
<span class="monster-reward-value">100k Galder Check + <a | |||
href="https://mewsie.world/CoraTOWiki/index.php/Cora_Boxes" target="_blank">Major Cora Box</a></span> | |||
</div> | |||
</div> | |||
</div> | |||
</div> | |||
</div> | |||
</div> | |||
</div> | |||
<!-- MEGALOPOLIS TAB --> | |||
<div id="tab-mega" class="nested-content"> | |||
<div class="section-header"> | |||
<h2>Dark Spirit Punishment 3 - Megalopolis</h2> | |||
</div> | |||
<div class="quest-info-card"> | |||
<div class="quest-card-header"> | |||
<h3>Quest Details</h3> | |||
<span class="quest-number-badge">#3</span> | |||
</div> | |||
<div class="quest-details-grid"> | |||
<div class="quest-detail-item"> | |||
<h5 class="quest-section-title">NPC:</h5> | |||
<div class="quest-detail-label"> | |||
<img class="image-container" | |||
src="https://wikimirror.lifeto.co/asset.103.ggftw.net/wiki/to-w/images/6/6b/Shaman_Girl_Jia.gif" | |||
alt="Shaman Girl Jia"> | |||
<p class="quest-detail-value">Shaman Girl Jia</p> | |||
</div> | |||
</div> | |||
<div class="quest-detail-item"> | |||
<h5 class="quest-section-title">Location:</h5> | |||
<div class="quest-detail-label"> | |||
<img class="quest-location-image" | |||
src="https://mewsie.world/CoraTOWiki/images/f/fd/ShamanJia-Megalopolis.png" | |||
alt="Megalopolis Location"> | |||
<p class="quest-detail-value"> <br>Megalopolis Square</br></p> | |||
</div> | |||
</div> | |||
<div class="quest-detail-item"> | |||
<h5 class="quest-section-title">Requirement:</h5> | |||
<div class="quest-detail-label"> | |||
<img class="quest-location-image" | |||
src="https://wikimirror.lifeto.co/asset.103.ggftw.net/wiki/to-w/images/f/f9/Mind%27s_Eye.jpg" | |||
alt="Mind's Eye"> | |||
<p class="quest-detail-value"> <br>Level 210+, Mind's Eye skill active</br></p> | |||
</div> | |||
</div> | |||
</div> | |||
</div> | |||
<div class="monster-info-grid"> | |||
<div class="monster-info-card" data-level="210-213"> | |||
<div class="monster-card-header"> | |||
<h4><a href="https://wikimirror.lifeto.co/wiki.ggftw.com/trickster/Shadow_Yamu.html" | |||
target="_blank">Shadow Yamu</a></h4> | |||
<span class="monster-level-badge">Lv. 378</span> | |||
</div> | |||
<div class="image-container"> | |||
<a href="https://wikimirror.lifeto.co/asset.103.ggftw.net/wiki/to-w/images/d/de/Pink_Chipmunk.gif" | |||
target="_blank"> | |||
<img src="https://wikimirror.lifeto.co/asset.103.ggftw.net/wiki/to-w/images/d/de/Pink_Chipmunk.gif" | |||
alt="Shadow Yamu" width="120"> | |||
</a> | |||
</div> | |||
<div class="monster-stats-details"> | |||
<div class="monster-stat-info"> | |||
<span class="monster-stat-label">Player Level:</span> | |||
<span class="monster-stat-value">210-213</span> | |||
</div> | |||
<div class="monster-stat-info"> | |||
<span class="monster-stat-label">Location:</span> | |||
<span class="monster-stat-value"><a | |||
href="https://wikimirror.lifeto.co/wiki.ggftw.com/trickster/Path_to_Desert_Beach.html" | |||
target="_blank">Path to Desert Beach</a></span> | |||
</div> | |||
<div class="monster-stat-info"> | |||
<span class="monster-stat-label">Kill Count:</span> | |||
<span class="monster-stat-value">3 monsters</span> | |||
</div> | |||
<div class="monster-stat-info"> | |||
<span class="monster-stat-label">Time Limit:</span> | |||
<span class="monster-stat-value">12 minutes</span> | |||
</div> | |||
<div class="monster-rewards-section"> | |||
<div class="monster-reward-item"> | |||
<span class="monster-reward-label">Reward:</span> | |||
<span class="monster-reward-value">100k Galder Check + <a | |||
href="https://mewsie.world/CoraTOWiki/index.php/Cora_Boxes" target="_blank">Major Cora Box</a></span> | |||
</div> | |||
</div> | |||
</div> | |||
</div> | |||
<div class="monster-info-card" data-level="213-217"> | |||
<div class="monster-card-header"> | |||
<h4><a href="https://wikimirror.lifeto.co/wiki.ggftw.com/trickster/Shadow_Pochi.html" | |||
target="_blank">Shadow Pochi</a></h4> | |||
<span class="monster-level-badge">Lv. 380</span> | |||
</div> | |||
<div class="image-container"> | |||
<a href="https://wikimirror.lifeto.co/asset.103.ggftw.net/wiki/to-w/images/4/43/Pochi.gif" | |||
target="_blank"> | |||
<img src="https://wikimirror.lifeto.co/asset.103.ggftw.net/wiki/to-w/images/4/43/Pochi.gif" | |||
alt="Shadow Pochi" width="120"> | |||
</a> | |||
</div> | |||
<div class="monster-stats-details"> | |||
<div class="monster-stat-info"> | |||
<span class="monster-stat-label">Player Level:</span> | |||
<span class="monster-stat-value">213-217</span> | |||
</div> | |||
<div class="monster-stat-info"> | |||
<span class="monster-stat-label">Location:</span> | |||
<span class="monster-stat-value"><a | |||
href="https://wikimirror.lifeto.co/wiki.ggftw.com/trickster/Path_to_Desert_Beach.html" | |||
target="_blank">Path to Desert Beach</a> and <a | |||
href="https://wikimirror.lifeto.co/wiki.ggftw.com/trickster/Southeast_Forest.html" | |||
target="_blank">Southeast Forest</a></span> | |||
</div> | |||
<div class="monster-stat-info"> | |||
<span class="monster-stat-label">Kill Count:</span> | |||
<span class="monster-stat-value">3 monsters</span> | |||
</div> | |||
<div class="monster-stat-info"> | |||
<span class="monster-stat-label">Time Limit:</span> | |||
<span class="monster-stat-value">12 minutes</span> | |||
</div> | |||
<div class="monster-rewards-section"> | |||
<div class="monster-reward-item"> | |||
<span class="monster-reward-label">Reward:</span> | |||
<span class="monster-reward-value">100k Galder Check + <a | |||
href="https://mewsie.world/CoraTOWiki/index.php/Cora_Boxes" target="_blank">Major Cora Box</a></span> | |||
</div> | |||
</div> | |||
</div> | |||
</div> | |||
<div class="monster-info-card" data-level="218-221"> | |||
<div class="monster-card-header"> | |||
<h4><a href="https://wikimirror.lifeto.co/wiki.ggftw.com/trickster/Shadow_Sppo.html" | |||
target="_blank">Shadow Sppo</a></h4> | |||
<span class="monster-level-badge">Lv. 388</span> | |||
</div> | |||
<div class="image-container"> | |||
<a href="https://wikimirror.lifeto.co/asset.103.ggftw.net/wiki/to-w/images/4/45/Sppo.gif" | |||
target="_blank"> | |||
<img src="https://wikimirror.lifeto.co/asset.103.ggftw.net/wiki/to-w/images/4/45/Sppo.gif" | |||
alt="Shadow Sppo" width="120"> | |||
</a> | |||
</div> | |||
<div class="monster-stats-details"> | |||
<div class="monster-stat-info"> | |||
<span class="monster-stat-label">Player Level:</span> | |||
<span class="monster-stat-value">218-221</span> | |||
</div> | |||
<div class="monster-stat-info"> | |||
<span class="monster-stat-label">Location:</span> | |||
<span class="monster-stat-value"><a | |||
href="https://wikimirror.lifeto.co/wiki.ggftw.com/trickster/Poppuri_Dungeon_-_Rainbow_Cave.html" | |||
target="_blank">Poppuri Dungeon - Rainbow Cave</a> and <a | |||
href="https://wikimirror.lifeto.co/wiki.ggftw.com/trickster/Poppuri_Dungeon_-_Root_Cave.html" | |||
target="_blank">Root Cave</a></span> | |||
</div> | |||
<div class="monster-stat-info"> | |||
<span class="monster-stat-label">Kill Count:</span> | |||
<span class="monster-stat-value">3 monsters</span> | |||
</div> | |||
<div class="monster-stat-info"> | |||
<span class="monster-stat-label">Time Limit:</span> | |||
<span class="monster-stat-value">11 minutes</span> | |||
</div> | |||
<div class="monster-rewards-section"> | |||
<div class="monster-reward-item"> | |||
<span class="monster-reward-label">Reward:</span> | |||
<span class="monster-reward-value">100k Galder Check + <a | |||
href="https://mewsie.world/CoraTOWiki/index.php/Cora_Boxes" target="_blank">Major Cora Box</a></span> | |||
</div> | |||
</div> | |||
</div> | |||
</div> | |||
<div class="monster-info-card" data-level="222-225"> | |||
<div class="monster-card-header"> | |||
<h4><a href="https://wikimirror.lifeto.co/wiki.ggftw.com/trickster/Shadow_Forest_Tickler.html" | |||
target="_blank">Shadow Forest Tickler</a></h4> | |||
<span class="monster-level-badge">Lv. 398</span> | |||
</div> | |||
<div class="image-container"> | |||
<a href="https://wikimirror.lifeto.co/asset.103.ggftw.net/wiki/to-w/images/f/f9/Tickler.gif" | |||
target="_blank"> | |||
<img src="https://wikimirror.lifeto.co/asset.103.ggftw.net/wiki/to-w/images/f/f9/Tickler.gif" | |||
alt="Shadow Forest Tickler" width="120"> | |||
</a> | |||
</div> | |||
<div class="monster-stats-details"> | |||
<div class="monster-stat-info"> | |||
<span class="monster-stat-label">Player Level:</span> | |||
<span class="monster-stat-value">222-225</span> | |||
</div> | |||
<div class="monster-stat-info"> | |||
<span class="monster-stat-label">Location:</span> | |||
<span class="monster-stat-value"><a | |||
href="https://wikimirror.lifeto.co/wiki.ggftw.com/trickster/Southwest_Forest.html" | |||
target="_blank">Southwest Forest</a></span> | |||
</div> | |||
<div class="monster-stat-info"> | |||
<span class="monster-stat-label">Kill Count:</span> | |||
<span class="monster-stat-value">3 monsters</span> | |||
</div> | |||
<div class="monster-stat-info"> | |||
<span class="monster-stat-label">Time Limit:</span> | |||
<span class="monster-stat-value">11 minutes</span> | |||
</div> | |||
<div class="monster-rewards-section"> | |||
<div class="monster-reward-item"> | |||
<span class="monster-reward-label">Reward:</span> | |||
<span class="monster-reward-value">100k Galder Check + <a | |||
href="https://mewsie.world/CoraTOWiki/index.php/Cora_Boxes" target="_blank">Major Cora Box</a></span> | |||
</div> | |||
</div> | |||
</div> | |||
</div> | |||
<div class="monster-info-card" data-level="226+"> | |||
<div class="monster-card-header"> | |||
<h4><a href="https://wikimirror.lifeto.co/wiki.ggftw.com/trickster/Shadow_Turvy.html" | |||
target="_blank">Shadow Turvy</a></h4> | |||
<span class="monster-level-badge">Lv. 396</span> | |||
</div> | |||
<div class="image-container"> | |||
<a href="https://wikimirror.lifeto.co/asset.103.ggftw.net/wiki/to-w/images/1/16/Turvy.gif" | |||
target="_blank"> | |||
<img src="https://wikimirror.lifeto.co/asset.103.ggftw.net/wiki/to-w/images/1/16/Turvy.gif" | |||
alt="Shadow Turvy" width="120"> | |||
</a> | |||
</div> | |||
<div class="monster-stats-details"> | |||
<div class="monster-stat-info"> | |||
<span class="monster-stat-label">Player Level:</span> | |||
<span class="monster-stat-value">226+</span> | |||
</div> | |||
<div class="monster-stat-info"> | |||
<span class="monster-stat-label">Location:</span> | |||
<span class="monster-stat-value"><a | |||
href="https://wikimirror.lifeto.co/wiki.ggftw.com/trickster/Poppuri_Dungeon_-_Spore_Cave.html" | |||
target="_blank">Poppuri Dungeon - Spore Cave</a></span> | |||
</div> | |||
<div class="monster-stat-info"> | |||
<span class="monster-stat-label">Kill Count:</span> | |||
<span class="monster-stat-value">3 monsters</span> | |||
</div> | |||
<div class="monster-stat-info"> | |||
<span class="monster-stat-label">Time Limit:</span> | |||
<span class="monster-stat-value">10 minutes</span> | |||
</div> | |||
<div class="monster-rewards-section"> | |||
<div class="monster-reward-item"> | |||
<span class="monster-reward-label">Reward:</span> | |||
<span class="monster-reward-value">100k Galder Check + <a | |||
href="https://mewsie.world/CoraTOWiki/index.php/Cora_Boxes" target="_blank">Major Cora Box</a></span> | |||
</div> | |||
</div> | |||
</div> | |||
</div> | |||
</div> | |||
</div> | |||
<!-- Placeholder sections for other locations --> | |||
<!-- CABALLA RELICS TAB --> | |||
<div id="tab-caballa" class="nested-content"> | |||
<div class="section-header"> | |||
<h2>Dark Spirit Punishment 4 - Caballa Relics</h2> | |||
</div> | |||
<div class="quest-info-card"> | |||
<div class="quest-card-header"> | |||
<h3>Quest Details</h3> | |||
<span class="quest-number-badge">#4</span> | |||
</div> | |||
<div class="quest-details-grid"> | |||
<div class="quest-detail-item"> | |||
<h5 class="quest-section-title">NPC:</h5> | |||
<div class="quest-detail-label"> | |||
<img class="image-container" | |||
src="https://wikimirror.lifeto.co/asset.103.ggftw.net/wiki/to-w/images/6/6b/Shaman_Girl_Jia.gif" | |||
alt="Shaman Girl Jia"> | |||
<p class="quest-detail-value">Shaman Girl Jia</p> | |||
</div> | |||
</div> | |||
<div class="quest-detail-item"> | |||
<h5 class="quest-section-title">Location:</h5> | |||
<div class="quest-detail-label"> | |||
<img class="quest-location-image" | |||
src="https://mewsie.world/CoraTOWiki/images/e/e7/ShamanJia-Azteca.png" | |||
alt="Caballa Relics Location"> | |||
<p class="quest-detail-value"> <br>Relics Town - Azteca</br></p> | |||
</div> | |||
</div> | |||
<div class="quest-detail-item"> | |||
<h5 class="quest-section-title">Requirement:</h5> | |||
<div class="quest-detail-label"> | |||
<img class="quest-location-image" | |||
src="https://wikimirror.lifeto.co/asset.103.ggftw.net/wiki/to-w/images/f/f9/Mind%27s_Eye.jpg" | |||
alt="Mind's Eye"> | |||
<p class="quest-detail-value"> <br>Level 225+, Mind's Eye skill active</br></p> | |||
</div> | |||
</div> | |||
</div> | |||
</div> | |||
<div class="monster-info-grid"> | |||
<div class="monster-info-card" data-level="225-228"> | |||
<div class="monster-card-header"> | |||
<h4><a href="https://wikimirror.lifeto.co/wiki.ggftw.com/trickster/Leaf_Bird.html" | |||
target="_blank">Shadow | |||
Leaf Bird</a></h4> | |||
<span class="monster-level-badge">Lv. 405</span> | |||
</div> | |||
<div class="image-container"> | |||
<a href="https://wikimirror.lifeto.co/asset.103.ggftw.net/wiki/to-w/images/6/6f/Leaf_Bird.gif" | |||
target="_blank"> | |||
<img src="https://wikimirror.lifeto.co/asset.103.ggftw.net/wiki/to-w/images/6/6f/Leaf_Bird.gif" | |||
alt="Shadow Leaf Bird" width="120"> | |||
</a> | |||
</div> | |||
<div class="monster-stats-details"> | |||
<div class="monster-stat-info"> | |||
<span class="monster-stat-label">Player Level:</span> | |||
<span class="monster-stat-value">225-228</span> | |||
</div> | |||
<div class="monster-stat-info"> | |||
<span class="monster-stat-label">Location:</span> | |||
<span class="monster-stat-value"><a | |||
href="https://wikimirror.lifeto.co/wiki.ggftw.com/trickster/Path_to_Caballa_Relics.html" | |||
target="_blank">Path to Caballa Relics</a></span> | |||
</div> | |||
<div class="monster-stat-info"> | |||
<span class="monster-stat-label">Kill Count:</span> | |||
<span class="monster-stat-value">3 monsters</span> | |||
</div> | |||
<div class="monster-stat-info"> | |||
<span class="monster-stat-label">Time Limit:</span> | |||
<span class="monster-stat-value">12 minutes</span> | |||
</div> | |||
<div class="monster-rewards-section"> | |||
<div class="monster-reward-item"> | |||
<span class="monster-reward-label">Reward:</span> | |||
<span class="monster-reward-value">100k Galder Check + <a | |||
href="https://mewsie.world/CoraTOWiki/index.php/Cora_Boxes" target="_blank">Major Cora Box</a></span> | |||
</div> | |||
</div> | |||
</div> | |||
</div> | |||
<div class="monster-info-card" data-level="229-232"> | |||
<div class="monster-card-header"> | |||
<h4><a href="https://wikimirror.lifeto.co/wiki.ggftw.com/trickster/Stone_Soldier.html" | |||
target="_blank">Shadow Stone Soldier</a></h4> | |||
<span class="monster-level-badge">Lv. 409</span> | |||
</div> | |||
<div class="image-container"> | |||
<a href="https://wikimirror.lifeto.co/asset.103.ggftw.net/wiki/to-w/images/5/55/Stone_Soldier.gif" | |||
target="_blank"> | |||
<img src="https://wikimirror.lifeto.co/asset.103.ggftw.net/wiki/to-w/images/5/55/Stone_Soldier.gif" | |||
alt="Shadow Stone Soldier" width="120"> | |||
</a> | |||
</div> | |||
<div class="monster-stats-details"> | |||
<div class="monster-stat-info"> | |||
<span class="monster-stat-label">Player Level:</span> | |||
<span class="monster-stat-value">229-232</span> | |||
</div> | |||
<div class="monster-stat-info"> | |||
<span class="monster-stat-label">Location:</span> | |||
<span class="monster-stat-value"><a | |||
href="https://wikimirror.lifeto.co/wiki.ggftw.com/trickster/Relics_Field_1_-_Atlas.html" | |||
target="_blank">Relics Field 1 - Atlas</a> and <a | |||
href="https://wikimirror.lifeto.co/wiki.ggftw.com/trickster/Relics_Field_2_-_Hand_of_Giant.html" | |||
target="_blank">Relics Field 2 - Hand of Giant</a></span> | |||
</div> | |||
<div class="monster-stat-info"> | |||
<span class="monster-stat-label">Kill Count:</span> | |||
<span class="monster-stat-value">3 monsters</span> | |||
</div> | |||
<div class="monster-stat-info"> | |||
<span class="monster-stat-label">Time Limit:</span> | |||
<span class="monster-stat-value">12 minutes</span> | |||
</div> | |||
<div class="monster-rewards-section"> | |||
<div class="monster-reward-item"> | |||
<span class="monster-reward-label">Reward:</span> | |||
<span class="monster-reward-value">100k Galder Check + <a | |||
href="https://mewsie.world/CoraTOWiki/index.php/Cora_Boxes" target="_blank">Major Cora Box</a></span> | |||
</div> | |||
</div> | |||
</div> | |||
</div> | |||
<div class="monster-info-card" data-level="233-236"> | |||
<div class="monster-card-header"> | |||
<h4><a href="https://wikimirror.lifeto.co/wiki.ggftw.com/trickster/Mimic.html" target="_blank">Shadow | |||
Mimic</a></h4> | |||
<span class="monster-level-badge">Lv. 411</span> | |||
</div> | |||
<div class="image-container"> | |||
<a href="https://wikimirror.lifeto.co/asset.103.ggftw.net/wiki/to-w/images/6/69/Mimic.gif" | |||
target="_blank"> | |||
<img src="https://wikimirror.lifeto.co/asset.103.ggftw.net/wiki/to-w/images/6/69/Mimic.gif" | |||
alt="Shadow Mimic" width="120"> | |||
</a> | |||
</div> | |||
<div class="monster-stats-details"> | |||
<div class="monster-stat-info"> | |||
<span class="monster-stat-label">Player Level:</span> | |||
<span class="monster-stat-value">233-236</span> | |||
</div> | |||
<div class="monster-stat-info"> | |||
<span class="monster-stat-label">Location:</span> | |||
<span class="monster-stat-value"><a | |||
href="https://wikimirror.lifeto.co/wiki.ggftw.com/trickster/Relics_Field_2_-_Hand_of_Giant.html" | |||
target="_blank">Relics Field 2 - Hand of Giant</a>, <a | |||
href="https://wikimirror.lifeto.co/wiki.ggftw.com/trickster/Relics_Field_3_-_Monkey_Statues.html" | |||
target="_blank">Relics Field 3 - Monkey Statues</a>, and <a | |||
href="https://wikimirror.lifeto.co/wiki.ggftw.com/trickster/Relics_Field_4_-_An_Altar_for_Sacrifice.html" | |||
target="_blank">Relics Field 4 - An Altar for Sacrifice</a></span> | |||
</div> | |||
<div class="monster-stat-info"> | |||
<span class="monster-stat-label">Kill Count:</span> | |||
<span class="monster-stat-value">3 monsters</span> | |||
</div> | |||
<div class="monster-stat-info"> | |||
<span class="monster-stat-label">Time Limit:</span> | |||
<span class="monster-stat-value">11 minutes</span> | |||
</div> | |||
<div class="monster-rewards-section"> | |||
<div class="monster-reward-item"> | |||
<span class="monster-reward-label">Reward:</span> | |||
<span class="monster-reward-value">100k Galder Check + <a | |||
href="https://mewsie.world/CoraTOWiki/index.php/Cora_Boxes" target="_blank">Major Cora Box</a></span> | |||
</div> | |||
</div> | |||
</div> | |||
</div> | |||
<div class="monster-info-card" data-level="237-240"> | |||
<div class="monster-card-header"> | |||
<h4><a href="https://wikimirror.lifeto.co/wiki.ggftw.com/trickster/Guiana.html" target="_blank">Shadow | |||
Guiana</a></h4> | |||
<span class="monster-level-badge">Lv. 416</span> | |||
</div> | |||
<div class="image-container"> | |||
<a href="https://wikimirror.lifeto.co/asset.103.ggftw.net/wiki/to-w/images/d/d8/Guiana.gif" | |||
target="_blank"> | |||
<img src="https://wikimirror.lifeto.co/asset.103.ggftw.net/wiki/to-w/images/d/d8/Guiana.gif" | |||
alt="Shadow Guiana" width="120"> | |||
</a> | |||
</div> | |||
<div class="monster-stats-details"> | |||
<div class="monster-stat-info"> | |||
<span class="monster-stat-label">Player Level:</span> | |||
<span class="monster-stat-value">237-240</span> | |||
</div> | |||
<div class="monster-stat-info"> | |||
<span class="monster-stat-label">Location:</span> | |||
<span class="monster-stat-value"><a | |||
href="https://wikimirror.lifeto.co/wiki.ggftw.com/trickster/Caballa_Relics_Dungeon_1.html" | |||
target="_blank">Caballa Relics Dungeon 1</a> and <a | |||
href="https://wikimirror.lifeto.co/wiki.ggftw.com/trickster/Caballa_Relics_Dungeon_2.html" | |||
target="_blank">2</a></span> | |||
</div> | |||
<div class="monster-stat-info"> | |||
<span class="monster-stat-label">Kill Count:</span> | |||
<span class="monster-stat-value">3 monsters</span> | |||
</div> | |||
<div class="monster-stat-info"> | |||
<span class="monster-stat-label">Time Limit:</span> | |||
<span class="monster-stat-value">11 minutes</span> | |||
</div> | |||
<div class="monster-rewards-section"> | |||
<div class="monster-reward-item"> | |||
<span class="monster-reward-label">Reward:</span> | |||
<span class="monster-reward-value">100k Galder Check + <a | |||
href="https://mewsie.world/CoraTOWiki/index.php/Cora_Boxes" target="_blank">Major Cora Box</a></span> | |||
</div> | |||
</div> | |||
</div> | |||
</div> | |||
<div class="monster-info-card" data-level="241+"> | |||
<div class="monster-card-header"> | |||
<h4><a href="https://wikimirror.lifeto.co/wiki.ggftw.com/trickster/Lima.html" target="_blank">Shadow | |||
Lima</a></h4> | |||
<span class="monster-level-badge">Lv. 419</span> | |||
</div> | |||
<div class="image-container"> | |||
<a href="https://wikimirror.lifeto.co/asset.103.ggftw.net/wiki/to-w/images/b/b2/Lima.gif" | |||
target="_blank"> | |||
<img src="https://wikimirror.lifeto.co/asset.103.ggftw.net/wiki/to-w/images/b/b2/Lima.gif" | |||
alt="Shadow Lima" width="120"> | |||
</a> | |||
</div> | |||
<div class="monster-stats-details"> | |||
<div class="monster-stat-info"> | |||
<span class="monster-stat-label">Player Level:</span> | |||
<span class="monster-stat-value">241+</span> | |||
</div> | |||
<div class="monster-stat-info"> | |||
<span class="monster-stat-label">Location:</span> | |||
<span class="monster-stat-value"><a | |||
href="https://wikimirror.lifeto.co/wiki.ggftw.com/trickster/Caballa_Relics_Dungeon_1.html" | |||
target="_blank">Caballa Relics Dungeon 1</a>, <a | |||
href="https://wikimirror.lifeto.co/wiki.ggftw.com/trickster/Caballa_Relics_Dungeon_2.html" | |||
target="_blank">2</a>, <a | |||
href="https://wikimirror.lifeto.co/wiki.ggftw.com/trickster/Caballa_Relics_Dungeon_3.html" | |||
target="_blank">3</a>, and <a | |||
href="https://wikimirror.lifeto.co/wiki.ggftw.com/trickster/Caballa_Relics_Dungeon_4.html" | |||
target="_blank">4</a></span> | |||
</div> | |||
<div class="monster-stat-info"> | |||
<span class="monster-stat-label">Kill Count:</span> | |||
<span class="monster-stat-value">3 monsters</span> | |||
</div> | |||
<div class="monster-stat-info"> | |||
<span class="monster-stat-label">Time Limit:</span> | |||
<span class="monster-stat-value">10 minutes</span> | |||
</div> | |||
<div class="monster-rewards-section"> | |||
<div class="monster-reward-item"> | |||
<span class="monster-reward-label">Reward:</span> | |||
<span class="monster-reward-value">100k Galder Check + <a | |||
href="https://mewsie.world/CoraTOWiki/index.php/Cora_Boxes" target="_blank">Major Cora Box</a></span> | |||
</div> | |||
</div> | |||
</div> | |||
</div> | |||
</div> | |||
</div> | |||
<div id="tab-oops" class="nested-content" role="tabpanel"> | |||
<div class="section-header"> | |||
<h2>Dark Spirit Punishment 5 - Oops Wharf/Mermaid Palace</h2> | |||
</div> | |||
<div class="quest-info-card"> | |||
<div class="quest-card-header"> | |||
<h3>Quest Details</h3> | |||
<span class="quest-number-badge">#5</span> | |||
</div> | |||
<div class="quest-details-grid"> | |||
<div class="quest-detail-item"> | |||
<h5 class="quest-section-title">NPC:</h5> | |||
<div class="quest-detail-label"> | |||
<img class="image-container" | |||
src="https://wikimirror.lifeto.co/asset.103.ggftw.net/wiki/to-w/images/6/6b/Shaman_Girl_Jia.gif" | |||
alt="Shaman Girl Jia"> | |||
<p class="quest-detail-value">Shaman Girl Jia</p> | |||
</div> | |||
</div> | |||
<div class="quest-detail-item"> | |||
<h5 class="quest-section-title">Location:</h5> | |||
<div class="quest-detail-label"> | |||
<img class="quest-location-image" | |||
src="https://mewsie.world/CoraTOWiki/images/9/92/ShamanJia-OopsWarf.png" alt="Oops Wharf Location"> | |||
<p class="quest-detail-value"> <br>Oops Wharf</br></p> | |||
</div> | |||
</div> | |||
<div class="quest-detail-item"> | |||
<h5 class="quest-section-title">Requirement:</h5> | |||
<div class="quest-detail-label"> | |||
<img class="quest-location-image" | |||
src="https://wikimirror.lifeto.co/asset.103.ggftw.net/wiki/to-w/images/f/f9/Mind%27s_Eye.jpg" | |||
alt="Mind's Eye"> | |||
<p class="quest-detail-value"> <br>Level 240+, Mind's Eye skill active</br></p> | |||
</div> | |||
</div> | |||
</div> | |||
</div> | |||
<div class="monster-info-grid"> | |||
<div class="monster-info-card" data-level="240-243"> | |||
<div class="monster-card-header"> | |||
<h4><a href="https://wikimirror.lifeto.co/wiki.ggftw.com/trickster/Shadow_Ironclad_Turtle.html" | |||
target="_blank">Shadow Ironclad Turtle</a></h4> | |||
<span class="monster-level-badge">Lv. 432</span> | |||
</div> | |||
<div class="image-container"> | |||
<a href="https://wikimirror.lifeto.co/asset.103.ggftw.net/wiki/to-w/images/9/93/Ironclad_Turtle.gif" | |||
target="_blank"> | |||
<img src="https://wikimirror.lifeto.co/asset.103.ggftw.net/wiki/to-w/images/9/93/Ironclad_Turtle.gif" | |||
alt="Shadow Ironclad Turtle" width="120"> | |||
</a> | |||
</div> | |||
<div class="monster-stats-details"> | |||
<div class="monster-stat-info"> | |||
<span class="monster-stat-label">Player Level:</span> | |||
<span class="monster-stat-value">240-243</span> | |||
</div> | |||
<div class="monster-stat-info"> | |||
<span class="monster-stat-label">Location:</span> | |||
<span class="monster-stat-value"><a | |||
href="https://wikimirror.lifeto.co/wiki.ggftw.com/trickster/Path_to_Oops_Wharf.html" | |||
target="_blank">Path to Oops Wharf</a></span> | |||
</div> | |||
<div class="monster-stat-info"> | |||
<span class="monster-stat-label">Kill Count:</span> | |||
<span class="monster-stat-value">3 monsters</span> | |||
</div> | |||
<div class="monster-stat-info"> | |||
<span class="monster-stat-label">Time Limit:</span> | |||
<span class="monster-stat-value">12 minutes</span> | |||
</div> | |||
<div class="monster-rewards-section"> | |||
<div class="monster-reward-item"> | |||
<span class="monster-reward-label">Reward:</span> | |||
<span class="monster-reward-value">100k Galder Check + <a | |||
href="https://mewsie.world/CoraTOWiki/index.php/Cora_Boxes" target="_blank">Major Cora Box</a></span> | |||
</div> | |||
</div> | |||
</div> | |||
</div> | |||
<div class="monster-info-card" data-level="244-247"> | |||
<div class="monster-card-header"> | |||
<h4><a href="https://wikimirror.lifeto.co/wiki.ggftw.com/trickster/Shadow_Requi.html" | |||
target="_blank">Shadow Requi</a></h4> | |||
<span class="monster-level-badge">Lv. 434</span> | |||
</div> | |||
<div class="image-container"> | |||
<a href="https://wikimirror.lifeto.co/asset.103.ggftw.net/wiki/to-w/images/3/34/Requi.gif" | |||
target="_blank"> | |||
<img src="https://wikimirror.lifeto.co/asset.103.ggftw.net/wiki/to-w/images/3/34/Requi.gif" | |||
alt="Shadow Requi" width="120"> | |||
</a> | |||
</div> | |||
<div class="monster-stats-details"> | |||
<div class="monster-stat-info"> | |||
<span class="monster-stat-label">Player Level:</span> | |||
<span class="monster-stat-value">244-247</span> | |||
</div> | |||
<div class="monster-stat-info"> | |||
<span class="monster-stat-label">Locations:</span> | |||
<span class="monster-stat-value"> | |||
<a href="https://wikimirror.lifeto.co/wiki.ggftw.com/trickster/Wharf_Field_1_-_Haunted_Town.html" | |||
target="_blank">Wharf Field 1 - Haunted Town</a><br> | |||
<a href="https://wikimirror.lifeto.co/wiki.ggftw.com/trickster/Wharf_Field_2_-_Devil_Crow.html" | |||
target="_blank">Wharf Field 2 - Devil Crow</a><br> | |||
<a href="https://wikimirror.lifeto.co/wiki.ggftw.com/trickster/Wharf_Field_3_-_Phantom_Park.html" | |||
target="_blank">Wharf Field 3 - Phantom Park</a> | |||
</span> | |||
</div> | |||
<div class="monster-stat-info"> | |||
<span class="monster-stat-label">Kill Count:</span> | |||
<span class="monster-stat-value">3 monsters</span> | |||
</div> | |||
<div class="monster-stat-info"> | |||
<span class="monster-stat-label">Time Limit:</span> | |||
<span class="monster-stat-value">11 minutes</span> | |||
</div> | |||
<div class="monster-rewards-section"> | |||
<div class="monster-reward-item"> | |||
<span class="monster-reward-label">Reward:</span> | |||
<span class="monster-reward-value">100k Galder Check + <a | |||
href="https://mewsie.world/CoraTOWiki/index.php/Cora_Boxes" target="_blank">Major Cora Box</a></span> | |||
</div> | |||
</div> | |||
</div> | |||
</div> | |||
<div class="monster-info-card" data-level="248-251"> | |||
<div class="monster-card-header"> | |||
<h4><a href="https://wikimirror.lifeto.co/wiki.ggftw.com/trickster/Shadow_Black_Foe.html" | |||
target="_blank">Shadow Black Foe</a></h4> | |||
<span class="monster-level-badge">Lv. 437</span> | |||
</div> | |||
<div class="image-container"> | |||
<a href="https://wikimirror.lifeto.co/asset.103.ggftw.net/wiki/to-w/images/d/d2/Black_Foe.gif" | |||
target="_blank"> | |||
<img src="https://wikimirror.lifeto.co/asset.103.ggftw.net/wiki/to-w/images/d/d2/Black_Foe.gif" | |||
alt="Shadow Black Foe" width="120"> | |||
</a> | |||
</div> | |||
<div class="monster-stats-details"> | |||
<div class="monster-stat-info"> | |||
<span class="monster-stat-label">Player Level:</span> | |||
<span class="monster-stat-value">248-251</span> | |||
</div> | |||
<div class="monster-stat-info"> | |||
<span class="monster-stat-label">Location:</span> | |||
<span class="monster-stat-value"><a | |||
href="https://wikimirror.lifeto.co/wiki.ggftw.com/trickster/Wharf_Field_4_-_Chrono_Wharf.html" | |||
target="_blank">Wharf Field 4 - Chrono Wharf</a></span> | |||
</div> | |||
<div class="monster-stat-info"> | |||
<span class="monster-stat-label">Kill Count:</span> | |||
<span class="monster-stat-value">3 monsters</span> | |||
</div> | |||
<div class="monster-stat-info"> | |||
<span class="monster-stat-label">Time Limit:</span> | |||
<span class="monster-stat-value">10 minutes</span> | |||
</div> | |||
<div class="monster-rewards-section"> | |||
<div class="monster-reward-item"> | |||
<span class="monster-reward-label">Reward:</span> | |||
<span class="monster-reward-value">100k Galder Check + <a | |||
href="https://mewsie.world/CoraTOWiki/index.php/Cora_Boxes" target="_blank">Major Cora Box</a></span> | |||
</div> | |||
</div> | |||
</div> | |||
</div> | |||
<div class="monster-info-card" data-level="252+"> | |||
<div class="monster-card-header"> | |||
<h4><a href="https://wikimirror.lifeto.co/wiki.ggftw.com/trickster/Shadow_Cone_Stone.html" | |||
target="_blank">Shadow Cone Stone</a></h4> | |||
<span class="monster-level-badge">Lv. 440</span> | |||
</div> | |||
<div class="image-container"> | |||
<a href="https://wikimirror.lifeto.co/asset.103.ggftw.net/wiki/to-w/images/a/ab/Cone_Stone.gif" | |||
target="_blank"> | |||
<img src="https://wikimirror.lifeto.co/asset.103.ggftw.net/wiki/to-w/images/a/ab/Cone_Stone.gif" | |||
alt="Shadow Cone Stone" width="120"> | |||
</a> | |||
</div> | |||
<div class="monster-stats-details"> | |||
<div class="monster-stat-info"> | |||
<span class="monster-stat-label">Player Level:</span> | |||
<span class="monster-stat-value">252+</span> | |||
</div> | |||
<div class="monster-stat-info"> | |||
<span class="monster-stat-label">Locations:</span> | |||
<span class="monster-stat-value"> | |||
<a href="https://wikimirror.lifeto.co/wiki.ggftw.com/trickster/Path_to_Mermaid_Palace_1.html" | |||
target="_blank">Path to Mermaid Palace 1</a><br> | |||
<a href="https://wikimirror.lifeto.co/wiki.ggftw.com/trickster/Path_to_Mermaid_Palace_2.html" | |||
target="_blank">Path to Mermaid Palace 2</a> | |||
</span> | |||
</div> | |||
<div class="monster-stat-info"> | |||
<span class="monster-stat-label">Kill Count:</span> | |||
<span class="monster-stat-value">3 monsters</span> | |||
</div> | |||
<div class="monster-stat-info"> | |||
<span class="monster-stat-label">Time Limit:</span> | |||
<span class="monster-stat-value">10 minutes</span> | |||
</div> | |||
<div class="monster-rewards-section"> | |||
<div class="monster-reward-item"> | |||
<span class="monster-reward-label">Reward:</span> | |||
<span class="monster-reward-value">100k Galder Check + <a | |||
href="https://mewsie.world/CoraTOWiki/index.php/Cora_Boxes" target="_blank">Major Cora Box</a></span> | |||
</div> | |||
</div> | |||
</div> | |||
</div> | |||
<div class="monster-info-card" data-level="252+"> | |||
<div class="monster-card-header"> | |||
<h4><a href="https://wikimirror.lifeto.co/wiki.ggftw.com/trickster/Shadow_Pirate_Boxer_B.html" | |||
target="_blank">Shadow Pirate Boxer B</a></h4> | |||
<span class="monster-level-badge">Lv. 441</span> | |||
</div> | |||
<div class="image-container"> | |||
<a href="https://wikimirror.lifeto.co/asset.103.ggftw.net/wiki/to-w/images/8/8b/Pirate_Boxer.gif" | |||
target="_blank"> | |||
<img src="https://wikimirror.lifeto.co/asset.103.ggftw.net/wiki/to-w/images/8/8b/Pirate_Boxer.gif" | |||
alt="Shadow Pirate Boxer B" width="120"> | |||
</a> | |||
</div> | |||
<div class="monster-stats-details"> | |||
<div class="monster-stat-info"> | |||
<span class="monster-stat-label">Player Level:</span> | |||
<span class="monster-stat-value">252+</span> | |||
</div> | |||
<div class="monster-stat-info"> | |||
<span class="monster-stat-label">Location:</span> | |||
<span class="monster-stat-value"><a | |||
href="https://wikimirror.lifeto.co/wiki.ggftw.com/trickster/Wharf_Field_4_-_Chrono_Wharf.html" | |||
target="_blank">Wharf Field 4 - Chrono Wharf</a></span> | |||
</div> | |||
<div class="monster-stat-info"> | |||
<span class="monster-stat-label">Kill Count:</span> | |||
<span class="monster-stat-value">3 monsters</span> | |||
</div> | |||
<div class="monster-stat-info"> | |||
<span class="monster-stat-label">Time Limit:</span> | |||
<span class="monster-stat-value">10 minutes</span> | |||
</div> | |||
<div class="monster-rewards-section"> | |||
<div class="monster-reward-item"> | |||
<span class="monster-reward-label">Reward:</span> | |||
<span class="monster-reward-value">100k Galder Check + <a | |||
href="https://mewsie.world/CoraTOWiki/index.php/Cora_Boxes" target="_blank">Major Cora Box</a></span> | |||
</div> | |||
</div> | |||
</div> | |||
</div> | |||
</div> | |||
</div> | |||
<div id="tab-ghost" class="nested-content" role="tabpanel"> | |||
<div class="section-header"> | |||
<h2>Dark Spirit Punishment 6 - Ghost Blue</h2> | |||
</div> | |||
<div class="quest-info-card"> | |||
<div class="quest-card-header"> | |||
<h3>Quest Details</h3> | |||
<span class="quest-number-badge">#7</span> | |||
</div> | |||
<div class="quest-details-grid"> | |||
<div class="quest-detail-item"> | |||
<h5 class="quest-section-title">NPC:</h5> | |||
<div class="quest-detail-label"> | |||
<img class="image-container" | |||
src="https://wikimirror.lifeto.co/asset.103.ggftw.net/wiki/to-w/images/6/6b/Shaman_Girl_Jia.gif" | |||
alt="Shaman Girl Jia"> | |||
<p class="quest-detail-value">Shaman Girl Jia</p> | |||
</div> | |||
</div> | |||
<div class="quest-detail-item"> | |||
<h5 class="quest-section-title">Location:</h5> | |||
<div class="quest-detail-label"> | |||
<img class="quest-location-image" | |||
src="https://mewsie.world/CoraTOWiki/images/7/7d/ShamanJia-GhostBlue.png" alt="Ghost Blue Location"> | |||
<p class="quest-detail-value"> <br>Ghost Blue Seabed Town - Aquarius</br></p> | |||
</div> | |||
</div> | |||
<div class="quest-detail-item"> | |||
<h5 class="quest-section-title">Requirement:</h5> | |||
<div class="quest-detail-label"> | |||
<img class="quest-location-image" | |||
src="https://wikimirror.lifeto.co/asset.103.ggftw.net/wiki/to-w/images/f/f9/Mind%27s_Eye.jpg" | |||
alt="Mind's Eye"> | |||
<p class="quest-detail-value"> <br>Level 255+, Mind's Eye skill active</br></p> | |||
</div> | |||
</div> | |||
</div> | |||
</div> | |||
<div class="monster-info-grid"> | |||
<div class="monster-info-card" data-level="255-258"> | |||
<div class="monster-card-header"> | |||
<h4><a href="https://wikimirror.lifeto.co/wiki.ggftw.com/trickster/Shadow_Mushumushu.html" | |||
target="_blank">Shadow Mushumushu</a></h4> | |||
<span class="monster-level-badge">Lv. 459</span> | |||
</div> | |||
<div class="image-container"> | |||
<a href="https://wikimirror.lifeto.co/asset.103.ggftw.net/wiki/to-w/images/8/86/Mushumushu.gif" | |||
target="_blank"> | |||
<img src="https://wikimirror.lifeto.co/asset.103.ggftw.net/wiki/to-w/images/8/86/Mushumushu.gif" | |||
alt="Shadow Mushumushu" width="120"> | |||
</a> | |||
</div> | |||
<div class="monster-stats-details"> | |||
<div class="monster-stat-info"> | |||
<span class="monster-stat-label">Player Level:</span> | |||
<span class="monster-stat-value">255-258</span> | |||
</div> | |||
<div class="monster-stat-info"> | |||
<span class="monster-stat-label">Location:</span> | |||
<span class="monster-stat-value"><a | |||
href="https://wikimirror.lifeto.co/wiki.ggftw.com/trickster/Path_to_Ghost_Blue_1.html" | |||
target="_blank">Path to Ghost Blue 1</a></span> | |||
</div> | |||
<div class="monster-stat-info"> | |||
<span class="monster-stat-label">Kill Count:</span> | |||
<span class="monster-stat-value">3 monsters</span> | |||
</div> | |||
<div class="monster-stat-info"> | |||
<span class="monster-stat-label">Time Limit:</span> | |||
<span class="monster-stat-value">12 minutes</span> | |||
</div> | |||
<div class="monster-rewards-section"> | |||
<div class="monster-reward-item"> | |||
<span class="monster-reward-label">Reward:</span> | |||
<span class="monster-reward-value">100k Galder Check + <a | |||
href="https://mewsie.world/CoraTOWiki/index.php/Cora_Boxes" target="_blank">Major Cora Box</a></span> | |||
</div> | |||
</div> | |||
</div> | |||
</div> | |||
<div class="monster-info-card" data-level="259-262"> | |||
<div class="monster-card-header"> | |||
<h4><a href="https://wikimirror.lifeto.co/wiki.ggftw.com/trickster/Shadow_Popeyed_Anemone.html" | |||
target="_blank">Shadow Popeyed Anemone</a></h4> | |||
<span class="monster-level-badge">Lv. 465</span> | |||
</div> | |||
<div class="image-container"> | |||
<a href="https://wikimirror.lifeto.co/asset.103.ggftw.net/wiki/to-w/images/5/5b/Popeyed_Anemone.gif" | |||
target="_blank"> | |||
<img src="https://wikimirror.lifeto.co/asset.103.ggftw.net/wiki/to-w/images/5/5b/Popeyed_Anemone.gif" | |||
alt="Shadow Popeyed Anemone" width="120"> | |||
</a> | |||
</div> | |||
<div class="monster-stats-details"> | |||
<div class="monster-stat-info"> | |||
<span class="monster-stat-label">Player Level:</span> | |||
<span class="monster-stat-value">259-262</span> | |||
</div> | |||
<div class="monster-stat-info"> | |||
<span class="monster-stat-label">Location:</span> | |||
<span class="monster-stat-value"><a | |||
href="https://wikimirror.lifeto.co/wiki.ggftw.com/trickster/Seabed_Field_1_-_North.html" | |||
target="_blank">Seabed Field 1 - North</a></span> | |||
</div> | |||
<div class="monster-stat-info"> | |||
<span class="monster-stat-label">Kill Count:</span> | |||
<span class="monster-stat-value">3 monsters</span> | |||
</div> | |||
<div class="monster-stat-info"> | |||
<span class="monster-stat-label">Time Limit:</span> | |||
<span class="monster-stat-value">12 minutes</span> | |||
</div> | |||
<div class="monster-rewards-section"> | |||
<div class="monster-reward-item"> | |||
<span class="monster-reward-label">Reward:</span> | |||
<span class="monster-reward-value">100k Galder Check + <a | |||
href="https://mewsie.world/CoraTOWiki/index.php/Cora_Boxes" target="_blank">Major Cora Box</a></span> | |||
</div> | |||
</div> | |||
</div> | |||
</div> | |||
<div class="monster-info-card" data-level="263-266"> | |||
<div class="monster-card-header"> | |||
<h4><a href="https://wikimirror.lifeto.co/wiki.ggftw.com/trickster/Shadow_Monguse.html" | |||
target="_blank">Shadow Monguse</a></h4> | |||
<span class="monster-level-badge">Lv. 467</span> | |||
</div> | |||
<div class="image-container"> | |||
<a href="https://wikimirror.lifeto.co/asset.103.ggftw.net/wiki/to-w/images/b/bb/Armor_Squirt.gif" | |||
target="_blank"> | |||
<img src="https://wikimirror.lifeto.co/asset.103.ggftw.net/wiki/to-w/images/b/bb/Armor_Squirt.gif" | |||
alt="Shadow Monguse" width="120"> | |||
</a> | |||
</div> | |||
<div class="monster-stats-details"> | |||
<div class="monster-stat-info"> | |||
<span class="monster-stat-label">Player Level:</span> | |||
<span class="monster-stat-value">263-266</span> | |||
</div> | |||
<div class="monster-stat-info"> | |||
<span class="monster-stat-label">Location:</span> | |||
<span class="monster-stat-value"><a | |||
href="https://wikimirror.lifeto.co/wiki.ggftw.com/trickster/Seabed_Field_1_-_North.html" | |||
target="_blank">Seabed Field 1 - North</a> / <a | |||
href="https://wikimirror.lifeto.co/wiki.ggftw.com/trickster/Seabed_Field_2_-_East.html" | |||
target="_blank">Seabed Field 2 - East</a></span> | |||
</div> | |||
<div class="monster-stat-info"> | |||
<span class="monster-stat-label">Kill Count:</span> | |||
<span class="monster-stat-value">3 monsters</span> | |||
</div> | |||
<div class="monster-stat-info"> | |||
<span class="monster-stat-label">Time Limit:</span> | |||
<span class="monster-stat-value">11 minutes</span> | |||
</div> | |||
<div class="monster-rewards-section"> | |||
<div class="monster-reward-item"> | |||
<span class="monster-reward-label">Reward:</span> | |||
<span class="monster-reward-value">100k Galder Check + <a | |||
href="https://mewsie.world/CoraTOWiki/index.php/Cora_Boxes" target="_blank">Major Cora Box</a></span> | |||
</div> | |||
</div> | |||
</div> | |||
</div> | |||
<div class="monster-info-card" data-level="267-270"> | |||
<div class="monster-card-header"> | |||
<h4><a href="https://wikimirror.lifeto.co/wiki.ggftw.com/trickster/Shadow_Merrow.html" | |||
target="_blank">Shadow Merrow</a></h4> | |||
<span class="monster-level-badge">Lv. 473</span> | |||
</div> | |||
<div class="image-container"> | |||
<a href="https://wikimirror.lifeto.co/asset.103.ggftw.net/wiki/to-w/images/b/b6/Merrow.gif" | |||
target="_blank"> | |||
<img src="https://wikimirror.lifeto.co/asset.103.ggftw.net/wiki/to-w/images/b/b6/Merrow.gif" | |||
alt="Shadow Merrow" width="120"> | |||
</a> | |||
</div> | |||
<div class="monster-stats-details"> | |||
<div class="monster-stat-info"> | |||
<span class="monster-stat-label">Player Level:</span> | |||
<span class="monster-stat-value">267-270</span> | |||
</div> | |||
<div class="monster-stat-info"> | |||
<span class="monster-stat-label">Location:</span> | |||
<span class="monster-stat-value"><a | |||
href="https://wikimirror.lifeto.co/wiki.ggftw.com/trickster/Seabed_Field_3_-_Undersea_Park.html" | |||
target="_blank">Seabed Field 3 - Undersea Park</a> / <a | |||
href="https://wikimirror.lifeto.co/wiki.ggftw.com/trickster/Seabed_Field_4_-_Undersea_Grave.html" | |||
target="_blank">Seabed Field 4 - Undersea Grave</a></span> | |||
</div> | |||
<div class="monster-stat-info"> | |||
<span class="monster-stat-label">Kill Count:</span> | |||
<span class="monster-stat-value">3 monsters</span> | |||
</div> | |||
<div class="monster-stat-info"> | |||
<span class="monster-stat-label">Time Limit:</span> | |||
<span class="monster-stat-value">10 minutes</span> | |||
</div> | |||
<div class="monster-rewards-section"> | |||
<div class="monster-reward-item"> | |||
<span class="monster-reward-label">Reward:</span> | |||
<span class="monster-reward-value">100k Galder Check + <a | |||
href="https://mewsie.world/CoraTOWiki/index.php/Cora_Boxes" target="_blank">Major Cora Box</a></span> | |||
</div> | |||
</div> | |||
</div> | |||
</div> | |||
<div class="monster-info-card" data-level="271+"> | |||
<div class="monster-card-header"> | |||
<h4><a href="https://wikimirror.lifeto.co/wiki.ggftw.com/trickster/Shadow_Nora_Joe.html" | |||
target="_blank">Shadow Nora Joe</a></h4> | |||
<span class="monster-level-badge">Lv. 481</span> | |||
</div> | |||
<div class="image-container"> | |||
<a href="https://wikimirror.lifeto.co/asset.103.ggftw.net/wiki/to-w/images/8/80/Nora_Joe.gif" | |||
target="_blank"> | |||
<img src="https://wikimirror.lifeto.co/asset.103.ggftw.net/wiki/to-w/images/8/80/Nora_Joe.gif" | |||
alt="Shadow Nora Joe" width="120"> | |||
</a> | |||
</div> | |||
<div class="monster-stats-details"> | |||
<div class="monster-stat-info"> | |||
<span class="monster-stat-label">Player Level:</span> | |||
<span class="monster-stat-value">271+</span> | |||
</div> | |||
<div class="monster-stat-info"> | |||
<span class="monster-stat-label">Location:</span> | |||
<span class="monster-stat-value"><a | |||
href="https://wikimirror.lifeto.co/wiki.ggftw.com/trickster/Nora_Sewer.html" target="_blank">Nora | |||
Sewer</a></span> | |||
</div> | |||
<div class="monster-stat-info"> | |||
<span class="monster-stat-label">Kill Count:</span> | |||
<span class="monster-stat-value">3 monsters</span> | |||
</div> | |||
<div class="monster-stat-info"> | |||
<span class="monster-stat-label">Time Limit:</span> | |||
<span class="monster-stat-value">10 minutes</span> | |||
</div> | |||
<div class="monster-rewards-section"> | |||
<div class="monster-reward-item"> | |||
<span class="monster-reward-label">Reward:</span> | |||
<span class="monster-reward-value">100k Galder Check + <a | |||
href="https://mewsie.world/CoraTOWiki/index.php/Cora_Boxes" target="_blank">Major Cora Box</a></span> | |||
</div> | |||
</div> | |||
</div> | |||
</div> | |||
</div> | |||
</div> | |||
<div id="tab-rose" class="nested-content"> | |||
<div class="section-header"> | |||
<h2>Dark Spirit Punishment 7 - Rose Garden</h2> | |||
</div> | |||
<div class="quest-info-card"> | |||
<div class="quest-card-header"> | |||
<h3>Quest Details</h3> | |||
<span class="quest-number-badge">#7</span> | |||
</div> | |||
<div class="quest-details-grid"> | |||
<div class="quest-detail-item"> | |||
<h5 class="quest-section-title">NPC:</h5> | |||
<div class="quest-detail-label"> | |||
<img class="image-container" | |||
src="https://wikimirror.lifeto.co/asset.103.ggftw.net/wiki/to-w/images/6/6b/Shaman_Girl_Jia.gif" | |||
alt="Shaman Girl Jia"> | |||
<p class="quest-detail-value">Shaman Girl Jia</p> | |||
</div> | |||
</div> | |||
<div class="quest-detail-item"> | |||
<h5 class="quest-section-title">Location:</h5> | |||
<div class="quest-detail-label"> | |||
<img class="quest-location-image" | |||
src="https://mewsie.world/CoraTOWiki/images/e/e9/ShamanJia-EventGarden.png" | |||
alt="Rose Garden Location"> | |||
<p class="quest-detail-value"> <br>Event Garden - Ceremonia</br></p> | |||
</div> | |||
</div> | |||
<div class="quest-detail-item"> | |||
<h5 class="quest-section-title">Requirement:</h5> | |||
<div class="quest-detail-label"> | |||
<img class="quest-location-image" | |||
src="https://wikimirror.lifeto.co/asset.103.ggftw.net/wiki/to-w/images/f/f9/Mind%27s_Eye.jpg" | |||
alt="Mind's Eye"> | |||
<p class="quest-detail-value"> <br>Level 270+, Mind's Eye skill active</br></p> | |||
</div> | |||
</div> | |||
</div> | |||
</div> | |||
<div class="monster-info-grid"> | |||
<div class="monster-info-card" data-level="270-273"> | |||
<div class="monster-card-header"> | |||
<h4><a href="https://wikimirror.lifeto.co/wiki.ggftw.com/trickster/Shadow_Dancer_Michel.html" | |||
target="_blank">Shadow Dancer Michel</a></h4> | |||
<span class="monster-level-badge">Lv. 483</span> | |||
</div> | |||
<div class="image-container"> | |||
<a href="https://wikimirror.lifeto.co/asset.103.ggftw.net/wiki/to-w/images/a/a8/Dancer_Michel.gif" | |||
target="_blank"> | |||
<img src="https://wikimirror.lifeto.co/asset.103.ggftw.net/wiki/to-w/images/a/a8/Dancer_Michel.gif" | |||
alt="Shadow Dancer Michel" width="120"> | |||
</a> | |||
</div> | |||
<div class="monster-stats-details"> | |||
<div class="monster-stat-info"> | |||
<span class="monster-stat-label">Player Level:</span> | |||
<span class="monster-stat-value">270-273</span> | |||
</div> | |||
<div class="monster-stat-info"> | |||
<span class="monster-stat-label">Location:</span> | |||
<span class="monster-stat-value"><a | |||
href="https://wikimirror.lifeto.co/wiki.ggftw.com/trickster/Rose_Field_1_-_Stairway_to_Sorrow.html" | |||
target="_blank">Rose Field 1 - Stairway to Sorrow</a></span> | |||
</div> | |||
<div class="monster-stat-info"> | |||
<span class="monster-stat-label">Kill Count:</span> | |||
<span class="monster-stat-value">3 monsters</span> | |||
</div> | |||
<div class="monster-stat-info"> | |||
<span class="monster-stat-label">Time Limit:</span> | |||
<span class="monster-stat-value">12 minutes</span> | |||
</div> | |||
<div class="monster-rewards-section"> | |||
<div class="monster-reward-item"> | |||
<span class="monster-reward-label">Reward:</span> | |||
<span class="monster-reward-value">100k Galder Check + <a | |||
href="https://mewsie.world/CoraTOWiki/index.php/Cora_Boxes" target="_blank">Major Cora Box</a></span> | |||
</div> | |||
</div> | |||
</div> | |||
</div> | |||
<div class="monster-info-card" data-level="274-277"> | |||
<div class="monster-card-header"> | |||
<h4><a href="https://wikimirror.lifeto.co/wiki.ggftw.com/trickster/Shadow_Captain_Norman.html" | |||
target="_blank">Shadow Captain Norman</a></h4> | |||
<span class="monster-level-badge">Lv. 490</span> | |||
</div> | |||
<div class="image-container"> | |||
<a href="https://wikimirror.lifeto.co/asset.103.ggftw.net/wiki/to-w/images/b/b7/Captain_Norman.gif" | |||
target="_blank"> | |||
<img src="https://wikimirror.lifeto.co/asset.103.ggftw.net/wiki/to-w/images/b/b7/Captain_Norman.gif" | |||
alt="Shadow Captain Norman" width="120"> | |||
</a> | |||
</div> | |||
<div class="monster-stats-details"> | |||
<div class="monster-stat-info"> | |||
<span class="monster-stat-label">Player Level:</span> | |||
<span class="monster-stat-value">274-277</span> | |||
</div> | |||
<div class="monster-stat-info"> | |||
<span class="monster-stat-label">Location:</span> | |||
<span class="monster-stat-value"><a | |||
href="https://wikimirror.lifeto.co/wiki.ggftw.com/trickster/Rose_Field_2_-_Maze_of_Black_Rose.html" | |||
target="_blank">Rose Field 2 - Maze of Black Rose</a> / <a | |||
href="https://wikimirror.lifeto.co/wiki.ggftw.com/trickster/Rose_Field_4_-_Bloom_Grave.html" | |||
target="_blank">Rose Field 4 - Bloom Grave</a></span> | |||
</div> | |||
<div class="monster-stat-info"> | |||
<span class="monster-stat-label">Kill Count:</span> | |||
<span class="monster-stat-value">3 monsters</span> | |||
</div> | |||
<div class="monster-stat-info"> | |||
<span class="monster-stat-label">Time Limit:</span> | |||
<span class="monster-stat-value">12 minutes</span> | |||
</div> | |||
<div class="monster-rewards-section"> | |||
<div class="monster-reward-item"> | |||
<span class="monster-reward-label">Reward:</span> | |||
<span class="monster-reward-value">100k Galder Check + <a | |||
href="https://mewsie.world/CoraTOWiki/index.php/Cora_Boxes" target="_blank">Major Cora Box</a></span> | |||
</div> | |||
</div> | |||
</div> | |||
</div> | |||
<div class="monster-info-card" data-level="278-281"> | |||
<div class="monster-card-header"> | |||
<h4><a href="https://wikimirror.lifeto.co/wiki.ggftw.com/trickster/Shadow_Madam_Chiffon.html" | |||
target="_blank">Shadow Madam Chiffon</a></h4> | |||
<span class="monster-level-badge">Lv. 491</span> | |||
</div> | |||
<div class="image-container"> | |||
<a href="https://wikimirror.lifeto.co/asset.103.ggftw.net/wiki/to-w/images/3/3b/Madam_Chiffon.gif" | |||
target="_blank"> | |||
<img src="https://wikimirror.lifeto.co/asset.103.ggftw.net/wiki/to-w/images/3/3b/Madam_Chiffon.gif" | |||
alt="Shadow Madam Chiffon" width="120"> | |||
</a> | |||
</div> | |||
<div class="monster-stats-details"> | |||
<div class="monster-stat-info"> | |||
<span class="monster-stat-label">Player Level:</span> | |||
<span class="monster-stat-value">278-281</span> | |||
</div> | |||
<div class="monster-stat-info"> | |||
<span class="monster-stat-label">Location:</span> | |||
<span class="monster-stat-value"><a | |||
href="https://wikimirror.lifeto.co/wiki.ggftw.com/trickster/Rose_Field_3_-_Maze_of_Blue_Rose.html" | |||
target="_blank">Rose Field 3 - Maze of Blue Rose</a></span> | |||
</div> | |||
<div class="monster-stat-info"> | |||
<span class="monster-stat-label">Kill Count:</span> | |||
<span class="monster-stat-value">3 monsters</span> | |||
</div> | |||
<div class="monster-stat-info"> | |||
<span class="monster-stat-label">Time Limit:</span> | |||
<span class="monster-stat-value">11 minutes</span> | |||
</div> | |||
<div class="monster-rewards-section"> | |||
<div class="monster-reward-item"> | |||
<span class="monster-reward-label">Reward:</span> | |||
<span class="monster-reward-value">100k Galder Check + <a | |||
href="https://mewsie.world/CoraTOWiki/index.php/Cora_Boxes" target="_blank">Major Cora Box</a></span> | |||
</div> | |||
</div> | |||
</div> | |||
</div> | |||
<div class="monster-info-card" data-level="282-285"> | |||
<div class="monster-card-header"> | |||
<h4><a href="https://wikimirror.lifeto.co/wiki.ggftw.com/trickster/Shadow_Maid_Lydia.html" | |||
target="_blank">Shadow Maid Lydia</a></h4> | |||
<span class="monster-level-badge">Lv. 498</span> | |||
</div> | |||
<div class="image-container"> | |||
<a href="https://wikimirror.lifeto.co/asset.103.ggftw.net/wiki/to-w/images/d/d0/Maid_Lydia.gif" | |||
target="_blank"> | |||
<img src="https://wikimirror.lifeto.co/asset.103.ggftw.net/wiki/to-w/images/d/d0/Maid_Lydia.gif" | |||
alt="Shadow Maid Lydia" width="120"> | |||
</a> | |||
</div> | |||
<div class="monster-stats-details"> | |||
<div class="monster-stat-info"> | |||
<span class="monster-stat-label">Player Level:</span> | |||
<span class="monster-stat-value">282-285</span> | |||
</div> | |||
<div class="monster-stat-info"> | |||
<span class="monster-stat-label">Location:</span> | |||
<span class="monster-stat-value"><a | |||
href="https://wikimirror.lifeto.co/wiki.ggftw.com/trickster/Vamp_Dungeon_1_-_Banquet_of_the_Vamp.html" | |||
target="_blank">Vamp Dungeon 1 - Banquet of the Vamp</a> / <a | |||
href="https://wikimirror.lifeto.co/wiki.ggftw.com/trickster/Vamp_Dungeon_2_-_Banquet_of_the_Dead.html" | |||
target="_blank">Vamp Dungeon 2 - Banquet of the Dead</a></span> | |||
</div> | |||
<div class="monster-stat-info"> | |||
<span class="monster-stat-label">Kill Count:</span> | |||
<span class="monster-stat-value">3 monsters</span> | |||
</div> | |||
<div class="monster-stat-info"> | |||
<span class="monster-stat-label">Time Limit:</span> | |||
<span class="monster-stat-value">11 minutes</span> | |||
</div> | |||
<div class="monster-rewards-section"> | |||
<div class="monster-reward-item"> | |||
<span class="monster-reward-label">Reward:</span> | |||
<span class="monster-reward-value">100k Galder Check + <a | |||
href="https://mewsie.world/CoraTOWiki/index.php/Cora_Boxes" target="_blank">Major Cora Box</a></span> | |||
</div> | |||
</div> | |||
</div> | |||
</div> | |||
<div class="monster-info-card" data-level="286+"> | |||
<div class="monster-card-header"> | |||
<h4><a href="https://wikimirror.lifeto.co/wiki.ggftw.com/trickster/Shadow_Bone_Warrior.html" | |||
target="_blank">Shadow Bone Warrior</a></h4> | |||
<span class="monster-level-badge">Lv. 508</span> | |||
</div> | |||
<div class="image-container"> | |||
<a href="https://wikimirror.lifeto.co/asset.103.ggftw.net/wiki/to-w/images/1/18/Bone_Warrior.gif" | |||
target="_blank"> | |||
<img src="https://wikimirror.lifeto.co/asset.103.ggftw.net/wiki/to-w/images/1/18/Bone_Warrior.gif" | |||
alt="Shadow Bone Warrior" width="120"> | |||
</a> | |||
</div> | |||
<div class="monster-stats-details"> | |||
<div class="monster-stat-info"> | |||
<span class="monster-stat-label">Player Level:</span> | |||
<span class="monster-stat-value">286+</span> | |||
</div> | |||
<div class="monster-stat-info"> | |||
<span class="monster-stat-label">Location:</span> | |||
<span class="monster-stat-value"><a | |||
href="https://wikimirror.lifeto.co/wiki.ggftw.com/trickster/Vamp_Dungeon_4_-_Center_of_the_Dark.html" | |||
target="_blank">Vamp Dungeon 4 - Center of the Dark</a> / <a | |||
href="https://wikimirror.lifeto.co/wiki.ggftw.com/trickster/Vamp_Dungeon_5_-_Resurrection_of_the_Dark.html" | |||
target="_blank">Vamp Dungeon 5 - Resurrection of the Dark</a></span> | |||
</div> | |||
<div class="monster-stat-info"> | |||
<span class="monster-stat-label">Kill Count:</span> | |||
<span class="monster-stat-value">3 monsters</span> | |||
</div> | |||
<div class="monster-stat-info"> | |||
<span class="monster-stat-label">Time Limit:</span> | |||
<span class="monster-stat-value">10 minutes</span> | |||
</div> | |||
<div class="monster-rewards-section"> | |||
<div class="monster-reward-item"> | |||
<span class="monster-reward-label">Reward:</span> | |||
<span class="monster-reward-value">100k Galder Check + <a | |||
href="https://mewsie.world/CoraTOWiki/index.php/Cora_Boxes" target="_blank">Major Cora Box</a></span> | |||
</div> | |||
</div> | |||
</div> | |||
</div> | |||
</div> | |||
</div> | |||
<div id="tab-swamp" class="nested-content" role="tabpanel" aria-labelledby="tab-swamp-label" aria-hidden="true"> | |||
<div class="section-header"> | |||
<h2>Dark Spirit Punishment 8 - Black Swamp</h2> | |||
</div> | |||
<div class="quest-info-card"> | |||
<div class="quest-card-header"> | |||
<h3>Quest Details</h3> | |||
<span class="quest-number-badge">#8</span> | |||
</div> | |||
<div class="quest-details-grid"> | |||
<div class="quest-detail-item"> | |||
<h5 class="quest-section-title">NPC:</h5> | |||
<div class="quest-detail-label"> | |||
<img class="image-container" | |||
src="https://wikimirror.lifeto.co/asset.103.ggftw.net/wiki/to-w/images/6/6b/Shaman_Girl_Jia.gif" | |||
alt="Shaman Girl Jia"> | |||
<p class="quest-detail-value">Shaman Girl Jia</p> | |||
</div> | |||
</div> | |||
<div class="quest-detail-item"> | |||
<h5 class="quest-section-title">Location:</h5> | |||
<div class="quest-detail-label"> | |||
<img class="quest-location-image" | |||
src="https://mewsie.world/CoraTOWiki/images/d/d7/ShamanJia-BlackSwamp.png" | |||
alt="Black Swamp Location"> | |||
<p class="quest-detail-value"> <br>Swamp Town - Carbigal</br></p> | |||
</div> | |||
</div> | |||
<div class="quest-detail-item"> | |||
<h5 class="quest-section-title">Requirement:</h5> | |||
<div class="quest-detail-label"> | |||
<img class="quest-location-image" | |||
src="https://wikimirror.lifeto.co/asset.103.ggftw.net/wiki/to-w/images/f/f9/Mind%27s_Eye.jpg" | |||
alt="Mind's Eye"> | |||
<p class="quest-detail-value"> <br>Level 285+, Mind's Eye skill active</br></p> | |||
</div> | |||
</div> | |||
</div> | |||
</div> | |||
<div class="monster-info-grid"> | |||
<div class="monster-info-card" data-level="285+"> | |||
<div class="monster-card-header"> | |||
<h4><a href="https://wikimirror.lifeto.co/wiki.ggftw.com/trickster/Shadow_Lotus_Wormhole.html" | |||
target="_blank">Shadow Lotus Wormhole</a></h4> | |||
<span class="monster-level-badge">Lv. 532</span> | |||
</div> | |||
<div class="image-container"> | |||
<a href="https://wikimirror.lifeto.co/asset.103.ggftw.net/wiki/to-w/images/a/ad/Lotus_Wormhole.gif" | |||
target="_blank"> | |||
<img src="https://wikimirror.lifeto.co/asset.103.ggftw.net/wiki/to-w/images/a/ad/Lotus_Wormhole.gif" | |||
alt="Shadow Lotus Wormhole" width="120"> | |||
</a> | |||
</div> | |||
<div class="monster-stats-details"> | |||
<div class="monster-stat-info"> | |||
<span class="monster-stat-label">Player Level:</span> | |||
<span class="monster-stat-value">285+</span> | |||
</div> | |||
<div class="monster-stat-info"> | |||
<span class="monster-stat-label">Location:</span> | |||
<span class="monster-stat-value"><a | |||
href="https://wikimirror.lifeto.co/wiki.ggftw.com/trickster/Swamp_Dungeon_4_-_Marshy_Garden.html" | |||
target="_blank">Swamp Dungeon 4 - Marshy Garden</a> / <a | |||
href="https://wikimirror.lifeto.co/wiki.ggftw.com/trickster/Swamp_Dungeon_5_-_Marshy_Lawn.html" | |||
target="_blank">Swamp Dungeon 5 - Marshy Lawn</a></span> | |||
</div> | |||
<div class="monster-stat-info"> | |||
<span class="monster-stat-label">Kill Count:</span> | |||
<span class="monster-stat-value">3 monsters</span> | |||
</div> | |||
<div class="monster-stat-info"> | |||
<span class="monster-stat-label">Time Limit:</span> | |||
<span class="monster-stat-value">10 minutes</span> | |||
</div> | |||
<div class="monster-rewards-section"> | |||
<div class="monster-reward-item"> | |||
<span class="monster-reward-label">Reward:</span> | |||
<span class="monster-reward-value">100k Galder Check + <a | |||
href="https://mewsie.world/CoraTOWiki/index.php/Cora_Boxes" target="_blank">Major Cora Box</a></span> | |||
</div> | |||
</div> | |||
</div> | |||
</div> | |||
</div> | |||
</div> | |||
<div id="tab-snow" class="nested-content" role="tabpanel" aria-labelledby="tab-snow-label" aria-hidden="true"> | |||
<div class="section-header"> | |||
<h2>Dark Spirit Punishment 9 - Snow Hill</h2> | |||
</div> | |||
<div class="quest-info-card"> | |||
<div class="quest-card-header"> | |||
<h3>Quest Details</h3> | |||
<span class="quest-number-badge">#9</span> | |||
</div> | |||
<div class="quest-details-grid"> | |||
<div class="quest-detail-item"> | |||
<span class="quest-detail-label"><img | |||
src="https://wikimirror.lifeto.co/asset.103.ggftw.net/wiki/to-w/images/6/6b/Shaman_Girl_Jia.gif" | |||
alt="Shaman Girl Jia" class="image-container"> NPC:</span> | |||
<span class="quest-detail-value">Shaman Girl Jia</span> | |||
</div> | |||
<div class="quest-detail-item"> | |||
<span class="quest-detail-label"><img | |||
src="https://mewsie.world/CoraTOWiki/images/c/c6/ShamanJia-SnowHill.png" alt="Snow Hill Location" | |||
class="quest-location-image"> Location:</span> | |||
<span class="quest-detail-value">Snow Hill Town - Laplanoel</span> | |||
</div> | |||
<div class="quest-detail-item"> | |||
<span class="quest-detail-label">Requirement:</span> | |||
<span class="quest-detail-value">Level 300+, Mind's Eye skill active</span> | |||
</div> | |||
</div> | |||
</div> | |||
<div class="monster-info-grid"> | |||
<div class="monster-info-card" data-level="300-303"> | |||
<div class="monster-card-header"> | |||
<h4><a href="https://wikimirror.lifeto.co/wiki.ggftw.com/trickster/Shadow_King_Yamu.html" | |||
target="_blank">Shadow King Yamu</a></h4> | |||
<span class="monster-level-badge">Lv. 540</span> | |||
</div> | |||
<div class="image-container"> | |||
<a href="https://wikimirror.lifeto.co/asset.103.ggftw.net/wiki/to-w/images/f/fe/King_Yamu.gif" | |||
target="_blank"> | |||
<img src="https://wikimirror.lifeto.co/asset.103.ggftw.net/wiki/to-w/images/f/fe/King_Yamu.gif" | |||
alt="Shadow King Yamu" width="120"> | |||
</a> | |||
</div> | |||
<div class="monster-stats-details"> | |||
<div class="monster-stat-info"> | |||
<span class="monster-stat-label">Player Level:</span> | |||
<span class="monster-stat-value">300-303</span> | |||
</div> | |||
<div class="monster-stat-info"> | |||
<span class="monster-stat-label">Location:</span> | |||
<span class="monster-stat-value"><a | |||
href="https://wikimirror.lifeto.co/wiki.ggftw.com/trickster/Northwest_Forest.html" | |||
target="_blank">Northwest Forest</a></span> | |||
</div> | |||
<div class="monster-stat-info"> | |||
<span class="monster-stat-label">Kill Count:</span> | |||
<span class="monster-stat-value">3 monsters</span> | |||
</div> | |||
<div class="monster-stat-info"> | |||
<span class="monster-stat-label">Time Limit:</span> | |||
<span class="monster-stat-value">12 minutes</span> | |||
</div> | |||
<div class="monster-rewards-section"> | |||
<div class="monster-reward-item"> | |||
<span class="monster-reward-label">Reward:</span> | |||
<span class="monster-reward-value">100k Galder Check + <a | |||
href="https://mewsie.world/CoraTOWiki/index.php/Cora_Boxes" target="_blank">Major Cora Box</a></span> | |||
</div> | |||
</div> | |||
</div> | |||
</div> | |||
<div class="monster-info-card" data-level="304-307"> | |||
<div class="monster-card-header"> | |||
<h4><a href="https://wikimirror.lifeto.co/wiki.ggftw.com/trickster/Shadow_Bug_Bear.html" | |||
target="_blank">Shadow Bug Bear</a></h4> | |||
<span class="monster-level-badge">Lv. 543</span> | |||
</div> | |||
<div class="image-container"> | |||
<a href="https://wikimirror.lifeto.co/asset.103.ggftw.net/wiki/to-w/images/9/9e/Bug_Bear.gif" | |||
target="_blank"> | |||
<img src="https://wikimirror.lifeto.co/asset.103.ggftw.net/wiki/to-w/images/9/9e/Bug_Bear.gif" | |||
alt="Shadow Bug Bear" width="120"> | |||
</a> | |||
</div> | |||
<div class="monster-stats-details"> | |||
<div class="monster-stat-info"> | |||
<span class="monster-stat-label">Player Level:</span> | |||
<span class="monster-stat-value">304-307</span> | |||
</div> | |||
<div class="monster-stat-info"> | |||
<span class="monster-stat-label">Location:</span> | |||
<span class="monster-stat-value"><a | |||
href="https://wikimirror.lifeto.co/wiki.ggftw.com/trickster/Path_to_Snow_Hill.html" | |||
target="_blank">Path to Snow Hill</a> / <a | |||
href="https://wikimirror.lifeto.co/wiki.ggftw.com/trickster/Frost_Wind_Forest_2.html" | |||
target="_blank">Frost Wind Forest 2</a></span> | |||
</div> | |||
<div class="monster-stat-info"> | |||
<span class="monster-stat-label">Kill Count:</span> | |||
<span class="monster-stat-value">3 monsters</span> | |||
</div> | |||
<div class="monster-stat-info"> | |||
<span class="monster-stat-label">Time Limit:</span> | |||
<span class="monster-stat-value">10 minutes</span> | |||
</div> | |||
<div class="monster-rewards-section"> | |||
<div class="monster-reward-item"> | |||
<span class="monster-reward-label">Reward:</span> | |||
<span class="monster-reward-value">100k Galder Check + <a | |||
href="https://mewsie.world/CoraTOWiki/index.php/Cora_Boxes" target="_blank">Major Cora Box</a></span> | |||
</div> | |||
</div> | |||
</div> | |||
</div> | |||
<div class="monster-info-card" data-level="308-311"> | |||
<div class="monster-card-header"> | |||
<h4><a href="https://wikimirror.lifeto.co/wiki.ggftw.com/trickster/Shadow_Polar_Bear.html" | |||
target="_blank">Shadow Polar Bear</a></h4> | |||
<span class="monster-level-badge">Lv. 546</span> | |||
</div> | |||
<div class="image-container"> | |||
<a href="https://wikimirror.lifeto.co/asset.103.ggftw.net/wiki/to-w/images/e/e2/Polar_Bear.gif" | |||
target="_blank"> | |||
<img src="https://wikimirror.lifeto.co/asset.103.ggftw.net/wiki/to-w/images/e/e2/Polar_Bear.gif" | |||
alt="Shadow Polar Bear" width="120"> | |||
</a> | |||
</div> | |||
<div class="monster-stats-details"> | |||
<div class="monster-stat-info"> | |||
<span class="monster-stat-label">Player Level:</span> | |||
<span class="monster-stat-value">308-311</span> | |||
</div> | |||
<div class="monster-stat-info"> | |||
<span class="monster-stat-label">Location:</span> | |||
<span class="monster-stat-value"><a | |||
href="https://wikimirror.lifeto.co/wiki.ggftw.com/trickster/Snow_Field_2_-_Snowflake_Park.html" | |||
target="_blank">Snow Field 2 - Snowflake Park</a> / <a | |||
href="https://wikimirror.lifeto.co/wiki.ggftw.com/trickster/Snow_Field_3_-_Stairway_of_Snowflake.html" | |||
target="_blank">Snow Field 3 - Stairway of Snowflake</a></span> | |||
</div> | |||
<div class="monster-stat-info"> | |||
<span class="monster-stat-label">Kill Count:</span> | |||
<span class="monster-stat-value">3 monsters</span> | |||
</div> | |||
<div class="monster-stat-info"> | |||
<span class="monster-stat-label">Time Limit:</span> | |||
<span class="monster-stat-value">10 minutes</span> | |||
</div> | |||
<div class="monster-rewards-section"> | |||
<div class="monster-reward-item"> | |||
<span class="monster-reward-label">Reward:</span> | |||
<span class="monster-reward-value">100k Galder Check + <a | |||
href="https://mewsie.world/CoraTOWiki/index.php/Cora_Boxes" target="_blank">Major Cora Box</a></span> | |||
</div> | |||
</div> | |||
</div> | |||
</div> | |||
<div class="monster-info-card" data-level="312-315"> | |||
<div class="monster-card-header"> | |||
<h4><a href="https://wikimirror.lifeto.co/wiki.ggftw.com/trickster/Shadow_Niwerth.html" | |||
target="_blank">Shadow Niwerth</a></h4> | |||
<span class="monster-level-badge">Lv. 552</span> | |||
</div> | |||
<div class="image-container"> | |||
<a href="https://wikimirror.lifeto.co/asset.103.ggftw.net/wiki/to-w/images/e/e7/Niwerth.gif" | |||
target="_blank"> | |||
<img src="https://wikimirror.lifeto.co/asset.103.ggftw.net/wiki/to-w/images/e/e7/Niwerth.gif" | |||
alt="Shadow Niwerth" width="120"> | |||
</a> | |||
</div> | |||
<div class="monster-stats-details"> | |||
<div class="monster-stat-info"> | |||
<span class="monster-stat-label">Player Level:</span> | |||
<span class="monster-stat-value">312-315</span> | |||
</div> | |||
<div class="monster-stat-info"> | |||
<span class="monster-stat-label">Location:</span> | |||
<span class="monster-stat-value"><a | |||
href="https://wikimirror.lifeto.co/wiki.ggftw.com/trickster/Ice_Dungeon_1_-_Cave_of_Dark_Blue.html" | |||
target="_blank">Ice Dungeon 1 - Cave of Dark Blue</a></span> | |||
</div> | |||
<div class="monster-stat-info"> | |||
<span class="monster-stat-label">Kill Count:</span> | |||
<span class="monster-stat-value">3 monsters</span> | |||
</div> | |||
<div class="monster-stat-info"> | |||
<span class="monster-stat-label">Time Limit:</span> | |||
<span class="monster-stat-value">11 minutes</span> | |||
</div> | |||
<div class="monster-rewards-section"> | |||
<div class="monster-reward-item"> | |||
<span class="monster-reward-label">Reward:</span> | |||
<span class="monster-reward-value">100k Galder Check + <a | |||
href="https://mewsie.world/CoraTOWiki/index.php/Cora_Boxes" target="_blank">Major Cora Box</a></span> | |||
</div> | |||
</div> | |||
</div> | |||
</div> | |||
<div class="monster-info-card" data-level="316+"> | |||
<div class="monster-card-header"> | |||
<h4><a href="https://wikimirror.lifeto.co/wiki.ggftw.com/trickster/Shadow_Coolem.html" | |||
target="_blank">Shadow Coolem</a></h4> | |||
<span class="monster-level-badge">Lv. 558</span> | |||
</div> | |||
<div class="image-container"> | |||
<a href="https://wikimirror.lifeto.co/asset.103.ggftw.net/wiki/to-w/images/1/1b/Coolem.gif" | |||
target="_blank"> | |||
<img src="https://wikimirror.lifeto.co/asset.103.ggftw.net/wiki/to-w/images/1/1b/Coolem.gif" | |||
alt="Shadow Coolem" width="120"> | |||
</a> | |||
</div> | |||
<div class="monster-stats-details"> | |||
<div class="monster-stat-info"> | |||
<span class="monster-stat-label">Player Level:</span> | |||
<span class="monster-stat-value">316+</span> | |||
</div> | |||
<div class="monster-stat-info"> | |||
<span class="monster-stat-label">Location:</span> | |||
<span class="monster-stat-value"><a | |||
href="https://wikimirror.lifeto.co/wiki.ggftw.com/trickster/Ice_Dungeon_2_-_Cave_of_Crystal.html" | |||
target="_blank">Ice Dungeon 2 - Cave of Crystal</a> / <a | |||
href="https://wikimirror.lifeto.co/wiki.ggftw.com/trickster/Ice_Dungeon_3_-_Heart_of_Crystal.html" | |||
target="_blank">Ice Dungeon 3 - Heart of Crystal</a> / <a | |||
href="https://wikimirror.lifeto.co/wiki.ggftw.com/trickster/Ice_Dungeon_4_-_Teardrop_Walkways.html" | |||
target="_blank">Ice Dungeon 4 - Teardrop Walkways</a></span> | |||
</div> | |||
<div class="monster-stat-info"> | |||
<span class="monster-stat-label">Kill Count:</span> | |||
<span class="monster-stat-value">3 monsters</span> | |||
</div> | |||
<div class="monster-stat-info"> | |||
<span class="monster-stat-label">Time Limit:</span> | |||
<span class="monster-stat-value">10 minutes</span> | |||
</div> | |||
<div class="monster-rewards-section"> | |||
<div class="monster-reward-item"> | |||
<span class="monster-reward-label">Reward:</span> | |||
<span class="monster-reward-value">100k Galder Check + <a | |||
href="https://mewsie.world/CoraTOWiki/index.php/Cora_Boxes" target="_blank">Major Cora Box</a></span> | |||
</div> | |||
</div> | |||
</div> | |||
</div> | |||
</div> | |||
</div> | |||
<div id="tab-techichi" class="nested-content" role="tabpanel" aria-labelledby="tab-techichi-label" | |||
aria-hidden="true"> | |||
<div class="section-header"> | |||
<h2>Dark Spirit Punishment 10 - Techichi Volcano</h2> | |||
</div> | |||
<div class="quest-info-card"> | |||
<div class="quest-card-header"> | |||
<h3>Quest Details</h3> | |||
<span class="quest-number-badge">#10</span> | |||
</div> | |||
<div class="quest-details-grid"> | |||
<div class="quest-detail-item"> | |||
<h5 class="quest-section-title">NPC:</h5> | |||
<div class="quest-detail-label"> | |||
<img class="image-container" | |||
src="https://wikimirror.lifeto.co/asset.103.ggftw.net/wiki/to-w/images/6/6b/Shaman_Girl_Jia.gif" | |||
alt="Shaman Girl Jia"> | |||
<p class="quest-detail-value">Shaman Girl Jia</p> | |||
</div> | |||
</div> | |||
<div class="quest-detail-item"> | |||
<h5 class="quest-section-title">Location:</h5> | |||
<div class="quest-detail-label"> | |||
<img class="quest-location-image" | |||
src="https://mewsie.world/CoraTOWiki/images/5/50/ShamanJia-Techichi.png" | |||
alt="Techichi Volcano Location"> | |||
<p class="quest-detail-value"> <br>Techichi Town - Neil's Camp</br></p> | |||
</div> | |||
</div> | |||
<div class="quest-detail-item"> | |||
<h5 class="quest-section-title">Requirement:</h5> | |||
<div class="quest-detail-label"> | |||
<img class="quest-location-image" | |||
src="https://wikimirror.lifeto.co/asset.103.ggftw.net/wiki/to-w/images/f/f9/Mind%27s_Eye.jpg" | |||
alt="Mind's Eye"> | |||
<p class="quest-detail-value"> <br>Level 315+, Mind's Eye skill active</br></p> | |||
</div> | |||
</div> | |||
</div> | |||
</div> | |||
<div class="monster-info-grid"> | |||
<div class="monster-info-card" data-level="315-318"> | |||
<div class="monster-card-header"> | |||
<h4><a href="https://wikimirror.lifeto.co/wiki.ggftw.com/trickster/Shadow_Fossil_Soldier.html" | |||
target="_blank">Shadow Fossil Soldier</a></h4> | |||
<span class="monster-level-badge">Lv. 567</span> | |||
</div> | |||
<div class="image-container"> | |||
<a href="https://wikimirror.lifeto.co/asset.103.ggftw.net/wiki/to-w/images/1/11/Coal_Soldier.gif" | |||
target="_blank"> | |||
<img src="https://wikimirror.lifeto.co/asset.103.ggftw.net/wiki/to-w/images/1/11/Coal_Soldier.gif" | |||
alt="Shadow Fossil Soldier" width="120"> | |||
</a> | |||
</div> | |||
<div class="monster-stats-details"> | |||
<div class="monster-stat-info"> | |||
<span class="monster-stat-label">Player Level:</span> | |||
<span class="monster-stat-value">315-318</span> | |||
</div> | |||
<div class="monster-stat-info"> | |||
<span class="monster-stat-label">Location:</span> | |||
<span class="monster-stat-value"><a | |||
href="https://wikimirror.lifeto.co/wiki.ggftw.com/trickster/Path_to_Techichi_1.html" | |||
target="_blank">Path to Techichi 1 - Sleet Forest</a></span> | |||
</div> | |||
<div class="monster-stat-info"> | |||
<span class="monster-stat-label">Kill Count:</span> | |||
<span class="monster-stat-value">3 monsters</span> | |||
</div> | |||
<div class="monster-stat-info"> | |||
<span class="monster-stat-label">Time Limit:</span> | |||
<span class="monster-stat-value">12 minutes</span> | |||
</div> | |||
<div class="monster-rewards-section"> | |||
<div class="monster-reward-item"> | |||
<span class="monster-reward-label">Reward:</span> | |||
<span class="monster-reward-value">100k Galder Check + <a | |||
href="https://mewsie.world/CoraTOWiki/index.php/Cora_Boxes" target="_blank">Major Cora Box</a></span> | |||
</div> | |||
</div> | |||
</div> | |||
</div> | |||
<div class="monster-info-card" data-level="319-322"> | |||
<div class="monster-card-header"> | |||
<h4><a href="https://wikimirror.lifeto.co/wiki.ggftw.com/trickster/Shadow_Laki.html" | |||
target="_blank">Shadow Laki</a></h4> | |||
<span class="monster-level-badge">Lv. 573</span> | |||
</div> | |||
<div class="image-container"> | |||
<a href="https://wikimirror.lifeto.co/asset.103.ggftw.net/wiki/to-w/images/6/6a/Laki.gif" | |||
target="_blank"> | |||
<img src="https://wikimirror.lifeto.co/asset.103.ggftw.net/wiki/to-w/images/6/6a/Laki.gif" | |||
alt="Shadow Laki" width="120"> | |||
</a> | |||
</div> | |||
<div class="monster-stats-details"> | |||
<div class="monster-stat-info"> | |||
<span class="monster-stat-label">Player Level:</span> | |||
<span class="monster-stat-value">319-322</span> | |||
</div> | |||
<div class="monster-stat-info"> | |||
<span class="monster-stat-label">Location:</span> | |||
<span class="monster-stat-value"><a | |||
href="https://wikimirror.lifeto.co/wiki.ggftw.com/trickster/Techichi_Field_1.html" | |||
target="_blank">Techichi Field 1</a> / <a | |||
href="https://wikimirror.lifeto.co/wiki.ggftw.com/trickster/Techichi_Field_2.html" | |||
target="_blank">Techichi Field 2</a></span> | |||
</div> | |||
<div class="monster-stat-info"> | |||
<span class="monster-stat-label">Kill Count:</span> | |||
<span class="monster-stat-value">3 monsters</span> | |||
</div> | |||
<div class="monster-stat-info"> | |||
<span class="monster-stat-label">Time Limit:</span> | |||
<span class="monster-stat-value">10 minutes</span> | |||
</div> | |||
<div class="monster-rewards-section"> | |||
<div class="monster-reward-item"> | |||
<span class="monster-reward-label">Reward:</span> | |||
<span class="monster-reward-value">100k Galder Check + <a | |||
href="https://mewsie.world/CoraTOWiki/index.php/Cora_Boxes" target="_blank">Major Cora Box</a></span> | |||
</div> | |||
</div> | |||
</div> | |||
</div> | |||
<div class="monster-info-card" data-level="323-325"> | |||
<div class="monster-card-header"> | |||
<h4><a href="https://wikimirror.lifeto.co/wiki.ggftw.com/trickster/Shadow_Aabon.html" | |||
target="_blank">Shadow Aabon</a></h4> | |||
<span class="monster-level-badge">Lv. 581</span> | |||
</div> | |||
<div class="image-container"> | |||
<a href="https://wikimirror.lifeto.co/asset.103.ggftw.net/wiki/to-w/images/7/7b/Aabon.gif" | |||
target="_blank"> | |||
<img src="https://wikimirror.lifeto.co/asset.103.ggftw.net/wiki/to-w/images/7/7b/Aabon.gif" | |||
alt="Shadow Aabon" width="120"> | |||
</a> | |||
</div> | |||
<div class="monster-stats-details"> | |||
<div class="monster-stat-info"> | |||
<span class="monster-stat-label">Player Level:</span> | |||
<span class="monster-stat-value">323-325</span> | |||
</div> | |||
<div class="monster-stat-info"> | |||
<span class="monster-stat-label">Location:</span> | |||
<span class="monster-stat-value"><a | |||
href="https://wikimirror.lifeto.co/wiki.ggftw.com/trickster/Techichi_Field_4.html" | |||
target="_blank">Techichi Field 4</a></span> | |||
</div> | |||
<div class="monster-stat-info"> | |||
<span class="monster-stat-label">Kill Count:</span> | |||
<span class="monster-stat-value">3 monsters</span> | |||
</div> | |||
<div class="monster-stat-info"> | |||
<span class="monster-stat-label">Time Limit:</span> | |||
<span class="monster-stat-value">11 minutes</span> | |||
</div> | |||
<div class="monster-rewards-section"> | |||
<div class="monster-reward-item"> | |||
<span class="monster-reward-label">Reward:</span> | |||
<span class="monster-reward-value">100k Galder Check + <a | |||
href="https://mewsie.world/CoraTOWiki/index.php/Cora_Boxes" target="_blank">Major Cora Box</a></span> | |||
</div> | |||
</div> | |||
</div> | |||
</div> | |||
<div class="monster-info-card" data-level="326-329"> | |||
<div class="monster-card-header"> | |||
<h4><a href="https://wikimirror.lifeto.co/wiki.ggftw.com/trickster/Shadow_Malefic_Matron.html" | |||
target="_blank">Shadow Malefic Matron</a></h4> | |||
<span class="monster-level-badge">Lv. 585</span> | |||
</div> | |||
<div class="image-container"> | |||
<a href="https://wikimirror.lifeto.co/asset.103.ggftw.net/wiki/to-w/images/c/c1/Malefic_Matron.gif" | |||
target="_blank"> | |||
<img src="https://wikimirror.lifeto.co/asset.103.ggftw.net/wiki/to-w/images/c/c1/Malefic_Matron.gif" | |||
alt="Shadow Malefic Matron" width="120"> | |||
</a> | |||
</div> | |||
<div class="monster-stats-details"> | |||
<div class="monster-stat-info"> | |||
<span class="monster-stat-label">Player Level:</span> | |||
<span class="monster-stat-value">326-329</span> | |||
</div> | |||
<div class="monster-stat-info"> | |||
<span class="monster-stat-label">Location:</span> | |||
<span class="monster-stat-value"><a | |||
href="https://wikimirror.lifeto.co/wiki.ggftw.com/trickster/Black_Ash_Dungeon_1.html" | |||
target="_blank">Black Ash Dungeon 1</a> / <a | |||
href="https://wikimirror.lifeto.co/wiki.ggftw.com/trickster/Black_Ash_Dungeon_2.html" | |||
target="_blank">Black Ash Dungeon 2</a></span> | |||
</div> | |||
<div class="monster-stat-info"> | |||
<span class="monster-stat-label">Kill Count:</span> | |||
<span class="monster-stat-value">3 monsters</span> | |||
</div> | |||
<div class="monster-stat-info"> | |||
<span class="monster-stat-label">Time Limit:</span> | |||
<span class="monster-stat-value">11 minutes</span> | |||
</div> | |||
<div class="monster-rewards-section"> | |||
<div class="monster-reward-item"> | |||
<span class="monster-reward-label">Reward:</span> | |||
<span class="monster-reward-value">100k Galder Check + <a | |||
href="https://mewsie.world/CoraTOWiki/index.php/Cora_Boxes" target="_blank">Major Cora Box</a></span> | |||
</div> | |||
</div> | |||
</div> | |||
</div> | |||
<div class="monster-info-card" data-level="330+"> | |||
<div class="monster-card-header"> | |||
<h4><a href="https://wikimirror.lifeto.co/wiki.ggftw.com/trickster/Shadow_Burning_Kili.html" | |||
target="_blank">Shadow Burning Kili</a></h4> | |||
<span class="monster-level-badge">Lv. 587</span> | |||
</div> | |||
<div class="image-container"> | |||
<a href="https://wikimirror.lifeto.co/asset.103.ggftw.net/wiki/to-w/images/7/78/Kilimanjaro.gif" | |||
target="_blank"> | |||
<img src="https://wikimirror.lifeto.co/asset.103.ggftw.net/wiki/to-w/images/7/78/Kilimanjaro.gif" | |||
alt="Shadow Burning Kili" width="120"> | |||
</a> | |||
</div> | |||
<div class="monster-stats-details"> | |||
<div class="monster-stat-info"> | |||
<span class="monster-stat-label">Player Level:</span> | |||
<span class="monster-stat-value">330+</span> | |||
</div> | |||
<div class="monster-stat-info"> | |||
<span class="monster-stat-label">Location:</span> | |||
<span class="monster-stat-value"><a | |||
href="https://wikimirror.lifeto.co/wiki.ggftw.com/trickster/Black_Ash_Dungeon_1.html" | |||
target="_blank">Black Ash Dungeon 1</a> / <a | |||
href="https://wikimirror.lifeto.co/wiki.ggftw.com/trickster/Black_Ash_Dungeon_3.html" | |||
target="_blank">Black Ash Dungeon 3</a></span> | |||
</div> | |||
<div class="monster-stat-info"> | |||
<span class="monster-stat-label">Kill Count:</span> | |||
<span class="monster-stat-value">3 monsters</span> | |||
</div> | |||
<div class="monster-stat-info"> | |||
<span class="monster-stat-label">Time Limit:</span> | |||
<span class="monster-stat-value">10 minutes</span> | |||
</div> | |||
<div class="monster-rewards-section"> | |||
<div class="monster-reward-item"> | |||
<span class="monster-reward-label">Reward:</span> | |||
<span class="monster-reward-value">100k Galder Check + <a | |||
href="https://mewsie.world/CoraTOWiki/index.php/Cora_Boxes" target="_blank">Major Cora Box</a></span> | |||
</div> | |||
</div> | |||
</div> | |||
</div> | |||
</div> | |||
</div> | |||
<div id="tab-tapasco" class="nested-content" role="tabpanel" aria-labelledby="tab-tapasco-label" | |||
aria-hidden="true"> | |||
<div class="section-header"> | |||
<h2>Dark Spirit Punishment 11 - Tapasco Volcano</h2> | |||
</div> | |||
<div class="quest-info-card"> | |||
<div class="quest-card-header"> | |||
<h3>Quest Details</h3> | |||
<span class="quest-number-badge">#11</span> | |||
</div> | |||
<div class="quest-details-grid"> | |||
<div class="quest-detail-item"> | |||
<h5 class="quest-section-title">NPC:</h5> | |||
<div class="quest-detail-label"> | |||
<img class="image-container" | |||
src="https://wikimirror.lifeto.co/asset.103.ggftw.net/wiki/to-w/images/6/6b/Shaman_Girl_Jia.gif" | |||
alt="Shaman Girl Jia"> | |||
<p class="quest-detail-value">Shaman Girl Jia</p> | |||
</div> | |||
</div> | |||
<div class="quest-detail-item"> | |||
<h5 class="quest-section-title">Location:</h5> | |||
<div class="quest-detail-label"> | |||
<img class="quest-location-image" | |||
src="https://mewsie.world/CoraTOWiki/images/9/99/ShamanJia-Tapasco.png" | |||
alt="Tapasco Volcano Location"> | |||
<p class="quest-detail-value"> <br>Gate of Tapasco Volcano</br></p> | |||
</div> | |||
</div> | |||
<div class="quest-detail-item"> | |||
<h5 class="quest-section-title">Requirement:</h5> | |||
<div class="quest-detail-label"> | |||
<img class="quest-location-image" | |||
src="https://wikimirror.lifeto.co/asset.103.ggftw.net/wiki/to-w/images/f/f9/Mind%27s_Eye.jpg" | |||
alt="Mind's Eye"> | |||
<p class="quest-detail-value"> <br>Level 330+, Mind's Eye skill active</br></p> | |||
</div> | |||
</div> | |||
</div> | |||
</div> | |||
<div class="monster-info-grid"> | |||
<div class="monster-info-card" data-level="330-333"> | |||
<div class="monster-card-header"> | |||
<h4><a href="https://wikimirror.lifeto.co/wiki.ggftw.com/trickster/Shadow_Fire_Moth.html" | |||
target="_blank">Shadow Fire Moth</a></h4> | |||
<span class="monster-level-badge">Lv. 594</span> | |||
</div> | |||
<div class="image-container"> | |||
<a href="https://wikimirror.lifeto.co/asset.103.ggftw.net/wiki/to-w/images/f/fa/Fire_Moth.gif" | |||
target="_blank"> | |||
<img src="https://wikimirror.lifeto.co/asset.103.ggftw.net/wiki/to-w/images/f/fa/Fire_Moth.gif" | |||
alt="Shadow Fire Moth" width="120"> | |||
</a> | |||
</div> | |||
<div class="monster-stats-details"> | |||
<div class="monster-stat-info"> | |||
<span class="monster-stat-label">Player Level:</span> | |||
<span class="monster-stat-value">330-333</span> | |||
</div> | |||
<div class="monster-stat-info"> | |||
<span class="monster-stat-label">Location:</span> | |||
<span class="monster-stat-value"><a | |||
href="https://wikimirror.lifeto.co/wiki.ggftw.com/trickster/Tapasco_Field_1_-_Net_of_Lava.html" | |||
target="_blank">Tapasco Field 1 - Net of Lava</a> / <a | |||
href="https://wikimirror.lifeto.co/wiki.ggftw.com/trickster/Tapasco_Field_2_-_Rhythm_of_Hammer.html" | |||
target="_blank">Tapasco Field 2 - Rhythm of Hammer</a></span> | |||
</div> | |||
<div class="monster-stat-info"> | |||
<span class="monster-stat-label">Kill Count:</span> | |||
<span class="monster-stat-value">3 monsters</span> | |||
</div> | |||
<div class="monster-stat-info"> | |||
<span class="monster-stat-label">Time Limit:</span> | |||
<span class="monster-stat-value">11 minutes</span> | |||
</div> | |||
<div class="monster-rewards-section"> | |||
<div class="monster-reward-item"> | |||
<span class="monster-reward-label">Reward:</span> | |||
<span class="monster-reward-value">100k Galder Check + <a | |||
href="https://mewsie.world/CoraTOWiki/index.php/Cora_Boxes" target="_blank">Major Cora Box</a></span> | |||
</div> | |||
</div> | |||
</div> | |||
</div> | |||
<div class="monster-info-card" data-level="334-337"> | |||
<div class="monster-card-header"> | |||
<h4><a href="https://wikimirror.lifeto.co/wiki.ggftw.com/trickster/Shadow_Funky_Orc.html" | |||
target="_blank">Shadow Funky Orc</a></h4> | |||
<span class="monster-level-badge">Lv. 601</span> | |||
</div> | |||
<div class="image-container"> | |||
<a href="https://wikimirror.lifeto.co/asset.103.ggftw.net/wiki/to-w/images/3/3b/Funky_Orc.gif" | |||
target="_blank"> | |||
<img src="https://wikimirror.lifeto.co/asset.103.ggftw.net/wiki/to-w/images/3/3b/Funky_Orc.gif" | |||
alt="Shadow Funky Orc" width="120"> | |||
</a> | |||
</div> | |||
<div class="monster-stats-details"> | |||
<div class="monster-stat-info"> | |||
<span class="monster-stat-label">Player Level:</span> | |||
<span class="monster-stat-value">334-337</span> | |||
</div> | |||
<div class="monster-stat-info"> | |||
<span class="monster-stat-label">Location:</span> | |||
<span class="monster-stat-value"><a | |||
href="https://wikimirror.lifeto.co/wiki.ggftw.com/trickster/Tapasco_Field_2_-_Rhythm_of_Hammer.html" | |||
target="_blank">Tapasco Field 2 - Rhythm of Hammer</a> / <a | |||
href="https://wikimirror.lifeto.co/wiki.ggftw.com/trickster/Tapasco_Field_3_-_Valley_of_Flame.html" | |||
target="_blank">Tapasco Field 3 - Valley of Flame</a></span> | |||
</div> | |||
<div class="monster-stat-info"> | |||
<span class="monster-stat-label">Kill Count:</span> | |||
<span class="monster-stat-value">3 monsters</span> | |||
</div> | |||
<div class="monster-stat-info"> | |||
<span class="monster-stat-label">Time Limit:</span> | |||
<span class="monster-stat-value">11 minutes</span> | |||
</div> | |||
<div class="monster-rewards-section"> | |||
<div class="monster-reward-item"> | |||
<span class="monster-reward-label">Reward:</span> | |||
<span class="monster-reward-value">100k Galder Check + <a | |||
href="https://mewsie.world/CoraTOWiki/index.php/Cora_Boxes" target="_blank">Major Cora Box</a></span> | |||
</div> | |||
</div> | |||
</div> | |||
</div> | |||
<div class="monster-info-card" data-level="338+"> | |||
<div class="monster-card-header"> | |||
<h4><a href="https://wikimirror.lifeto.co/wiki.ggftw.com/trickster/Shadow_Regent_Orc.html" | |||
target="_blank">Shadow Regent Orc</a></h4> | |||
<span class="monster-level-badge">Lv. 603</span> | |||
</div> | |||
<div class="image-container"> | |||
<a href="https://wikimirror.lifeto.co/asset.103.ggftw.net/wiki/to-w/images/d/d8/Regent_Orc.gif" | |||
target="_blank"> | |||
<img src="https://wikimirror.lifeto.co/asset.103.ggftw.net/wiki/to-w/images/d/d8/Regent_Orc.gif" | |||
alt="Shadow Regent Orc" width="120"> | |||
</a> | |||
</div> | |||
<div class="monster-stats-details"> | |||
<div class="monster-stat-info"> | |||
<span class="monster-stat-label">Player Level:</span> | |||
<span class="monster-stat-value">338+</span> | |||
</div> | |||
<div class="monster-stat-info"> | |||
<span class="monster-stat-label">Location:</span> | |||
<span class="monster-stat-value"><a | |||
href="https://wikimirror.lifeto.co/wiki.ggftw.com/trickster/Tapasco_Field_2_-_Rhythm_of_Hammer.html" | |||
target="_blank">Tapasco Field 2 - Rhythm of Hammer</a> / <a | |||
href="https://wikimirror.lifeto.co/wiki.ggftw.com/trickster/Tapasco_Field_3_-_Valley_of_Flame.html" | |||
target="_blank">Tapasco Field 3 - Valley of Flame</a></span> | |||
</div> | |||
<div class="monster-stat-info"> | |||
<span class="monster-stat-label">Kill Count:</span> | |||
<span class="monster-stat-value">3 monsters</span> | |||
</div> | |||
<div class="monster-stat-info"> | |||
<span class="monster-stat-label">Time Limit:</span> | |||
<span class="monster-stat-value">11 minutes</span> | |||
</div> | |||
<div class="monster-rewards-section"> | |||
<div class="monster-reward-item"> | |||
<span class="monster-reward-label">Reward:</span> | |||
<span class="monster-reward-value">100k Galder Check + <a | |||
href="https://mewsie.world/CoraTOWiki/index.php/Cora_Boxes" target="_blank">Major Cora Box</a></span> | |||
</div> | |||
</div> | |||
</div> | |||
</div> | |||
</div> | |||
</div> | |||
<div id="tab-abyss" class="nested-content" role="tabpanel" aria-labelledby="tab-abyss-label" aria-hidden="true"> | |||
<div class="section-header"> | |||
<h2>Dark Spirit Punishment 12 - Abyss</h2> | |||
</div> | |||
<div class="quest-info-card"> | |||
<div class="quest-card-header"> | |||
<h3>Quest Details</h3> | |||
<span class="quest-number-badge">#12</span> | |||
</div> | |||
<div class="quest-details-grid"> | |||
<div class="quest-detail-item"> | |||
<h5 class="quest-section-title">NPC:</h5> | |||
<div class="quest-detail-label"> | |||
<img class="image-container" | |||
src="https://wikimirror.lifeto.co/asset.103.ggftw.net/wiki/to-w/images/6/6b/Shaman_Girl_Jia.gif" | |||
alt="Shaman Girl Jia"> | |||
<p class="quest-detail-value">Shaman Girl Jia</p> | |||
</div> | |||
</div> | |||
<div class="quest-detail-item"> | |||
<h5 class="quest-section-title">Location:</h5> | |||
<div class="quest-detail-label"> | |||
<img class="quest-location-image" | |||
src="https://mewsie.world/CoraTOWiki/images/d/d3/ShamanJia-Abyss.png" alt="Abyss Location"> | |||
<p class="quest-detail-value"> <br>Abyss Town - Platonia</br></p> | |||
</div> | |||
</div> | |||
<div class="quest-detail-item"> | |||
<h5 class="quest-section-title">Requirement:</h5> | |||
<div class="quest-detail-label"> | |||
<img class="quest-location-image" | |||
src="https://wikimirror.lifeto.co/asset.103.ggftw.net/wiki/to-w/images/f/f9/Mind%27s_Eye.jpg" | |||
alt="Mind's Eye"> | |||
<p class="quest-detail-value"> <br>Level 345+, Mind's Eye skill active</br></p> | |||
</div> | |||
</div> | |||
</div> | |||
</div> | |||
<div class="monster-info-grid"> | |||
<div class="monster-info-card" data-level="345-348"> | |||
<div class="monster-card-header"> | |||
<h4><a href="https://wikimirror.lifeto.co/wiki.ggftw.com/trickster/Shadow_Krybeth.html" | |||
target="_blank">Shadow Krybeth</a></h4> | |||
<span class="monster-level-badge">Lv. 624</span> | |||
</div> | |||
<div class="image-container"> | |||
<a href="https://wikimirror.lifeto.co/asset.103.ggftw.net/wiki/to-w/images/8/87/Krybeth.gif" | |||
target="_blank"> | |||
<img src="https://wikimirror.lifeto.co/asset.103.ggftw.net/wiki/to-w/images/8/87/Krybeth.gif" | |||
alt="Shadow Krybeth" width="120"> | |||
</a> | |||
</div> | |||
<div class="monster-stats-details"> | |||
<div class="monster-stat-info"> | |||
<span class="monster-stat-label">Player Level:</span> | |||
<span class="monster-stat-value">345-348</span> | |||
</div> | |||
<div class="monster-stat-info"> | |||
<span class="monster-stat-label">Location:</span> | |||
<span class="monster-stat-value"><a | |||
href="https://wikimirror.lifeto.co/wiki.ggftw.com/trickster/Abyss_Field_1_-_The_Valley_Mouth.html" | |||
target="_blank">Abyss Field 1 - The Valley Mouth</a> / <a | |||
href="https://wikimirror.lifeto.co/wiki.ggftw.com/trickster/Abyss_Field_3_-_The_Dark_Hills.html" | |||
target="_blank">Abyss Field 3 - The Dark Hills</a></span> | |||
</div> | |||
<div class="monster-stat-info"> | |||
<span class="monster-stat-label">Kill Count:</span> | |||
<span class="monster-stat-value">3 monsters</span> | |||
</div> | |||
<div class="monster-stat-info"> | |||
<span class="monster-stat-label">Time Limit:</span> | |||
<span class="monster-stat-value">12 minutes</span> | |||
</div> | |||
<div class="monster-rewards-section"> | |||
<div class="monster-reward-item"> | |||
<span class="monster-reward-label">Reward:</span> | |||
<span class="monster-reward-value">100k Galder Check + <a | |||
href="https://mewsie.world/CoraTOWiki/index.php/Cora_Boxes" target="_blank">Major Cora Box</a></span> | |||
</div> | |||
</div> | |||
</div> | |||
</div> | |||
<div class="monster-info-card" data-level="349+"> | |||
<div class="monster-card-header"> | |||
<h4><a href="https://wikimirror.lifeto.co/wiki.ggftw.com/trickster/Shadow_Skelefish.html" | |||
target="_blank">Shadow Skelefish</a></h4> | |||
<span class="monster-level-badge">Lv. 630</span> | |||
</div> | |||
<div class="image-container"> | |||
<a href="https://wikimirror.lifeto.co/asset.103.ggftw.net/wiki/to-w/images/2/2b/Skelefish.gif" | |||
target="_blank"> | |||
<img src="https://wikimirror.lifeto.co/asset.103.ggftw.net/wiki/to-w/images/2/2b/Skelefish.gif" | |||
alt="Shadow Skelefish" width="120"> | |||
</a> | |||
</div> | |||
<div class="monster-stats-details"> | |||
<div class="monster-stat-info"> | |||
<span class="monster-stat-label">Player Level:</span> | |||
<span class="monster-stat-value">349+</span> | |||
</div> | |||
<div class="monster-stat-info"> | |||
<span class="monster-stat-label">Location:</span> | |||
<span class="monster-stat-value"><a | |||
href="https://wikimirror.lifeto.co/wiki.ggftw.com/trickster/Abyss_Field_2_-_Living_Boneyard.html" | |||
target="_blank">Abyss Field 2 - Living Boneyard</a></span> | |||
</div> | |||
<div class="monster-stat-info"> | |||
<span class="monster-stat-label">Kill Count:</span> | |||
<span class="monster-stat-value">3 monsters</span> | |||
</div> | |||
<div class="monster-stat-info"> | |||
<span class="monster-stat-label">Time Limit:</span> | |||
<span class="monster-stat-value">12 minutes</span> | |||
</div> | |||
<div class="monster-rewards-section"> | |||
<div class="monster-reward-item"> | |||
<span class="monster-reward-label">Reward:</span> | |||
<span class="monster-reward-value">100k Galder Check + <a | |||
href="https://mewsie.world/CoraTOWiki/index.php/Cora_Boxes" target="_blank">Major Cora Box</a></span> | |||
</div> | |||
</div> | |||
</div> | |||
</div> | |||
</div> | |||
</div> | |||
</section> | |||
<!------------------------------------------------------------ Monkey T TAB -------------------------------------------------------------> | |||
<section id="tab-monkey-t" class="tab-content" role="tabpanel"> | |||
<nav class="nested-tabs" role="tablist"> | |||
<button type="button" id="btn-tab-overview" class="nested-tab active" role="tab" aria-selected="true" | |||
aria-controls="monkeytab-overview" data-tab="monkeytab-overview" tabindex="0"><span | |||
class="full-text">Overview</span><span class="short-text">Overview</span></button> | |||
<button type="button" id="btn-tab-faq" class="nested-tab" role="tab" aria-selected="false" aria-controls="monkeytab-faq" | |||
data-tab="monkeytab-faq" tabindex="-1"><span class="full-text">FAQ</span><span | |||
class="short-text">FAQ</span></button> | |||
<button type="button" id="btn-tab-tracker" class="nested-tab" role="tab" aria-selected="false" aria-controls="monkeytab-tracker" | |||
data-tab="monkeytab-tracker" tabindex="-1"><span class="full-text">Quest Tracker</span><span | |||
class="short-text">Tracker</span></button> | |||
<button type="button" id="btn-tab-monkey" class="nested-tab" role="tab" aria-selected="false" aria-controls="tab-monkeyT" | |||
data-tab="tab-monkeyT" tabindex="-1"><span class="full-text">Monkey T</span><span class="short-text">Monkey | |||
T</span></button> | |||
</nav> | |||
<div id="monkeytab-overview" class="nested-content active" role="tabpanel"> | |||
<div class="guide-section-header"> | |||
<h1 class="guide-main-title">Monkey T Grass Quests Overview</h1> | |||
<p class="hero-subtitle">Daily collection quests that grant shards for <a | |||
href="https://mewsie.world/CoraTOWiki/index.php/Harkon_Defense_Custom_Exchanges" target="_blank" | |||
rel="noopener">Harkon Defense Custom Exchanges</a> or <a | |||
href="https://mewsie.world/CoraTOWiki/index.php/Cora_Coupons" target="_blank" rel="noopener">Cora | |||
Coupons</a>. Each location requires 10 specific grasses with location-based level requirements.</p> | |||
</div> | |||
<div class="guide-intro"> | |||
<div class="highlights-grid"> | |||
<div class="guide-card"> | |||
<div class="guide-card-icon">🌿</div> | |||
<h3>How It Works</h3> | |||
<p>Collect 10 of the required grass for the selected location and report back to Monkey T to receive | |||
your reward.</p> | |||
</div> | |||
<div class="guide-card"> | |||
<div class="guide-card-icon">🎁</div> | |||
<h3>Rewards</h3> | |||
<p>50% chance to receive shards and 50% chance to receive <a | |||
href="https://mewsie.world/CoraTOWiki/index.php/Cora_Coupons" target="_blank" rel="noopener">Cora | |||
Coupons</a>. Some locations grant fewer shards for balancing purposes.</p> | |||
</div> | |||
<div class="guide-card"> | |||
<div class="guide-card-icon">🧭</div> | |||
<h3>Where To Start</h3> | |||
<p>Use the tabs to pick a location. Requirements scale from level 12 up to 290 across multiple areas. | |||
</p> | |||
</div> | |||
</div> | |||
</div> | |||
<div class="guide-section"> | |||
<div class="guide-content full-width"> | |||
<div class="cta-box"> | |||
<h4><a href="https://mewsie.world/CoraTOWiki/index.php/Harkon_Defense_Custom_Exchanges" target="_blank" | |||
rel="noopener">Harkon Defense Custom Exchanges</a></h4> | |||
<p>Exchange shards earned from Monkey T to obtain Compound Stones previously only available via MyShop. | |||
</p> | |||
<p><a href="https://mewsie.world/CoraTOWiki/index.php/Harkon_Defense_Custom_Exchanges" target="_blank" | |||
rel="noopener">Go to Harkon Shard Compound Exchange</a></p> | |||
</div> | |||
</div> | |||
</div> | |||
<div class="guide-navigation"> | |||
<h2 class="guide-section-title">Quick Access</h2> | |||
<div class="navigation-steps"> | |||
<div class="nav-step"> | |||
<div class="step-number">1</div> | |||
<div class="image-container"><img | |||
src="https://wikimirror.lifeto.co/asset.103.ggftw.net/wiki/to-w/images/3/3e/Monkey_T.gif" | |||
alt="Monkey T" /></div> | |||
<h3 class="step-title"><a href="#monkeytab-tracker" data-tab-trigger="monkeytab-tracker" | |||
data-tab-button="btn-tab-tracker">Quest Tracker</a></h3> | |||
<p class="step-description">Track completion across all locations and monitor overall progress.</p> | |||
</div> | |||
<div class="nav-step"> | |||
<div class="step-number">2</div> | |||
<div class="image-container"><img src="https://mewsie.world/CoraTOWiki/images/9/97/Monkey_T_Cora.png" | |||
alt="Coral Beach" /></div> | |||
<h3 class="step-title"><a id="quick-start-coral" href="#tab-monkeyT" data-tab-trigger="tab-monkeyT" | |||
data-tab-button="btn-tab-monkey" data-scroll-to="coral-lv12">Start at Coral Beach</a></h3> | |||
<p class="step-description">Begin with Panacea Herb collection at level 12.</p> | |||
</div> | |||
<div class="nav-step"> | |||
<div class="step-number">3</div> | |||
<div class="image-container"><img | |||
src="https://mewsie.world/CoraTOWiki/images/3/37/Monkey_T_Techichi.png" alt="Techichi" /></div> | |||
<h3 class="step-title"><a id="quick-advance-techichi" href="#tab-monkeyT" data-tab-trigger="tab-monkeyT" | |||
data-tab-button="btn-tab-monkey" data-scroll-to="techichi-lv200">Advance to higher levels</a></h3> | |||
<p class="step-description">Progress through later zones like Techichi, Tapasco, and Abyss.</p> | |||
</div> | |||
</div> | |||
</div> | |||
</div> | |||
<div id="monkeytab-tracker" class="nested-content" role="tabpanel"> | |||
<div class="section-header"> | |||
<h2>Quest Tracker</h2> | |||
</div> | |||
<div class="quest-tracker-overview"> | |||
<div class="progress-stats"> | |||
<div class="stat-item"><span class="stat-label">Total Progress:</span><span class="stat-value" | |||
id="total-progress">0/14</span></div> | |||
<div class="stat-item"><span class="stat-label">Completion:</span><span class="stat-value" | |||
id="completion-percentage">0%</span></div> | |||
</div> | |||
<div class="progress-bar-container"> | |||
<div class="progress-bar"> | |||
<div class="progress-fill" id="progress-fill" style="width: 0%"></div> | |||
</div> | |||
</div> | |||
<div class="tracker-actions"><button type="button" class="reset-progress-btn" id="reset-progress">Reset All | |||
Progress</button></div> | |||
</div> | |||
<div class="quest-tracker-locations"> | |||
<div class="location-section"> | |||
<h3 class="location-title">Coral Beach</h3> | |||
<div class="quest-list"> | |||
<div class="quest-item"><label class="quest-checkbox-label"><input type="checkbox" | |||
class="quest-checkbox" data-quest="monkey-coral"><span class="checkmark"></span><span | |||
class="quest-name">Collect 10 Panacea Herb (Lv 12)</span></label></div> | |||
</div> | |||
</div> | |||
<div class="location-section"> | |||
<h3 class="location-title">Desert Beach</h3> | |||
<div class="quest-list"> | |||
<div class="quest-item"><label class="quest-checkbox-label"><input type="checkbox" | |||
class="quest-checkbox" data-quest="monkey-desert"><span class="checkmark"></span><span | |||
class="quest-name">Collect 10 Iron Grass (Lv 20)</span></label></div> | |||
</div> | |||
</div> | |||
<div class="location-section"> | |||
<h3 class="location-title">Megalopolis</h3> | |||
<div class="quest-list"> | |||
<div class="quest-item"><label class="quest-checkbox-label"><input type="checkbox" | |||
class="quest-checkbox" data-quest="monkey-mega"><span class="checkmark"></span><span | |||
class="quest-name">Collect 10 Energy Grass (Lv 30)</span></label></div> | |||
</div> | |||
</div> | |||
<div class="location-section"> | |||
<h3 class="location-title">Oops Wharf</h3> | |||
<div class="quest-list"> | |||
<div class="quest-item"><label class="quest-checkbox-label"><input type="checkbox" | |||
class="quest-checkbox" data-quest="monkey-oops"><span class="checkmark"></span><span | |||
class="quest-name">Collect 10 Eternal Life Grass (Lv 60)</span></label></div> | |||
</div> | |||
</div> | |||
<div class="location-section"> | |||
<h3 class="location-title">Mermaid Palace</h3> | |||
<div class="quest-list"> | |||
<div class="quest-item"><label class="quest-checkbox-label"><input type="checkbox" | |||
class="quest-checkbox" data-quest="monkey-mermaid"><span class="checkmark"></span><span | |||
class="quest-name">Collect 10 Eternal Glamor Grass (Lv 75)</span></label></div> | |||
</div> | |||
</div> | |||
<div class="location-section"> | |||
<h3 class="location-title">Mirage Island</h3> | |||
<div class="quest-list"> | |||
<div class="quest-item"><label class="quest-checkbox-label"><input type="checkbox" | |||
class="quest-checkbox" data-quest="monkey-mirage"><span class="checkmark"></span><span | |||
class="quest-name">Collect 10 Panacea (Lv 80)</span></label></div> | |||
</div> | |||
</div> | |||
<div class="location-section"> | |||
<h3 class="location-title">Ghost Blue</h3> | |||
<div class="quest-list"> | |||
<div class="quest-item"><label class="quest-checkbox-label"><input type="checkbox" | |||
class="quest-checkbox" data-quest="monkey-ghost"><span class="checkmark"></span><span | |||
class="quest-name">Collect 10 Eternal Vigor Grass (Lv 95)</span></label></div> | |||
</div> | |||
</div> | |||
<div class="location-section"> | |||
<h3 class="location-title">Rose Garden</h3> | |||
<div class="quest-list"> | |||
<div class="quest-item"><label class="quest-checkbox-label"><input type="checkbox" | |||
class="quest-checkbox" data-quest="monkey-rose"><span class="checkmark"></span><span | |||
class="quest-name">Collect 10 Eternal Charm Grass (Lv 120)</span></label></div> | |||
</div> | |||
</div> | |||
<div class="location-section"> | |||
<h3 class="location-title">Black Swamp</h3> | |||
<div class="quest-list"> | |||
<div class="quest-item"><label class="quest-checkbox-label"><input type="checkbox" | |||
class="quest-checkbox" data-quest="monkey-swamp"><span class="checkmark"></span><span | |||
class="quest-name">Collect 10 Eternal Clarity Grass (Lv 140)</span></label></div> | |||
</div> | |||
</div> | |||
<div class="location-section"> | |||
<h3 class="location-title">Underground Dev Room</h3> | |||
<div class="quest-list"> | |||
<div class="quest-item"><label class="quest-checkbox-label"><input type="checkbox" | |||
class="quest-checkbox" data-quest="monkey-devroom"><span class="checkmark"></span><span | |||
class="quest-name">Collect 10 Eternal Youth Grass (Lv 150)</span></label></div> | |||
</div> | |||
</div> | |||
<div class="location-section"> | |||
<h3 class="location-title">Snow Hill</h3> | |||
<div class="quest-list"> | |||
<div class="quest-item"><label class="quest-checkbox-label"><input type="checkbox" | |||
class="quest-checkbox" data-quest="monkey-snow"><span class="checkmark"></span><span | |||
class="quest-name">Collect 10 Eternal Ice Grass (Lv 160)</span></label></div> | |||
</div> | |||
</div> | |||
<div class="location-section"> | |||
<h3 class="location-title">Techichi</h3> | |||
<div class="quest-list"> | |||
<div class="quest-item"><label class="quest-checkbox-label"><input type="checkbox" | |||
class="quest-checkbox" data-quest="monkey-techichi"><span class="checkmark"></span><span | |||
class="quest-name">Collect 10 Eternal Fire Grass (Lv 200)</span></label></div> | |||
</div> | |||
</div> | |||
<div class="location-section"> | |||
<h3 class="location-title">Tapasco</h3> | |||
<div class="quest-list"> | |||
<div class="quest-item"><label class="quest-checkbox-label"><input type="checkbox" | |||
class="quest-checkbox" data-quest="monkey-tapasco"><span class="checkmark"></span><span | |||
class="quest-name">Collect 10 Eternal Veneration Grass (Lv 270)</span></label></div> | |||
</div> | |||
</div> | |||
<div class="location-section"> | |||
<h3 class="location-title">Abyss</h3> | |||
<div class="quest-list"> | |||
<div class="quest-item"><label class="quest-checkbox-label"><input type="checkbox" | |||
class="quest-checkbox" data-quest="monkey-abyss"><span class="checkmark"></span><span | |||
class="quest-name">Collect 10 Eternal Bestial Grass (Lv 290)</span></label></div> | |||
</div> | |||
</div> | |||
</div> | |||
</div> | |||
<div id="monkeytab-faq" class="nested-content" role="tabpanel"> | |||
<div class="section-header"> | |||
<h2>Monkey T — FAQ</h2> | |||
<p class="section-lead">Answers to the most common questions about Grass Quests and their rewards.</p> | |||
</div> | |||
<div class="guide-section"> | |||
<div class="guide-content full-width"> | |||
<div class="info-box"> | |||
<h3>What changed from TM focus to shards?</h3> | |||
<p>Monkey T quests used to focus on TM. On CoraTO, they also grant shards used in the <a | |||
href="https://mewsie.world/CoraTOWiki/index.php/Harkon_Defense_Custom_Exchanges" target="_blank" | |||
rel="noopener">Harkon Defense Custom Exchanges</a>, alongside a parallel chance of <a | |||
href="https://mewsie.world/CoraTOWiki/index.php/Cora_Coupons" target="_blank" rel="noopener">Cora | |||
Coupons</a>.</p> | |||
</div> | |||
<div class="info-box"> | |||
<h3>How many items do I need to collect?</h3> | |||
<p>Each daily requires 10 pieces of grass. The type depends on the location.</p> | |||
</div> | |||
<div class="info-box"> | |||
<h3>What are the rewards?</h3> | |||
<p>Rewards follow a 50% rule: shards (amount varies by location and some grant fewer) or <a | |||
href="https://mewsie.world/CoraTOWiki/index.php/Cora_Coupons" target="_blank" rel="noopener">Cora | |||
Coupons</a>.</p> | |||
</div> | |||
<div class="info-box"> | |||
<h3>How do I use shards?</h3> | |||
<p>Exchange shards in the <a | |||
href="https://mewsie.world/CoraTOWiki/index.php/Harkon_Defense_Custom_Exchanges" target="_blank" | |||
rel="noopener">Harkon Defense Custom Exchanges</a> to obtain Compound Stones that were previously | |||
exclusive to MyShop.</p> | |||
<p><a href="https://mewsie.world/CoraTOWiki/index.php/Harkon_Defense_Custom_Exchanges" target="_blank" | |||
rel="noopener">Open Harkon Exchange</a></p> | |||
</div> | |||
<div class="info-box"> | |||
<h3>Where do I start?</h3> | |||
<p>Use Overview’s Quick Access to open Coral Beach or Techichi, or go to the Monkey T tab and select a | |||
location using the nested tabs.</p> | |||
</div> | |||
<div class="info-box"> | |||
<h3>Does the tracker progress persist?</h3> | |||
<p>The Quest Tracker stores your selections locally in your browser. Use “Reset All Progress” to clear. | |||
</p> | |||
<p>If you do not like the quest tracker here, then you may like <a href="https://tools.cora-to.com/daily-tracker/index.html">the other version we have here</a>, which tracks all the custom dailies in the server. | |||
</p> | |||
</div> | |||
</div> | |||
</div> | |||
</div> | |||
<div id="tab-monkeyT" class="nested-content" role="tabpanel"> | |||
<div class="monkeyT"> | |||
<div class="section-header"> | |||
<h2>About Monkey T's Grass Quests</h2> | |||
<p class="section-lead">Monkey T's Grass Quests are custom daily missions that reward shards for <a | |||
href="https://mewsie.world/CoraTOWiki/index.php/Harkon_Defense_Custom_Exchanges" target="_blank" | |||
rel="noopener">Harkon Defense Custom Exchanges</a> and offer a parallel chance at <a | |||
href="https://mewsie.world/CoraTOWiki/index.php/Cora_Coupons" target="_blank" rel="noopener">Cora | |||
Coupons</a>. Each quest requires 10 pieces of a specific grass based on location.</p> | |||
</div> | |||
<div class="guide-section"> | |||
<div class="guide-content full-width"> | |||
<div class="info-box"> | |||
<p>Collect 10 of the required grass in the chosen location and report to Monkey T to claim your | |||
reward. Requirements scale from early areas like Coral Beach to late-game zones such as Techichi, | |||
Tapasco, and Abyss.</p> | |||
<span class="quest-detail-label"> | |||
<img src="https://wikimirror.lifeto.co/asset.103.ggftw.net/wiki/to-w/images/3/3e/Monkey_T.gif" | |||
alt="Monkey T"> | |||
<strong>To start or report</strong>, talk to Monkey T in the appropriate area after gathering the | |||
required grasses. | |||
</span> | |||
<div class="tip-box">Rewards follow a 50% distribution: half the time you receive shards (amount | |||
varies by location) and half the time you receive <a | |||
href="https://mewsie.world/CoraTOWiki/index.php/Cora_Coupons" target="_blank" rel="noopener">Cora | |||
Coupons</a>. Some locations like Coral Beach, Dev Room, and Abyss grant fewer shards.</div> | |||
<div class="warning-box">Originally focused on TM experience, these quests on CoraTO now emphasize | |||
shard rewards and coupon chances. Plan your daily route around shard types you need instead of TM | |||
grinding.</div> | |||
<p>Use the nested tabs below to navigate each location and see item requirements, level gates, and | |||
shard rewards.</p> | |||
</div> | |||
</div> | |||
</div> | |||
<nav class="nested-tabs" role="tablist"> | |||
<button class="nested-tab active" role="tab" aria-selected="true" data-tab="coral-lv12" tabindex="0"><span | |||
class="full-text">Coral Beach — Sunny Beach lv 12</span><span class="short-text">Coral</span></button> | |||
<button class="nested-tab" role="tab" aria-selected="false" data-tab="desert-lv20"><span | |||
class="full-text">Desert Beach — Delta Island lv 20</span><span | |||
class="short-text">Desert</span></button> | |||
<button class="nested-tab" role="tab" aria-selected="false" data-tab="mega-lv30"><span | |||
class="full-text">Megalopolis — Southwest Forest lv 30</span><span | |||
class="short-text">Mega</span></button> | |||
<button class="nested-tab" role="tab" aria-selected="false" data-tab="oops-lv60"><span | |||
class="full-text">Oops Wharf — Haunted Town lv 60</span><span class="short-text">Oops</span></button> | |||
<button class="nested-tab" role="tab" aria-selected="false" data-tab="mermaid-lv75"><span | |||
class="full-text">Mermaid Palace — Seaweeds Square lv 75</span><span | |||
class="short-text">Mermaid</span></button> | |||
<button class="nested-tab" role="tab" aria-selected="false" data-tab="mirage-lv80"><span | |||
class="full-text">Mirage Island — Alteo lv 80</span><span class="short-text">Mirage</span></button> | |||
<button class="nested-tab" role="tab" aria-selected="false" data-tab="ghost-lv95"><span | |||
class="full-text">Seabed — East (Ghost Blue) lv 95</span><span | |||
class="short-text">Ghost</span></button> | |||
<button class="nested-tab" role="tab" aria-selected="false" data-tab="rose-lv120"><span | |||
class="full-text">Rose Garden — Maze of Black Rose lv 120</span><span | |||
class="short-text">Rose</span></button> | |||
<button class="nested-tab" role="tab" aria-selected="false" data-tab="swamp-lv140"><span | |||
class="full-text">Black Swamp — Maze of Forest lv 140</span><span | |||
class="short-text">Swamp</span></button> | |||
<button class="nested-tab" role="tab" aria-selected="false" data-tab="devroom-lv150"><span | |||
class="full-text">Underground Dev Room — Passage 3 lv 150</span><span | |||
class="short-text">Dev</span></button> | |||
<button class="nested-tab" role="tab" aria-selected="false" data-tab="snow-lv160"><span | |||
class="full-text">Snow Hill — Stairway of Snowflake lv 160</span><span | |||
class="short-text">Snow</span></button> | |||
<button class="nested-tab" role="tab" aria-selected="false" data-tab="techichi-lv200"><span | |||
class="full-text">Techichi — Field 3 lv 200</span><span class="short-text">Techichi</span></button> | |||
<button class="nested-tab" role="tab" aria-selected="false" data-tab="tapasco-lv270"><span | |||
class="full-text">Tapasco — Rhythm of Hammer lv 270</span><span | |||
class="short-text">Tapasco</span></button> | |||
<button class="nested-tab" role="tab" aria-selected="false" data-tab="abyss-lv290"><span | |||
class="full-text">Abyss — The Valley Mouth lv 290</span><span class="short-text">Abyss</span></button> | |||
</nav> | |||
<!-- Coral Beach lv 12 --> | |||
<div id="coral-lv12" class="nested-content active"> | |||
<div class="quest-card"> | |||
<div class="quest-header"> | |||
<h1 class="quest-title">Coral Beach Grass Daily</h1> | |||
<span class="quest-type">Hunt</span> | |||
</div> | |||
<div class="quest-sections"> | |||
<div class="quest-section"> | |||
<h5 class="quest-section-title">Location</h5> | |||
<div class="image-container"> | |||
<img src="https://mewsie.world/CoraTOWiki/images/9/97/Monkey_T_Cora.png" | |||
alt="Coral Beach Field 3 - Sunny Beach"> | |||
<strong>Coral Beach Field 3 — Sunny Beach</strong> | |||
</div> | |||
<div class="quest-section-content"><span class="quest-badge">Level 12 Required</span></div> | |||
</div> | |||
<div class="quest-section"> | |||
<h5 class="quest-section-title">Requested Item</h5> | |||
<div class="image-container"> | |||
<img src="https://mewsie.world/CoraTOWiki/images/1/1d/Grass.gif" alt="Panacea Herb"> | |||
<strong>10x Panacea Herb</strong> | |||
</div> | |||
<div class="quest-section-content"><span class="quest-badge">Grass</span></div> | |||
</div> | |||
<div class="quest-section"> | |||
<h5 class="quest-section-title">Shard Reward</h5> | |||
<div class="image-container"> | |||
<img src="https://mewsie.world/CoraTOWiki/images/7/70/Gorgon_Shard_Icon.png" alt="Gorgon Shard"> | |||
<strong>2x Gorgon Shard</strong> | |||
</div> | |||
</div> | |||
</div> | |||
<div class="quest-drop-info"> | |||
<strong>Monsters:</strong> | |||
<div class="image-grid"> | |||
<div class="image-container"> | |||
<img src="https://mewsie.world/CoraTOWiki/images/8/8e/Clione_gif.gif" alt="Clione"> | |||
<strong>Clione (Field 3)</strong> | |||
</div> | |||
</div> | |||
</div> | |||
</div> | |||
</div> | |||
<!-- Desert Beach lv 20 --> | |||
<div id="desert-lv20" class="nested-content"> | |||
<div class="quest-card"> | |||
<div class="quest-header"> | |||
<h1 class="quest-title">Desert Beach Grass Daily</h1> | |||
<span class="quest-type">Hunt</span> | |||
</div> | |||
<div class="quest-sections"> | |||
<div class="quest-section"> | |||
<h5 class="quest-section-title">Location</h5> | |||
<div class="image-container"> | |||
<img src="https://mewsie.world/CoraTOWiki/images/9/9f/Monkey_T_Paradise.png" | |||
alt="Desert Beach Field 1 - Delta Island"> | |||
<strong>Desert Beach Field 1 — Delta Island</strong> | |||
</div> | |||
<div class="quest-section-content"><span class="quest-badge">Level 20 Required</span></div> | |||
</div> | |||
<div class="quest-section"> | |||
<h5 class="quest-section-title">Requested Item</h5> | |||
<div class="image-container"> | |||
<img src="https://mewsie.world/CoraTOWiki/images/1/1d/Grass.gif" alt="Iron Grass"> | |||
<strong>10x Iron Grass</strong> | |||
</div> | |||
<div class="quest-section-content"><span class="quest-badge">Grass</span></div> | |||
</div> | |||
<div class="quest-section"> | |||
<h5 class="quest-section-title">Shard Reward</h5> | |||
<div class="image-container"> | |||
<img src="https://mewsie.world/CoraTOWiki/images/7/70/Gorgon_Shard_Icon.png" alt="Gorgon Shard"> | |||
<strong>3x Gorgon Shard</strong> | |||
</div> | |||
</div> | |||
</div> | |||
<div class="quest-drop-info"> | |||
<strong>Monsters:</strong> | |||
<div class="image-grid"> | |||
<div class="image-container"> | |||
<img src="https://mewsie.world/CoraTOWiki/images/3/3e/Shell_Trap_gif.gif" alt="Shell Trap"> | |||
<strong>Shell Trap (Field 1)</strong> | |||
</div> | |||
</div> | |||
</div> | |||
</div> | |||
</div> | |||
<!-- Megalopolis lv 30 --> | |||
<div id="mega-lv30" class="nested-content"> | |||
<div class="quest-card"> | |||
<div class="quest-header"> | |||
<h1 class="quest-title">Megalopolis Grass Daily</h1> | |||
<span class="quest-type">Hunt</span> | |||
</div> | |||
<div class="quest-sections"> | |||
<div class="quest-section"> | |||
<h5 class="quest-section-title">Location</h5> | |||
<div class="image-container"> | |||
<img src="https://mewsie.world/CoraTOWiki/images/4/40/Monkey_T_Mega.png" alt="Southwest Forest"> | |||
<strong>Southwest Forest</strong> | |||
</div> | |||
<div class="quest-section-content"><span class="quest-badge">Level 30 Required</span></div> | |||
</div> | |||
<div class="quest-section"> | |||
<h5 class="quest-section-title">Requested Item</h5> | |||
<div class="image-container"> | |||
<img src="https://mewsie.world/CoraTOWiki/images/1/1d/Grass.gif" alt="Energy Grass"> | |||
<strong>10x Energy Grass</strong> | |||
</div> | |||
<div class="quest-section-content"><span class="quest-badge">Grass</span></div> | |||
</div> | |||
<div class="quest-section"> | |||
<h5 class="quest-section-title">Shard Reward</h5> | |||
<div class="image-container"> | |||
<img src="https://mewsie.world/CoraTOWiki/images/7/70/Gorgon_Shard_Icon.png" alt="Gorgon Shard"> | |||
<strong>3x Gorgon Shard</strong> | |||
</div> | |||
</div> | |||
</div> | |||
<div class="quest-drop-info"> | |||
<strong>Monsters:</strong> | |||
<div class="image-grid"> | |||
<div class="image-container"> | |||
<img src="https://mewsie.world/CoraTOWiki/images/b/b6/Forest_Tickler.gif" alt="Forest Tickler"> | |||
<strong>Forest Tickler (Southwest Forest)</strong> | |||
</div> | |||
</div> | |||
</div> | |||
</div> | |||
</div> | |||
<!-- Oops Wharf lv 60 --> | |||
<div id="oops-lv60" class="nested-content"> | |||
<div class="quest-card"> | |||
<div class="quest-header"> | |||
<h1 class="quest-title">Oops Wharf Grass Daily</h1> | |||
<span class="quest-type">Hunt</span> | |||
</div> | |||
<div class="quest-sections"> | |||
<div class="quest-section"> | |||
<h5 class="quest-section-title">Location</h5> | |||
<div class="image-container"> | |||
<img src="https://mewsie.world/CoraTOWiki/images/1/1e/Monkey_T_Oops.png" | |||
alt="Wharf Field 1 - Haunted Town"> | |||
<strong>Wharf Field 1 — Haunted Town</strong> | |||
</div> | |||
<div class="quest-section-content"><span class="quest-badge">Level 60 Required</span></div> | |||
</div> | |||
<div class="quest-section"> | |||
<h5 class="quest-section-title">Requested Item</h5> | |||
<div class="image-container"> | |||
<img src="https://mewsie.world/CoraTOWiki/images/1/1d/Grass.gif" alt="Eternal Life Grass"> | |||
<strong>10x Eternal Life Grass</strong> | |||
</div> | |||
<div class="quest-section-content"><span class="quest-badge">Grass</span></div> | |||
</div> | |||
<div class="quest-section"> | |||
<h5 class="quest-section-title">Shard Reward</h5> | |||
<div class="image-container"> | |||
<img src="https://mewsie.world/CoraTOWiki/images/5/53/Charybdis_Shard.png" alt="Charybdis Shard"> | |||
<strong>3x Charybdis Shard</strong> | |||
</div> | |||
</div> | |||
</div> | |||
<div class="quest-drop-info"> | |||
<strong>Monsters:</strong> | |||
<div class="image-grid"> | |||
<div class="image-container"> | |||
<img src="https://mewsie.world/CoraTOWiki/images/d/d8/Quiem.gif" alt="Quiem"> | |||
<strong>Quiem (Oops Field 1, Field 3)</strong> | |||
</div> | |||
</div> | |||
</div> | |||
</div> | |||
</div> | |||
<!-- Mermaid Palace lv 75 --> | |||
<div id="mermaid-lv75" class="nested-content"> | |||
<div class="quest-card"> | |||
<div class="quest-header"> | |||
<h1 class="quest-title">Mermaid Palace Grass Daily</h1> | |||
<span class="quest-type">Hunt</span> | |||
</div> | |||
<div class="quest-sections"> | |||
<div class="quest-section"> | |||
<h5 class="quest-section-title">Location</h5> | |||
<div class="image-container"> | |||
<img src="https://mewsie.world/CoraTOWiki/images/8/8a/Monkey_T_Mermaid.png" | |||
alt="Mermaid Palace Field 2 - Seaweeds Square"> | |||
<strong>Mermaid Palace Field 2 — Seaweeds Square</strong> | |||
</div> | |||
<div class="quest-section-content"><span class="quest-badge">Level 75 Required</span></div> | |||
</div> | |||
<div class="quest-section"> | |||
<h5 class="quest-section-title">Requested Item</h5> | |||
<div class="image-container"> | |||
<img src="https://mewsie.world/CoraTOWiki/images/1/1d/Grass.gif" alt="Eternal Glamor Grass"> | |||
<strong>10x Eternal Glamor Grass</strong> | |||
</div> | |||
<div class="quest-section-content"><span class="quest-badge">Grass</span></div> | |||
</div> | |||
<div class="quest-section"> | |||
<h5 class="quest-section-title">Shard Reward</h5> | |||
<div class="image-container"> | |||
<img src="https://mewsie.world/CoraTOWiki/images/5/53/Charybdis_Shard.png" alt="Charybdis Shard"> | |||
<strong>3x Charybdis Shard</strong> | |||
</div> | |||
</div> | |||
</div> | |||
<div class="quest-drop-info"> | |||
<strong>Monsters:</strong> | |||
<div class="image-grid"> | |||
<div class="image-container"> | |||
<img src="https://mewsie.world/CoraTOWiki/images/7/73/Mermaid_Little.gif" alt="Mermaid Little"> | |||
<strong>Mermaid Little (Mermaid Field 1, Field 2)</strong> | |||
</div> | |||
</div> | |||
</div> | |||
</div> | |||
</div> | |||
<!-- Mirage Island lv 80 --> | |||
<div id="mirage-lv80" class="nested-content"> | |||
<div class="quest-card"> | |||
<div class="quest-header"> | |||
<h1 class="quest-title">Mirage Island Grass Daily</h1> | |||
<span class="quest-type">LIMITED Hunt</span> | |||
</div> | |||
<div class="quest-sections"> | |||
<div class="quest-section"> | |||
<h5 class="quest-section-title">Location</h5> | |||
<div class="image-container"> | |||
<img src="https://mewsie.world/CoraTOWiki/images/a/a0/Monkey_T_Mirage.png" | |||
alt="Mirage Island Field 1 - Alteo"> | |||
<strong>Mirage Island Field 1 — Alteo</strong> | |||
</div> | |||
<div class="quest-section-content"><span class="quest-badge">Level 80 Required</span></div> | |||
</div> | |||
<div class="quest-section"> | |||
<h5 class="quest-section-title">Requested Item</h5> | |||
<div class="image-container"> | |||
<img src="https://mewsie.world/CoraTOWiki/images/1/1d/Grass.gif" alt="Panacea"> | |||
<strong>10x Panacea</strong> | |||
</div> | |||
<div class="quest-section-content"><span class="quest-badge">Grass</span></div> | |||
</div> | |||
<div class="quest-section"> | |||
<h5 class="quest-section-title">Shard Reward</h5> | |||
<div class="image-container"> | |||
<img src="https://mewsie.world/CoraTOWiki/images/5/53/Charybdis_Shard.png" alt="Charybdis Shard"> | |||
<strong>3x Charybdis Shard</strong> | |||
</div> | |||
</div> | |||
</div> | |||
<div class="quest-drop-info"> | |||
<strong>Monsters:</strong> | |||
<div class="image-grid"> | |||
<div class="image-container"><img src="https://mewsie.world/CoraTOWiki/images/7/78/Werepot.gif" | |||
alt="Werepot"><strong>Werepot (Mirage Field 1)</strong></div> | |||
<div class="image-container"><img src="https://mewsie.world/CoraTOWiki/images/d/d9/Fabilsag.gif" | |||
alt="Fabilsag"><strong>Fabilsag (Mirage Field 1)</strong></div> | |||
<div class="image-container"><img src="https://mewsie.world/CoraTOWiki/images/9/96/Fabilsag_G.gif" | |||
alt="Fabilsag G"><strong>Fabilsag G (Mirage Field 1)</strong></div> | |||
<div class="image-container"><img | |||
src="https://mewsie.world/CoraTOWiki/images/2/20/Chickensaurus.gif" | |||
alt="Chickensaurus"><strong>Chickensaurus (Mirage Field 2)</strong></div> | |||
<div class="image-container"><img src="https://mewsie.world/CoraTOWiki/images/d/df/Dark_Hollow.gif" | |||
alt="Dark Hollow"><strong>Dark Hollow (Mirage Field 2, Dungeon 2)</strong></div> | |||
<div class="image-container"><img | |||
src="https://mewsie.world/CoraTOWiki/images/5/5e/Ancient_Chimu.gif" | |||
alt="Ancient Chimu"><strong>Ancient Chimu (Mirage Field 5, Field 7)</strong></div> | |||
</div> | |||
</div> | |||
</div> | |||
</div> | |||
<!-- Ghost Blue (Seabed) lv 95 --> | |||
<div id="ghost-lv95" class="nested-content"> | |||
<div class="quest-card"> | |||
<div class="quest-header"> | |||
<h1 class="quest-title">Ghost Blue Grass Daily</h1> | |||
<span class="quest-type">Hunt</span> | |||
</div> | |||
<div class="quest-sections"> | |||
<div class="quest-section"> | |||
<h5 class="quest-section-title">Location</h5> | |||
<div class="image-container"> | |||
<img src="https://mewsie.world/CoraTOWiki/images/3/35/Monkey_T_Ghost_Blue.png" | |||
alt="Seabed Field 2 - East"> | |||
<strong>Seabed Field 2 — East</strong> | |||
</div> | |||
<div class="quest-section-content"><span class="quest-badge">Level 95 Required</span></div> | |||
</div> | |||
<div class="quest-section"> | |||
<h5 class="quest-section-title">Requested Item</h5> | |||
<div class="image-container"> | |||
<img src="https://mewsie.world/CoraTOWiki/images/1/1d/Grass.gif" alt="Eternal Vigor Grass"> | |||
<strong>10x Eternal Vigor Grass</strong> | |||
</div> | |||
<div class="quest-section-content"><span class="quest-badge">Grass</span></div> | |||
</div> | |||
<div class="quest-section"> | |||
<h5 class="quest-section-title">Shard Reward</h5> | |||
<div class="image-container"> | |||
<img src="https://mewsie.world/CoraTOWiki/images/5/53/Charybdis_Shard.png" alt="Charybdis Shard"> | |||
<strong>3x Charybdis Shard</strong> | |||
</div> | |||
</div> | |||
</div> | |||
<div class="quest-drop-info"> | |||
<strong>Monsters:</strong> | |||
<div class="image-grid"> | |||
<div class="image-container"> | |||
<img src="https://mewsie.world/CoraTOWiki/images/0/0d/Cora_Pyupyu.gif" alt="Cora Pyupyu"> | |||
<strong>Cora Pyupyu (Field 2, Field 3)</strong> | |||
</div> | |||
</div> | |||
</div> | |||
</div> | |||
</div> | |||
<!-- Rose Garden lv 120 --> | |||
<div id="rose-lv120" class="nested-content"> | |||
<div class="quest-card"> | |||
<div class="quest-header"> | |||
<h1 class="quest-title">Rose Garden Grass Daily</h1> | |||
<span class="quest-type">Hunt</span> | |||
</div> | |||
<div class="quest-sections"> | |||
<div class="quest-section"> | |||
<h5 class="quest-section-title">Location</h5> | |||
<div class="image-container"> | |||
<img src="https://mewsie.world/CoraTOWiki/images/2/21/Monkey_T_Rose_Garden.png" | |||
alt="Rose Field 2 - Maze of Black Rose"> | |||
<strong>Rose Field 2 — Maze of Black Rose</strong> | |||
</div> | |||
<div class="quest-section-content"><span class="quest-badge">Level 120 Required</span></div> | |||
</div> | |||
<div class="quest-section"> | |||
<h5 class="quest-section-title">Requested Item</h5> | |||
<div class="image-container"> | |||
<img src="https://mewsie.world/CoraTOWiki/images/1/1d/Grass.gif" alt="Eternal Charm Grass"> | |||
<strong>10x Eternal Charm Grass</strong> | |||
</div> | |||
<div class="quest-section-content"><span class="quest-badge">Grass</span></div> | |||
</div> | |||
<div class="quest-section"> | |||
<h5 class="quest-section-title">Shard Reward</h5> | |||
<div class="image-container"> | |||
<img src="https://mewsie.world/CoraTOWiki/images/0/0f/Scylla_Shard.png" alt="Scylla Shard"> | |||
<strong>3x Scylla Shard</strong> | |||
</div> | |||
</div> | |||
</div> | |||
<div class="quest-drop-info"> | |||
<strong>Monsters:</strong> | |||
<div class="image-grid"> | |||
<div class="image-container"> | |||
<img src="https://mewsie.world/CoraTOWiki/images/8/81/Beast_Vincento.gif" alt="Beast Vincento"> | |||
<strong>Beast Vincento (Field 4)</strong> | |||
</div> | |||
</div> | |||
</div> | |||
</div> | |||
</div> | |||
<!-- Black Swamp lv 140 --> | |||
<div id="swamp-lv140" class="nested-content"> | |||
<div class="quest-card"> | |||
<div class="quest-header"> | |||
<h1 class="quest-title">Black Swamp Grass Daily</h1> | |||
<span class="quest-type">Hunt</span> | |||
</div> | |||
<div class="quest-sections"> | |||
<div class="quest-section"> | |||
<h5 class="quest-section-title">Location</h5> | |||
<div class="image-container"> | |||
<img src="https://mewsie.world/CoraTOWiki/images/c/cc/Monkey_T_Black_Swamp.png" | |||
alt="Swamp Field 3 - Maze of Forest"> | |||
<strong>Swamp Field 3 — Maze of Forest</strong> | |||
</div> | |||
<div class="quest-section-content"><span class="quest-badge">Level 140 Required</span></div> | |||
</div> | |||
<div class="quest-section"> | |||
<h5 class="quest-section-title">Requested Item</h5> | |||
<div class="image-container"> | |||
<img src="https://mewsie.world/CoraTOWiki/images/1/1d/Grass.gif" alt="Eternal Clarity Grass"> | |||
<strong>10x Eternal Clarity Grass</strong> | |||
</div> | |||
<div class="quest-section-content"><span class="quest-badge">Grass</span></div> | |||
</div> | |||
<div class="quest-section"> | |||
<h5 class="quest-section-title">Shard Reward</h5> | |||
<div class="image-container"> | |||
<img src="https://mewsie.world/CoraTOWiki/images/0/0f/Scylla_Shard.png" alt="Scylla Shard"> | |||
<strong>3x Scylla Shard</strong> | |||
</div> | |||
</div> | |||
</div> | |||
<div class="quest-drop-info"> | |||
<strong>Monsters:</strong> | |||
<div class="image-grid"> | |||
<div class="image-container"> | |||
<img src="https://mewsie.world/CoraTOWiki/images/a/aa/Monkya.gif" alt="Monkya"> | |||
<strong>Monkya (Field 3)</strong> | |||
</div> | |||
</div> | |||
</div> | |||
</div> | |||
</div> | |||
<!-- Underground Dev Room lv 150 --> | |||
<div id="devroom-lv150" class="nested-content"> | |||
<div class="quest-card"> | |||
<div class="quest-header"> | |||
<h1 class="quest-title">Underground Dev Room Grass Daily</h1> | |||
<span class="quest-type">LIMITED Hunt</span> | |||
</div> | |||
<div class="quest-sections"> | |||
<div class="quest-section"> | |||
<h5 class="quest-section-title">Location</h5> | |||
<div class="image-container"> | |||
<img src="https://mewsie.world/CoraTOWiki/images/4/4a/Monkey_T_Dev_Room.png" | |||
alt="Underground Dev Room — Underground Passage 3"> | |||
<strong>Underground Dev Room — Underground Passage 3</strong> | |||
</div> | |||
<div class="quest-section-content"><span class="quest-badge">Level 150 Required</span></div> | |||
</div> | |||
<div class="quest-section"> | |||
<h5 class="quest-section-title">Requested Item</h5> | |||
<div class="image-container"> | |||
<img src="https://mewsie.world/CoraTOWiki/images/1/1d/Grass.gif" alt="Eternal Youth Grass"> | |||
<strong>10x Eternal Youth Grass</strong> | |||
</div> | |||
<div class="quest-section-content"><span class="quest-badge">Grass</span></div> | |||
</div> | |||
<div class="quest-section"> | |||
<h5 class="quest-section-title">Shard Reward</h5> | |||
<div class="image-container"> | |||
<img src="https://mewsie.world/CoraTOWiki/images/0/0f/Scylla_Shard.png" alt="Scylla Shard"> | |||
<strong>1x Scylla Shard</strong> | |||
</div> | |||
</div> | |||
</div> | |||
<div class="quest-drop-info"> | |||
<strong>Monsters:</strong> | |||
<div class="image-grid"> | |||
<div class="image-container"> | |||
<img src="https://mewsie.world/CoraTOWiki/images/f/fe/Spiteful_Developer_Spirit.gif" | |||
alt="Spiteful Developer Spirit"> | |||
<strong>Spiteful Developer Spirit (Dev Room areas)</strong> | |||
</div> | |||
</div> | |||
</div> | |||
</div> | |||
</div> | |||
<!-- Snow Hill lv 160 --> | |||
<div id="snow-lv160" class="nested-content"> | |||
<div class="quest-card"> | |||
<div class="quest-header"> | |||
<h1 class="quest-title">Snow Hill Grass Daily</h1> | |||
<span class="quest-type">Hunt</span> | |||
</div> | |||
<div class="quest-sections"> | |||
<div class="quest-section"> | |||
<h5 class="quest-section-title">Location</h5> | |||
<div class="image-container"> | |||
<img src="https://mewsie.world/CoraTOWiki/images/a/ab/Monkey_T_Snow.png" | |||
alt="Snow Field 3 - Stairway of Snowflake"> | |||
<strong>Snow Field 3 — Stairway of Snowflake</strong> | |||
</div> | |||
<div class="quest-section-content"><span class="quest-badge">Level 160 Required</span></div> | |||
</div> | |||
<div class="quest-section"> | |||
<h5 class="quest-section-title">Requested Item</h5> | |||
<div class="image-container"> | |||
<img src="https://mewsie.world/CoraTOWiki/images/1/1d/Grass.gif" alt="Eternal Ice Grass"> | |||
<strong>10x Eternal Ice Grass</strong> | |||
</div> | |||
<div class="quest-section-content"><span class="quest-badge">Grass</span></div> | |||
</div> | |||
<div class="quest-section"> | |||
<h5 class="quest-section-title">Shard Reward</h5> | |||
<div class="image-container"> | |||
<img src="https://mewsie.world/CoraTOWiki/images/b/b5/Hecate_Shard.png" alt="Hecate Shard"> | |||
<strong>3x Hecate Shard</strong> | |||
</div> | |||
</div> | |||
</div> | |||
<div class="quest-drop-info"> | |||
<strong>Monsters:</strong> | |||
<div class="image-grid"> | |||
<div class="image-container"> | |||
<img src="https://mewsie.world/CoraTOWiki/images/e/e9/Yeti.gif" alt="Yeti"> | |||
<strong>Yeti (Field 3)</strong> | |||
</div> | |||
</div> | |||
</div> | |||
</div> | |||
</div> | |||
<!-- Techichi lv 200 --> | |||
<div id="techichi-lv200" class="nested-content"> | |||
<div class="quest-card"> | |||
<div class="quest-header"> | |||
<h1 class="quest-title">Techichi Grass Daily</h1> | |||
<span class="quest-type">Hunt</span> | |||
</div> | |||
<div class="quest-sections"> | |||
<div class="quest-section"> | |||
<h5 class="quest-section-title">Location</h5> | |||
<div class="image-container"> | |||
<img src="https://mewsie.world/CoraTOWiki/images/3/37/Monkey_T_Techichi.png" | |||
alt="Techichi Field 3"> | |||
<strong>Techichi Field 3</strong> | |||
</div> | |||
<div class="quest-section-content"><span class="quest-badge">Level 200 Required</span></div> | |||
</div> | |||
<div class="quest-section"> | |||
<h5 class="quest-section-title">Requested Item</h5> | |||
<div class="image-container"> | |||
<img src="https://mewsie.world/CoraTOWiki/images/1/1d/Grass.gif" alt="Eternal Fire Grass"> | |||
<strong>10x Eternal Fire Grass</strong> | |||
</div> | |||
<div class="quest-section-content"><span class="quest-badge">Grass</span></div> | |||
</div> | |||
<div class="quest-section"> | |||
<h5 class="quest-section-title">Shard Reward</h5> | |||
<div class="image-container"> | |||
<img src="https://mewsie.world/CoraTOWiki/images/b/b5/Hecate_Shard.png" alt="Hecate Shard"> | |||
<strong>3x Hecate Shard</strong> | |||
</div> | |||
</div> | |||
</div> | |||
<div class="quest-drop-info"> | |||
<strong>Monsters:</strong> | |||
<div class="image-grid"> | |||
<div class="image-container"> | |||
<img src="https://mewsie.world/CoraTOWiki/images/0/00/Ponchichi.gif" alt="Ponchichi"> | |||
<strong>Ponchichi (Field 2, Field 3)</strong> | |||
</div> | |||
</div> | |||
</div> | |||
</div> | |||
</div> | |||
<!-- Tapasco lv 270 --> | |||
<div id="tapasco-lv270" class="nested-content"> | |||
<div class="quest-card"> | |||
<div class="quest-header"> | |||
<h1 class="quest-title">Tapasco Grass Daily</h1> | |||
<span class="quest-type">Hunt</span> | |||
</div> | |||
<div class="quest-sections"> | |||
<div class="quest-section"> | |||
<h5 class="quest-section-title">Location</h5> | |||
<div class="image-container"> | |||
<img src="https://mewsie.world/CoraTOWiki/images/6/6e/Monkey_T_Tapasco.png" | |||
alt="Tapasco Field 2 - Rhythm of Hammer"> | |||
<strong>Tapasco Field 2 — Rhythm of Hammer</strong> | |||
</div> | |||
<div class="quest-section-content"><span class="quest-badge">Level 270 Required</span></div> | |||
</div> | |||
<div class="quest-section"> | |||
<h5 class="quest-section-title">Requested Item</h5> | |||
<div class="image-container"> | |||
<img src="https://mewsie.world/CoraTOWiki/images/1/1d/Grass.gif" alt="Eternal Veneration Grass"> | |||
<strong>10x Eternal Veneration Grass</strong> | |||
</div> | |||
<div class="quest-section-content"><span class="quest-badge">Grass</span></div> | |||
</div> | |||
<div class="quest-section"> | |||
<h5 class="quest-section-title">Shard Reward</h5> | |||
<div class="image-container"> | |||
<img src="https://mewsie.world/CoraTOWiki/images/b/b5/Hecate_Shard.png" alt="Hecate Shard"> | |||
<strong>3x Hecate Shard</strong> | |||
</div> | |||
</div> | |||
</div> | |||
<div class="quest-drop-info"> | |||
<strong>Monsters:</strong> | |||
<div class="image-grid"> | |||
<div class="image-container"> | |||
<img src="https://mewsie.world/CoraTOWiki/images/f/fa/Fire_Moth.gif" alt="Fire Moth"> | |||
<strong>Fire Moth (Field 1, Field 2)</strong> | |||
</div> | |||
</div> | |||
</div> | |||
</div> | |||
</div> | |||
<!-- Abyss lv 290 --> | |||
<div id="abyss-lv290" class="nested-content"> | |||
<div class="quest-card"> | |||
<div class="quest-header"> | |||
<h1 class="quest-title">Abyss Grass Daily</h1> | |||
<span class="quest-type">Hunt</span> | |||
</div> | |||
<div class="quest-sections"> | |||
<div class="quest-section"> | |||
<h5 class="quest-section-title">Location</h5> | |||
<div class="image-container"> | |||
<img src="https://mewsie.world/CoraTOWiki/images/d/d1/Monkey_T_Abyss.png" | |||
alt="Abyss Field 1 - The Valley Mouth"> | |||
<strong>Abyss Field 1 — The Valley Mouth</strong> | |||
</div> | |||
<div class="quest-section-content"><span class="quest-badge">Level 290 Required</span></div> | |||
</div> | |||
<div class="quest-section"> | |||
<h5 class="quest-section-title">Requested Item</h5> | |||
<div class="image-container"> | |||
<img src="https://mewsie.world/CoraTOWiki/images/1/1d/Grass.gif" alt="Eternal Bestial Grass"> | |||
<strong>10x Eternal Bestial Grass</strong> | |||
</div> | |||
<div class="quest-section-content"><span class="quest-badge">Grass</span></div> | |||
</div> | |||
<div class="quest-section"> | |||
<h5 class="quest-section-title">Shard Reward</h5> | |||
<div class="image-container"> | |||
<img src="https://mewsie.world/CoraTOWiki/images/2/20/Chronos_Shard.png" alt="Chronos Shard"> | |||
<strong>1x Chronos Shard</strong> | |||
</div> | |||
</div> | |||
</div> | |||
<div class="quest-drop-info"> | |||
<strong>Monsters:</strong> | |||
<div class="image-grid"> | |||
<div class="image-container"> | |||
<img src="https://mewsie.world/CoraTOWiki/images/1/12/Ghost_Diver.gif" alt="Ghost Diver"> | |||
<strong>Ghost Diver (Field 1, Field 4)</strong> | |||
</div> | |||
</div> | |||
</div> | |||
</div> | |||
</div> | |||
</div> | |||
</div> | |||
</section> | |||
</main> | |||
</body> | |||
</html> | |||
Latest revision as of 21:42, 25 March 2026
Daily Quests
Complete repeatable quests daily to earn TM Experience and Daily Coupons. Reset occurs at approximately 8:00AM UTC.
Check out this easy-to-use tracker here to help guide you in this server!
Daily Content
Complete Daily Quests Guide
Everything you need to know to maximize your daily earnings in CoraTO
What are Daily Quests?
Daily missions that provide TM Experience and Daily Coupons. They reset approximately at 12:00AM PST every day, allowing constant progression.
Types of Daily Quests
There are four main types: Normal Dailies, Stella Dailies, Shaman Girl Jia Dailies, and Monkey_T Dailies. (special), each with unique requirements and rewards.
Benefits
Besides TM Experience, you earn Daily Coupons that can be exchanged for valuable items with the PyuPyu Exchange in Skill Garden.
Mission Types
Normal Dailies
Basic missions for all levels
- Available in 13 different zones
- Low to medium level requirements
- Involves basic drilling or hunting
- Rewards: 1x Daily Coupon, 100k Galder, 75% 1x Cora Coupon / 25% 3 Bonus Eggs + TM EXP (Normal) OR 50% Chance at specific Shards (Grass)
- Ideal for beginners
- Daily reset at 8:00AM UTC
Shadow Dailies
Advanced missions with Shadow Monsters
- Requires guardian + levels 180+ up to 345+
- More challenging Shadow monsters
- Better TM EXP rewards
- 50% chance at MyShop Consumables Box or Guaranteed Star Card Pack No.5 + Star Tears EV Rewards
- Great for progression through difficulty zones
- End-game content
Important Tips
Daily Reset
All Daily Quests reset at 8:00AM UTC. Plan your time to complete all before the reset.
NPC Locations
Each zone has its specific NPC. Use the provided images and maps to find them easily.
Preparation
Check required items before leaving. Some can be drilled, others need to be hunted from specific monsters.
Daily Coupons
Exchange your Daily Coupons with Miranda Watty in Megalopolis for valuable items and equipment.
Efficiency
Start with geographically closest missions to optimize your travel time.
Progression
As your level increases, unlock Shadow Dailies for better rewards and challenges.
Normal Daily Requests and Rewards
Note: The rewards do not include all possible drops, but will include guaranteed ones.
Coral Beach Daily
Drill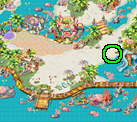
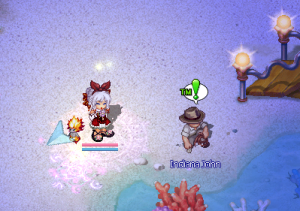


Rewards
 1x Daily Coupon +
 75% chance of 2x Cora Coupon
  75% chance of 3x Bonus Eggs
Indiana John, On the right half of the map, below Pachi/Field 3
Recommendation: Drill in Coral Beach fields.
Can be drilled in:
Can be drilled in:
- Coral Beach Fields
- Dark Cave
- Gate of Desert Beach
- Pyramid Dungeon Halls
- Poppuri Dungeons
- Path to Desert Beach
- Ghost Blue fields
- Fiesta Zones 1-6
Desert Beach Daily
Hunt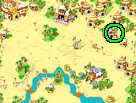
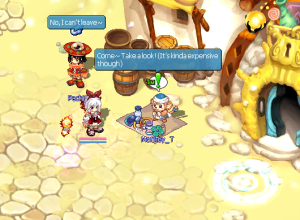

Rewards
1x Daily Coupon +
 1x 100k Galder Check +
75% chance of 2x Cora Coupon
75% chance of 3x Bonus Eggs
1x 100k Galder Check +
75% chance of 2x Cora Coupon
75% chance of 3x Bonus Eggs
Monkey_T location on the right half of the map next to Pachi and Paradise Shop
Guaranteed drop from Punisher Cannonshell in Desert Beach Fields 1-4

Megalopolis Daily
Hunt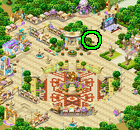
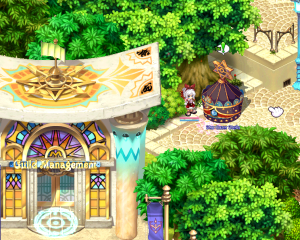


Rewards
1x Daily Coupon +
1x 100k Galder Check +
75% chance of 2x Cora Coupon
75% chance of 3x Bonus Eggs
Stargazer Stella, east of the Guild Management building
Random drop from monsters in:
- Desert Beach
- Caballa Relics
- Oops Wharfs
Azteca Daily
Hunt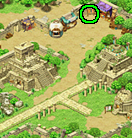


Rewards
1x Daily Coupon +
1x 100k Galder Check +
75% chance of 2x Cora Coupon
75% chance of 3x Bonus Eggs
Pharoah Boy, Top Right of Azteca
Guaranteed drop from Punisher Aposis in Relics Fields 1-4
Oops Warf Daily
Hunt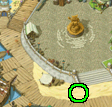
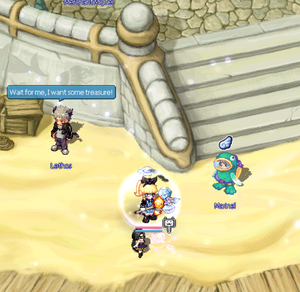


Rewards
1x Daily Coupon +
1x 100k Galder Check +
75% chance of 2x Cora Coupon
75% chance of 3x Bonus Eggs
Marinel, bottom right of Oops Warf
Drillable in any Oops Field
Mermaid Palace Daily
Hunt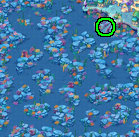
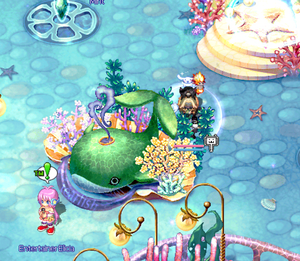


Rewards
1x Daily Coupon +
1x 100k Galder Check +
75% chance of 2x Cora Coupon
75% chance of 3x Bonus Eggs
Entertainer Alicia, top right of field 4 by the portal to the Gate
Guaranteed drop from Punisher Merman in Mermaid Fields 1-4
Ghost Blue Daily
Hunt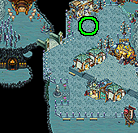
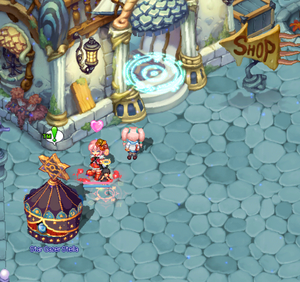
Rewards
1x Daily Coupon +
1x 100k Galder Check +
75% chance of 2x Cora Coupon
75% chance of 3x Bonus Eggs
Stargazer Stella, in Aquarius to the left of the Shop portal
Random drop from monsters in:
- Mermaid Fields
- Ghost Blue Fields
- Rose Garden Fields
Rose Garden Daily
Hunt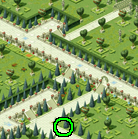
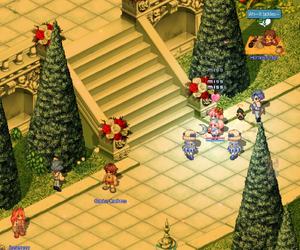


Rewards
1x Daily Coupon +
1x 100k Galder Check +
75% chance of 2x Cora Coupon
75% chance of 3x Bonus Eggs
Homeless Ian, in Rose Field 1 near the Event Garden Portal stairs and right of Genius Cochma and Rosemary
Guaranteed drop from Punisher Beast Vincento in Rose Garden Fields 1-4

Black Swamp Daily
Drill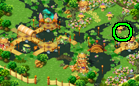
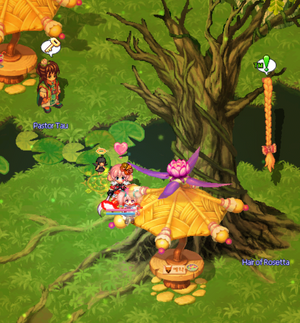


Rewards
1x Daily Coupon +
75% chance of 2x Cora Coupon
75% chance of 3x Bonus Eggs
Hair of Rosetta, at the top right of Carbigal near Pastor Tau
Drillable in any Swamp Field
Snow Hill Daily
Hunt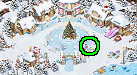


Rewards
1x Daily Coupon +
1x 100k Galder Check +
75% chance of 2x Cora Coupon
75% chance of 3x Bonus Eggs
Winnie, at the bottom-right of Laplanoel town center
Guaranteed drop from Punisher Icicler in Snow Fields 1-4

Techichi Daily
Hunt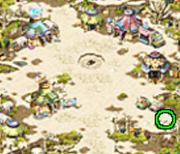
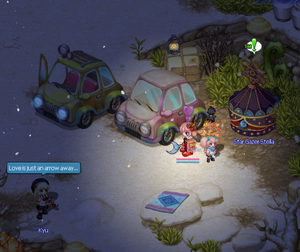
Rewards
1x Daily Coupon +
1x 100k Galder Check +
75% chance of 2x Cora Coupon
75% chance of 3x Bonus Eggs
Star Gazer Stella, bottom right of Neil's Camp by Kyu and the local drive-in
Random drop from monsters in:
- Techichi Fields
- Tapasco Fields
Tapasco Daily
Hunt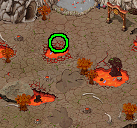
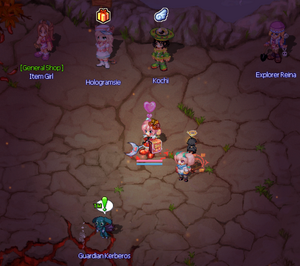


Rewards
1x Daily Coupon +
1x 100k Galder Check +
75% chance of 2x Cora Coupon
75% chance of 3x Bonus Eggs
Guardian Kerberos, directly below Hologramsie near the Tap 1 field portal at Tap Gate
Guaranteed drop from Punisher Fire Golem in Tap Fields 1-4
Abyss Daily
Drill


Rewards
1x Daily Coupon +
75% chance of 2x Cora Coupon
75% chance of 3x Bonus Eggs
Madam Sarah, at the top of Platonia
Drillable in any Abyss Field
About Shadow Dailies
Shadow Dailies are special daily quests that require you to hunt Shadow monsters in exchange for Fortune Cards and Star Tears to extend your fortunes. These quests are available from level 180 and above.
Shadow Dailies are special dailies you can do after you obtain guardian to grind low to mid level drop rate fortune cards and Star Tears! If you do all 12 in a day, you can get unlimited fortune (each star tear covers 2h of fortune so 2*12=24!), but they are Star Tears EV, so you cannot trade them.
 To see Stella, you must use Mind's Eye in the appropriate location.
Each quest is guaranteed to drop both a Star Card Pack No. 5 and a Star Tears EV on this server.
Coral Town Shadow Daily
Hunt

Monsters:

Shadow Totochi (Field 1)
 Shadow Clione (Field 3)

Shadow Thiefmon (Field 3)
Shadow Totochi (Field 1)
Shadow Clione (Field 3)
Shadow Thiefmon (Field 3)
Desert Town Shadow Daily
Hunt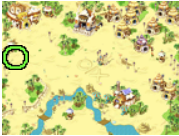
Monsters:

Shadow Shell Trap (Field 1)
 Shadow Golden Mole (Field 1)
 Shadow Fanta Fish (Field 2)
 Shadow Sand Demon (Field 3)
 Shadow Pineapple (Field 3)
 Shadow Fan Lizard (Field 4)
 Shadow Cannon Shell (Field 4)
Shadow Shell Trap (Field 1)
Shadow Golden Mole (Field 1)
Shadow Fanta Fish (Field 2)
Shadow Sand Demon (Field 3)
Shadow Pineapple (Field 3)
Shadow Fan Lizard (Field 4)
Shadow Cannon Shell (Field 4)
Megalopolis Shadow Daily
Hunt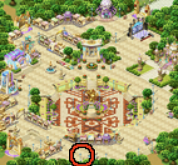
Monsters:

Shadow Queen Yamu (Southeast Forest)
 Shadow Forest Wasp (Southwest Forest)
 Shadow Forest Mantis (Southwest Forest)
Shadow Queen Yamu (Southeast Forest)
Shadow Forest Wasp (Southwest Forest)
Shadow Forest Mantis (Southwest Forest)
Azteca Shadow Daily
Hunt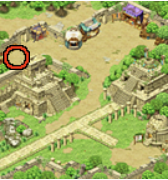
Monsters:

Shadow Mandragora (Path to, Field 1)
 Shadow Aposis (Field 3, Field 4)
Shadow Mandragora (Path to, Field 1)
Shadow Aposis (Field 3, Field 4)
Oops Warf Shadow Daily
Hunt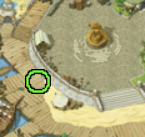
Monsters:
 Shadow Sea Tiger (Path to Oops)
 Shadow Quiem (Oops Field 1, Field 3)
 Shadow Crow (Oops Field 2, Field 3)

Shadow Black Foe (Oops Field 4)
 Shadow Master Foe (Oops Field 4)
 Shadow Mermaid Little (Mermaid Field 1, Field 2)
 Shadow Fish Guardian Tink (Mermaid Field 2, Field 3)
 Shadow Fish Guardian Bell (Mermaid Field 3)
 Shadow Merman Aku (Mermaid Field 4)
 Shadow Merman Ale (Mermaid Field 4)
Shadow Sea Tiger (Path to Oops)
Shadow Quiem (Oops Field 1, Field 3)
Shadow Crow (Oops Field 2, Field 3)
Shadow Black Foe (Oops Field 4)
Shadow Master Foe (Oops Field 4)
Shadow Mermaid Little (Mermaid Field 1, Field 2)
Shadow Fish Guardian Tink (Mermaid Field 2, Field 3)
Shadow Fish Guardian Bell (Mermaid Field 3)
Shadow Merman Aku (Mermaid Field 4)
Shadow Merman Ale (Mermaid Field 4)
Ghost Blue Shadow Daily
Hunt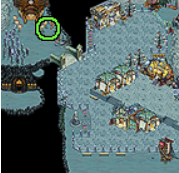
Monsters:
 Shadow Plug Bat (Path to 1, Path to 2)
 Shadow Pirate Boxer (Path to 2)
 Shadow Torpedo Fish (Field 2, Field 3)
 Shadow Cora Pyupyu (Field 2, Field 3)
 Shadow Siremaid (Field 4)
 Shadow Pirate Ghost (Field 4)
Shadow Plug Bat (Path to 1, Path to 2)
Shadow Pirate Boxer (Path to 2)
Shadow Torpedo Fish (Field 2, Field 3)
Shadow Cora Pyupyu (Field 2, Field 3)
Shadow Siremaid (Field 4)
Shadow Pirate Ghost (Field 4)
Rose Garden Shadow Daily
Hunt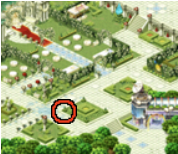

Monsters:
 Shadow Dancer Isabelle (Field 1)
 Shadow Captain Charman (Field 2)
 Shadow Captain Arman (Field 2)
 Shadow Madam Fondue (Field 3, Field 4)
 Shadow Beast Vincento (Field 4)
Shadow Dancer Isabelle (Field 1)
Shadow Captain Charman (Field 2)
Shadow Captain Arman (Field 2)
Shadow Madam Fondue (Field 3, Field 4)
Shadow Beast Vincento (Field 4)
Black Swamp Shadow Daily
Hunt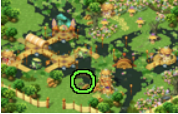

Monsters:

Shadow Monkya (Field 3)
 Shadow Arachne (Field 4, Field 5, Field 6)
 Shadow Mud Bigfoot (Field 6)
Shadow Monkya (Field 3)
Shadow Arachne (Field 4, Field 5, Field 6)
Shadow Mud Bigfoot (Field 6)
Snow Hill Shadow Daily
Hunt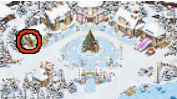

Monsters:
 Shadow Joker (Northwest Forest, Frost Forest 1)
 Shadow Goma (Frost Forest 1, Frost Forest 2)
 Shadow Santa Bear (Field 2)
 Shadow Ice Cream (Field 3)
 Shadow Yeti (Field 3)
 Shadow Icicler (Field 4)
Shadow Joker (Northwest Forest, Frost Forest 1)
Shadow Goma (Frost Forest 1, Frost Forest 2)
Shadow Santa Bear (Field 2)
Shadow Ice Cream (Field 3)
Shadow Yeti (Field 3)
Shadow Icicler (Field 4)
Techichi Shadow Daily
Hunt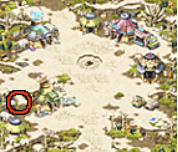

Monsters:
 Shadow Roaster (Path to 1, Path to 2)
 Shadow Kilimanjaro (Path to 2, Field 1)
 Shadow Ponchichi (Field 2, Field 1)
 Shadow Orpeo (Field 3)
 Shadow Orconio (Field 3)
 Shadow Dekumanus (Field 4)
Shadow Roaster (Path to 1, Path to 2)
Shadow Kilimanjaro (Path to 2, Field 1)
Shadow Ponchichi (Field 2, Field 1)
Shadow Orpeo (Field 3)
Shadow Orconio (Field 3)
Shadow Dekumanus (Field 4)
Tapasco Shadow Daily
Hunt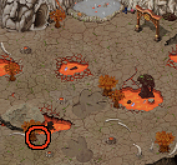

Monsters:
 Shadow Red Salamander (Field 1)
 Shadow Blue Salamander (Field 2)
 Shadow Funky Orc (Field 3)

Shadow Reggae Orc (Field 3, Field 4)
 Shadow Fire Golem (Field 2, Field 4)
Shadow Red Salamander (Field 1)
Shadow Blue Salamander (Field 2)
Shadow Funky Orc (Field 3)
Shadow Reggae Orc (Field 3, Field 4)
Shadow Fire Golem (Field 2, Field 4)
Abyss Town - Platonia Shadow Daily
Hunt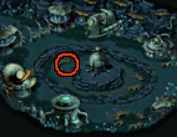
Monsters:

Shadow Channa (Field 4)
 Shadow Ghost Diver (Field 1, Field 4)
Shadow Channa (Field 4)
Shadow Ghost Diver (Field 1, Field 4)
What is Shadow World?
An advanced quest system available at level 180+ featuring shadow versions of familiar monsters with enhanced stats and unique rewards across 12 different locations.
Mind's Eye Required
Essential skill obtained from Eclipse NPC that allows you to see and interact with shadow entities throughout the game world.
51 Shadow Quests
Complete progression system spanning levels 180-250+ with location-specific NPCs offering different quests based on your level and area.
Understanding Shadow World Tabs
Eclipse Tab
Essential Prerequisites
- Complete Mind's Eye quest walkthrough
- Required items and NPC locations
- Step-by-step instructions
- Unlock the entire Shadow World system
Quest Tracker
Progress Monitoring
- Track all 51 shadow quests simultaneously
- Visual progress indicators
- Completion status for each location
- Organized by difficulty and level
Location Tabs
Detailed Area Guides
- Monster stats and locations
- Quest requirements and rewards
- NPC locations and dialogue
- Level recommendations and tips
Essential Tips & Strategies
Mind's Eye Active
Always keep Mind's Eye skill active. Without it, you cannot see shadow NPCs or monsters anywhere in the game world.
Guardian Required
Keep your Guardian active during all shadow activities. It's required for accessing Shadow World content.
Use Quest Tracker
Monitor your progress across all 12 locations simultaneously using the Quest Tracker tab for efficient completion.
Shadow Monsters Stronger
Shadow monsters have enhanced stats compared to regular versions. Prepare with better equipment and consumables.
Level Progression Matters
Complete quests in order for optimal experience gain. Don't attempt areas too early or too late for your level.
Location-Specific NPCs
Each area has its own Shaman Girl Jia offering different quests based on your level and the specific location.
Eclipse - Another View for the World
Complete guide to obtaining Mind's Eye skill and accessing Shadow World
Level Required
180+
Quest Type
One-Time
Reward
Mind's Eye Skill
Prerequisites
Character Level
Minimum Level 180+ required (Eclipse's Message auto-received)
Guardian
Hatched from Poseidon Seed
Eclipse NPC Location
Location: Garden of Skill Master
Eclipse is the essential NPC who grants the Mind's Eye skill. This skill allows you to see and interact with Shadow NPCs and monsters throughout the game world.
Required Items
P. Anemone Card
From Popeyed Anemone (Lv. 105)
Dimensional Key
Step-by-Step Guide
1
Prepare Prerequisites
Make sure you have reached Level 180 and hatched a Guardian from
Poseidon Seed.
Check these guides if needed: Soul Seed and Soul Guardian
2
Gather Required Items
P. Anemone Card - From Popeyed Anemone (Lv. 105)
Dimensional Key - From Eclipse - Aid from Eclipse quest
3
Complete Eclipse Quest
Visit Eclipse in Garden of Skill Master and complete the quest
to receive the Mind's Eye skill.
4
Start Shadow World Quests
With Mind's Eye active, you can now see and interact with Shaman
Girl Jia in various towns to begin Shadow World quests.
Important Notes
- Eclipse quest is a one-time only quest
- No Base or TM Experience is gained from this quest
- Mind's Eye skill is required for all Shadow World activities
- Keep your Guardian active when doing Shadow World quests
Quest Tracker
Total Progress:
0/40
Completion:
0%
Coral Beach
Desert Beach
Megalopolis
Caballa Relics
Oops Wharf
Ghost Blue
Rose Garden
Black Swamp
Snow Hill
Techichi Volcano
Tapasco Volcano
Abyss
Dark Spirit Punishment 1 - Coral Beach
Quest Details
#1NPC:

Shaman Girl Jia
Location:

Coral Town - Blooming Cora
Requirement:

Level 180+, Mind's Eye skill active
Shadow Torobbie
Lv. 324
Player Level:
180-183
Location:
Coral Beach Field 1 - Blue Wave
Kill Count:
3 monsters
Time Limit:
15 minutes
Reward:
100k Galder Check + Major Cora Box
Shadow Bad Fury
Lv. 327
Player Level:
184-187
Location:
Coral Beach Field 2 - Passionate Sun
Kill Count:
3 monsters
Time Limit:
10 minutes
Reward:
100k Galder Check + Major Cora Box
Shadow Little Cora
Lv. 333
Player Level:
188-191
Location:
Coral Beach Field 2 - Passionate Sun
Kill Count:
3 monsters
Time Limit:
11 minutes
Reward:
100k Galder Check + Major Cora Box
Shadow Bustshell
Lv. 339
Player Level:
192-195
Location:
Coral Beach Field 2 - Passionate Sun
Kill Count:
3 monsters
Time Limit:
11 minutes
Reward:
100k Galder Check + Major Cora Box
Shadow Addax
Lv. 349
Player Level:
196+
Location:
Coral Beach - Dark Cave
Kill Count:
3 monsters
Time Limit:
10 minutes
Reward:
100k Galder Check + Major Cora Box
Dark Spirit Punishment 2 - Desert Beach
Quest Details
#2NPC:
Shaman Girl Jia
Location:
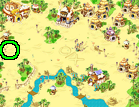
Beach Town - Paradise
Requirement:
Level 195+, Mind's Eye skill active
Shadow Fanta Slime
Lv. 351
Player Level:
195-198
Location:
Desert Beach Field 1 - Delta Island
Kill Count:
3 monsters
Time Limit:
12 minutes
Reward:
100k Galder Check + Major Cora Box
Shadow Hula Octopus
Lv. 355
Player Level:
199-202
Location:
Desert Beach Field 2 - Sand Palace
Kill Count:
3 monsters
Time Limit:
12 minutes
Reward:
100k Galder Check + Major Cora Box
Shadow Sea Scorpion
Lv. 357
Player Level:
203-205
Location:
Desert Beach Field 3 - Statue of Anubis
Kill Count:
3 monsters
Time Limit:
11 minutes
Reward:
100k Galder Check + Major Cora Box
Shadow Oran G
Lv. 362
Player Level:
206-209
Location:
Pyramid Dungeon 1 - Hall of the Slave
Kill Count:
3 monsters
Time Limit:
11 minutes
Reward:
100k Galder Check + Major Cora Box
Shadow Basic Mummy
Lv. 370
Player Level:
210+
Location:
Pyramid Dungeon 3 - Hall of Bastet / Pyramid Dungeon 4 - Hall of the Dead / Pyramid Dungeon 6 - Hall of the Queen
Kill Count:
3 monsters
Time Limit:
10 minutes
Reward:
100k Galder Check + Major Cora Box
Dark Spirit Punishment 3 - Megalopolis
Quest Details
#3NPC:
Shaman Girl Jia
Location:
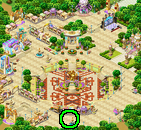
Megalopolis Square
Requirement:
Level 210+, Mind's Eye skill active
Shadow Yamu
Lv. 378
Player Level:
210-213
Location:
Path to Desert Beach
Kill Count:
3 monsters
Time Limit:
12 minutes
Reward:
100k Galder Check + Major Cora Box
Shadow Pochi
Lv. 380
Player Level:
213-217
Location:
Path to Desert Beach and Southeast Forest
Kill Count:
3 monsters
Time Limit:
12 minutes
Reward:
100k Galder Check + Major Cora Box
Shadow Sppo
Lv. 388
Player Level:
218-221
Location:
Poppuri Dungeon - Rainbow Cave and Root Cave
Kill Count:
3 monsters
Time Limit:
11 minutes
Reward:
100k Galder Check + Major Cora Box
Shadow Forest Tickler
Lv. 398
Player Level:
222-225
Location:
Southwest Forest
Kill Count:
3 monsters
Time Limit:
11 minutes
Reward:
100k Galder Check + Major Cora Box
Shadow Turvy
Lv. 396
Player Level:
226+
Location:
Poppuri Dungeon - Spore Cave
Kill Count:
3 monsters
Time Limit:
10 minutes
Reward:
100k Galder Check + Major Cora Box
Dark Spirit Punishment 4 - Caballa Relics
Quest Details
#4NPC:
Shaman Girl Jia
Location:
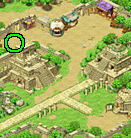
Relics Town - Azteca
Requirement:
Level 225+, Mind's Eye skill active
Shadow Leaf Bird
Lv. 405
Player Level:
225-228
Location:
Path to Caballa Relics
Kill Count:
3 monsters
Time Limit:
12 minutes
Reward:
100k Galder Check + Major Cora Box
Shadow Stone Soldier
Lv. 409
Player Level:
229-232
Location:
Relics Field 1 - Atlas and Relics Field 2 - Hand of Giant
Kill Count:
3 monsters
Time Limit:
12 minutes
Reward:
100k Galder Check + Major Cora Box
Shadow Mimic
Lv. 411
Player Level:
233-236
Location:
Relics Field 2 - Hand of Giant, Relics Field 3 - Monkey Statues, and Relics Field 4 - An Altar for Sacrifice
Kill Count:
3 monsters
Time Limit:
11 minutes
Reward:
100k Galder Check + Major Cora Box
Shadow Guiana
Lv. 416
Player Level:
237-240
Location:
Caballa Relics Dungeon 1 and 2
Kill Count:
3 monsters
Time Limit:
11 minutes
Reward:
100k Galder Check + Major Cora Box
Shadow Lima
Lv. 419
Player Level:
241+
Location:
Caballa Relics Dungeon 1, 2, 3, and 4
Kill Count:
3 monsters
Time Limit:
10 minutes
Reward:
100k Galder Check + Major Cora Box
Dark Spirit Punishment 5 - Oops Wharf/Mermaid Palace
Quest Details
#5NPC:
Shaman Girl Jia
Location:
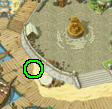
Oops Wharf
Requirement:
Level 240+, Mind's Eye skill active
Shadow Ironclad Turtle
Lv. 432
Player Level:
240-243
Location:
Path to Oops Wharf
Kill Count:
3 monsters
Time Limit:
12 minutes
Reward:
100k Galder Check + Major Cora Box
Shadow Requi
Lv. 434
Player Level:
244-247
Kill Count:
3 monsters
Time Limit:
11 minutes
Reward:
100k Galder Check + Major Cora Box
Shadow Black Foe
Lv. 437
Player Level:
248-251
Location:
Wharf Field 4 - Chrono Wharf
Kill Count:
3 monsters
Time Limit:
10 minutes
Reward:
100k Galder Check + Major Cora Box
Shadow Cone Stone
Lv. 440
Player Level:
252+
Locations:
Path to Mermaid Palace 1
Path to Mermaid Palace 2
Path to Mermaid Palace 2
Kill Count:
3 monsters
Time Limit:
10 minutes
Reward:
100k Galder Check + Major Cora Box
Shadow Pirate Boxer B
Lv. 441
Player Level:
252+
Location:
Wharf Field 4 - Chrono Wharf
Kill Count:
3 monsters
Time Limit:
10 minutes
Reward:
100k Galder Check + Major Cora Box
Dark Spirit Punishment 6 - Ghost Blue
Quest Details
#7NPC:
Shaman Girl Jia
Location:
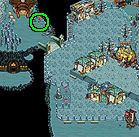
Ghost Blue Seabed Town - Aquarius
Requirement:
Level 255+, Mind's Eye skill active
Shadow Mushumushu
Lv. 459
Player Level:
255-258
Location:
Path to Ghost Blue 1
Kill Count:
3 monsters
Time Limit:
12 minutes
Reward:
100k Galder Check + Major Cora Box
Shadow Popeyed Anemone
Lv. 465
Player Level:
259-262
Location:
Seabed Field 1 - North
Kill Count:
3 monsters
Time Limit:
12 minutes
Reward:
100k Galder Check + Major Cora Box
Shadow Monguse
Lv. 467
Player Level:
263-266
Location:
Seabed Field 1 - North / Seabed Field 2 - East
Kill Count:
3 monsters
Time Limit:
11 minutes
Reward:
100k Galder Check + Major Cora Box
Shadow Merrow
Lv. 473
Player Level:
267-270
Kill Count:
3 monsters
Time Limit:
10 minutes
Reward:
100k Galder Check + Major Cora Box
Shadow Nora Joe
Lv. 481
Player Level:
271+
Location:
Nora
Sewer
Kill Count:
3 monsters
Time Limit:
10 minutes
Reward:
100k Galder Check + Major Cora Box
Dark Spirit Punishment 7 - Rose Garden
Quest Details
#7NPC:
Shaman Girl Jia
Location:
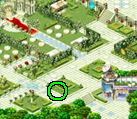
Event Garden - Ceremonia
Requirement:
Level 270+, Mind's Eye skill active
Shadow Dancer Michel
Lv. 483
Player Level:
270-273
Location:
Rose Field 1 - Stairway to Sorrow
Kill Count:
3 monsters
Time Limit:
12 minutes
Reward:
100k Galder Check + Major Cora Box
Shadow Captain Norman
Lv. 490
Player Level:
274-277
Kill Count:
3 monsters
Time Limit:
12 minutes
Reward:
100k Galder Check + Major Cora Box
Shadow Madam Chiffon
Lv. 491
Player Level:
278-281
Location:
Rose Field 3 - Maze of Blue Rose
Kill Count:
3 monsters
Time Limit:
11 minutes
Reward:
100k Galder Check + Major Cora Box
Shadow Maid Lydia
Lv. 498
Player Level:
282-285
Kill Count:
3 monsters
Time Limit:
11 minutes
Reward:
100k Galder Check + Major Cora Box
Shadow Bone Warrior
Lv. 508
Player Level:
286+
Kill Count:
3 monsters
Time Limit:
10 minutes
Reward:
100k Galder Check + Major Cora Box
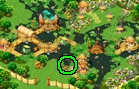

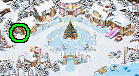 Location:


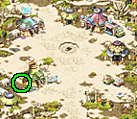


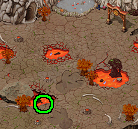


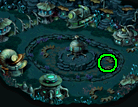


Monkey T Grass Quests Overview
Daily collection quests that grant shards for Harkon Defense Custom Exchanges or Cora Coupons. Each location requires 10 specific grasses with location-based level requirements.
How It Works
Collect 10 of the required grass for the selected location and report back to Monkey T to receive your reward.
Rewards
50% chance to receive shards and 50% chance to receive Cora Coupons. Some locations grant fewer shards for balancing purposes.
Where To Start
Use the tabs to pick a location. Requirements scale from level 12 up to 290 across multiple areas.
Harkon Defense Custom Exchanges
Exchange shards earned from Monkey T to obtain Compound Stones previously only available via MyShop.
Quick Access
Quest Tracker
Total Progress:0/14
Completion:0%
Coral Beach
Desert Beach
Megalopolis
Oops Wharf
Mermaid Palace
Mirage Island
Ghost Blue
Rose Garden
Black Swamp
Underground Dev Room
Snow Hill
Techichi
Tapasco
Abyss
Monkey T — FAQ
Answers to the most common questions about Grass Quests and their rewards.
What changed from TM focus to shards?
Monkey T quests used to focus on TM. On CoraTO, they also grant shards used in the Harkon Defense Custom Exchanges, alongside a parallel chance of Cora Coupons.
How many items do I need to collect?
Each daily requires 10 pieces of grass. The type depends on the location.
What are the rewards?
Rewards follow a 50% rule: shards (amount varies by location and some grant fewer) or Cora Coupons.
How do I use shards?
Exchange shards in the Harkon Defense Custom Exchanges to obtain Compound Stones that were previously exclusive to MyShop.
Where do I start?
Use Overview’s Quick Access to open Coral Beach or Techichi, or go to the Monkey T tab and select a location using the nested tabs.
Does the tracker progress persist?
The Quest Tracker stores your selections locally in your browser. Use “Reset All Progress” to clear.
If you do not like the quest tracker here, then you may like the other version we have here, which tracks all the custom dailies in the server.
About Monkey T's Grass Quests
Monkey T's Grass Quests are custom daily missions that reward shards for Harkon Defense Custom Exchanges and offer a parallel chance at Cora Coupons. Each quest requires 10 pieces of a specific grass based on location.
Collect 10 of the required grass in the chosen location and report to Monkey T to claim your reward. Requirements scale from early areas like Coral Beach to late-game zones such as Techichi, Tapasco, and Abyss.
 To start or report, talk to Monkey T in the appropriate area after gathering the
required grasses.
To start or report, talk to Monkey T in the appropriate area after gathering the
required grasses.
Rewards follow a 50% distribution: half the time you receive shards (amount
varies by location) and half the time you receive Cora
Coupons. Some locations like Coral Beach, Dev Room, and Abyss grant fewer shards.
Originally focused on TM experience, these quests on CoraTO now emphasize
shard rewards and coupon chances. Plan your daily route around shard types you need instead of TM
grinding.
Use the nested tabs below to navigate each location and see item requirements, level gates, and shard rewards.
Coral Beach Grass Daily
HuntLocation
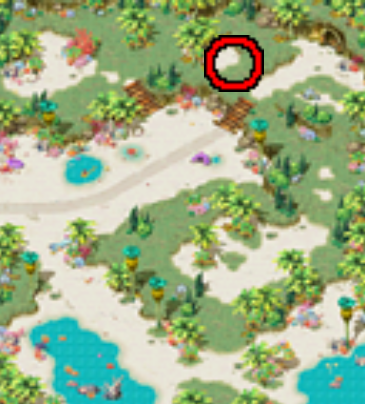 Coral Beach Field 3 — Sunny Beach
Level 12 Required
Requested Item
 10x Panacea Herb
Grass
Shard Reward
Monsters:
Clione (Field 3)
Clione (Field 3)
Desert Beach Grass Daily
HuntLocation
 Desert Beach Field 1 — Delta Island
Level 20 Required
Requested Item
10x Iron Grass
Grass
Shard Reward
Monsters:
Shell Trap (Field 1)
Shell Trap (Field 1)
Megalopolis Grass Daily
HuntLocation
 Southwest Forest
Level 30 Required
Requested Item
10x Energy Grass
Grass
Shard Reward
Monsters:
 Forest Tickler (Southwest Forest)
Forest Tickler (Southwest Forest)
Oops Wharf Grass Daily
HuntLocation
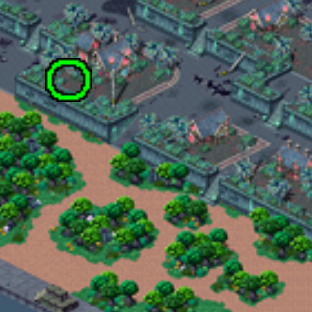 Wharf Field 1 — Haunted Town
Level 60 Required
Requested Item
10x Eternal Life Grass
Grass
Shard Reward
 3x Charybdis Shard
Monsters:
Quiem (Oops Field 1, Field 3)
Quiem (Oops Field 1, Field 3)
Mermaid Palace Grass Daily
HuntLocation
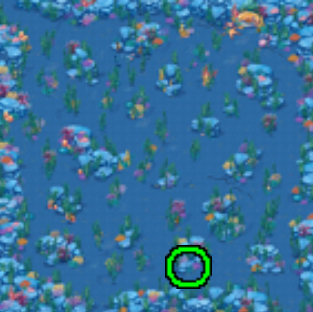 Mermaid Palace Field 2 — Seaweeds Square
Level 75 Required
Requested Item
10x Eternal Glamor Grass
Grass
Shard Reward
3x Charybdis Shard
Monsters:
Mermaid Little (Mermaid Field 1, Field 2)
Mermaid Little (Mermaid Field 1, Field 2)
Mirage Island Grass Daily
LIMITED HuntLocation
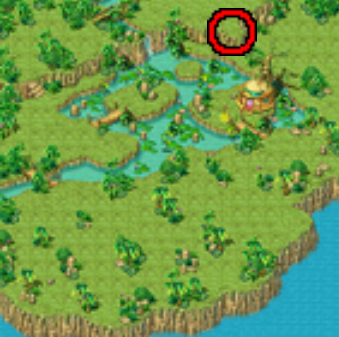 Mirage Island Field 1 — Alteo
Level 80 Required
Requested Item
10x Panacea
Grass
Shard Reward
3x Charybdis Shard
Monsters:
 Werepot (Mirage Field 1)
 Fabilsag (Mirage Field 1)
 Fabilsag G (Mirage Field 1)
 Chickensaurus (Mirage Field 2)
 Dark Hollow (Mirage Field 2, Dungeon 2)
 Ancient Chimu (Mirage Field 5, Field 7)
Werepot (Mirage Field 1)Fabilsag (Mirage Field 1)Fabilsag G (Mirage Field 1)Chickensaurus (Mirage Field 2)Dark Hollow (Mirage Field 2, Dungeon 2)Ancient Chimu (Mirage Field 5, Field 7)Ghost Blue Grass Daily
HuntLocation
 Seabed Field 2 — East
Level 95 Required
Requested Item
10x Eternal Vigor Grass
Grass
Shard Reward
3x Charybdis Shard
Monsters:
Cora Pyupyu (Field 2, Field 3)
Cora Pyupyu (Field 2, Field 3)
Rose Garden Grass Daily
HuntLocation
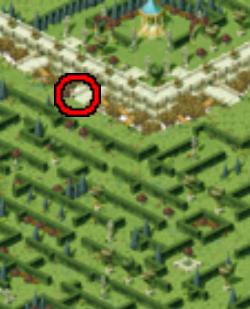 Rose Field 2 — Maze of Black Rose
Level 120 Required
Requested Item
10x Eternal Charm Grass
Grass
Shard Reward
 3x Scylla Shard
Monsters:
Beast Vincento (Field 4)
Beast Vincento (Field 4)
Black Swamp Grass Daily
HuntLocation
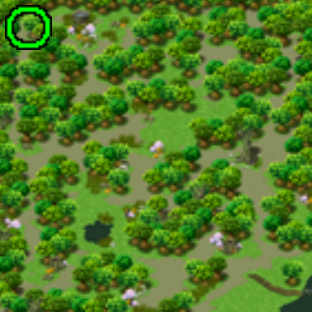 Swamp Field 3 — Maze of Forest
Level 140 Required
Requested Item
10x Eternal Clarity Grass
Grass
Shard Reward
3x Scylla Shard
Monsters:
Monkya (Field 3)
Monkya (Field 3)
Underground Dev Room Grass Daily
LIMITED HuntLocation
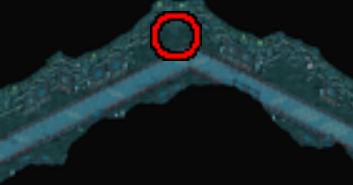 Underground Dev Room — Underground Passage 3
Level 150 Required
Requested Item
10x Eternal Youth Grass
Grass
Shard Reward
1x Scylla Shard
Monsters:
 Spiteful Developer Spirit (Dev Room areas)
Spiteful Developer Spirit (Dev Room areas)
Snow Hill Grass Daily
HuntLocation
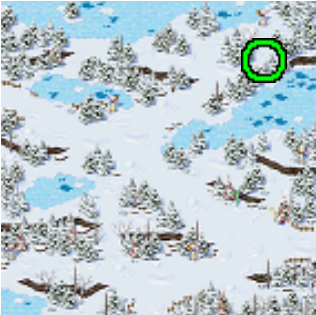 Snow Field 3 — Stairway of Snowflake
Level 160 Required
Requested Item
10x Eternal Ice Grass
Grass
Shard Reward
 3x Hecate Shard
Monsters:
Yeti (Field 3)
Yeti (Field 3)
Techichi Grass Daily
HuntLocation
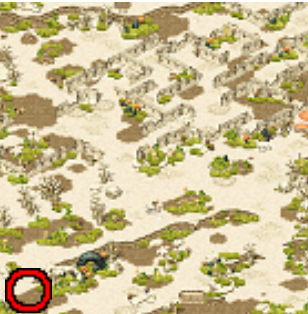 Techichi Field 3
Level 200 Required
Requested Item
10x Eternal Fire Grass
Grass
Shard Reward
3x Hecate Shard
Monsters:
Ponchichi (Field 2, Field 3)
Ponchichi (Field 2, Field 3)
Tapasco Grass Daily
HuntLocation
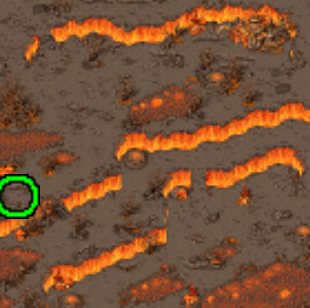 Tapasco Field 2 — Rhythm of Hammer
Level 270 Required
Requested Item
10x Eternal Veneration Grass
Grass
Shard Reward
3x Hecate Shard
Monsters:
 Fire Moth (Field 1, Field 2)
Fire Moth (Field 1, Field 2)
Abyss Grass Daily
HuntLocation
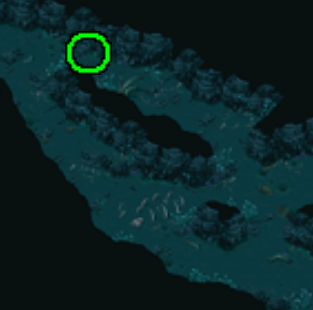 Abyss Field 1 — The Valley Mouth
Level 290 Required
Requested Item
10x Eternal Bestial Grass
Grass
Shard Reward
 1x Chronos Shard
Monsters:
Ghost Diver (Field 1, Field 4)
Ghost Diver (Field 1, Field 4)